This article is co-authored with generative AI. While I have cross-checked facts against official documentation where possible, errors may remain. Please verify primary sources before making important decisions.
I built TEI Scanner, a macOS app that runs Vision OCR over a folder of scanned page images and folds the recognised lines and their bounding boxes into a single TEI/XML document, mapping each line to a <zone> inside <facsimile>.
The latest build is published on GitHub.
- Repository: https://github.com/nakamura196/tei-scanner
- Releases: https://github.com/nakamura196/tei-scanner/releases/latest
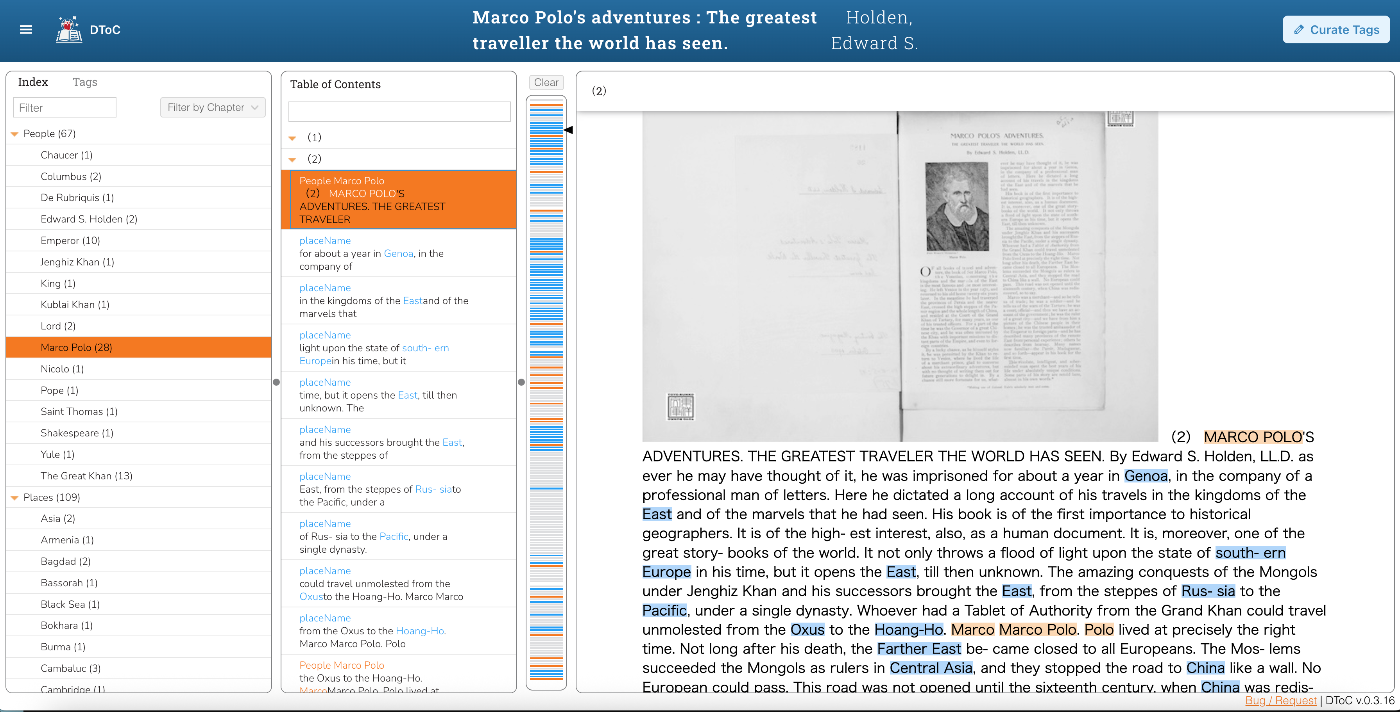
| Empty state | After loading a folder |
|---|---|
 |  |
| OCR done | TEI/XML view |
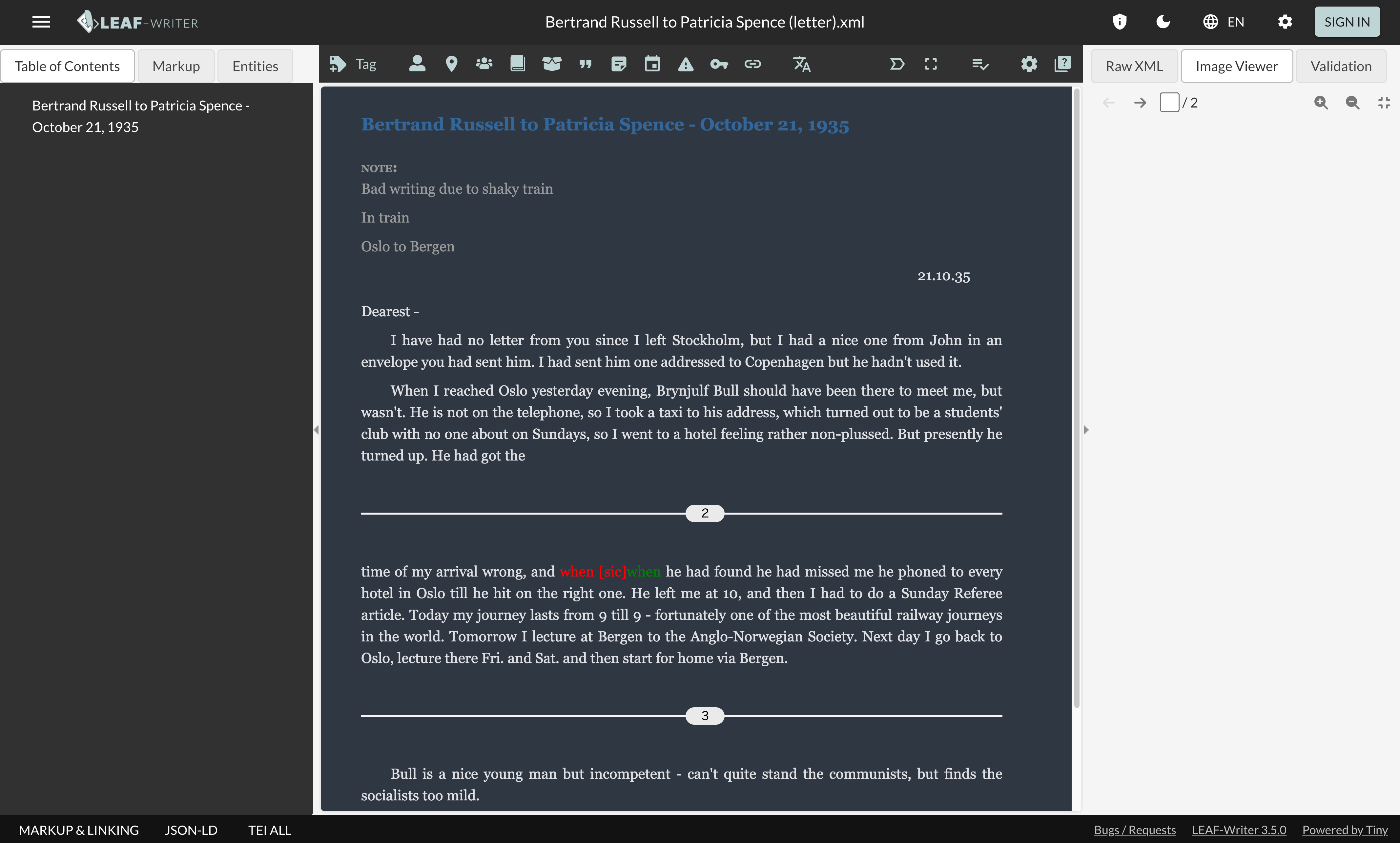
|---|---|
 |  |
This post walks through the SwiftUI implementation, project management via xcodegen, notarization driven by an App Store Connect API key, and .dmg distribution through GitHub Releases. The screenshots above are produced by a self-screenshot mode built into the app together with a small shell-driven automation pipeline. Mac App Store submission is left for a separate post.
Quick start
- Download the latest
.dmgfrom Releases. - Double-click to mount, then drag
TEIScanner.appinto/Applications. - Launch from Launchpad or Spotlight. On the empty window, click Try sample to load the two bundled English-text pages.
- Hit Run OCR, then Export TEI/XML… to save the result.
The app is notarized by Apple, so no "unidentified developer" prompt appears on first launch.
Typical workflow
When you want to OCR your own images instead of the bundled sample:
- Put one image per scanned page into a single folder (JPG / PNG / TIFF / HEIC / BMP / GIF). Zero-padded filenames like
001.png,002.pngsort naturally - Click Choose Folder…, or drag the folder onto the same spot
- Switch the sidebar language picker to Auto-detect or the target language
- Click Run OCR, then Export TEI/XML…
The rest of the post dives into implementation details.
Motivation
While preparing TEI editions of English-language printed material (kanpon — printed books, as opposed to manuscripts), I wanted each recognised line on the page image to be tied to its TEI text via <zone> references. The source material is typically delivered as a folder of scanned PNGs, so feeding pages one by one to a web-based OCR tool felt inefficient. I wanted a macOS app that could process a whole folder at once and emit a single TEI/XML at the end.
The first concrete target is English-language print, but the same pipeline applies to other languages supported by Apple Vision (Japanese, Chinese, Korean, French, German, Spanish). Scripts that fall outside Vision's coverage — Manchu script and old Hangul, for instance — are out of scope for now.
Tech stack
| Layer | Choice |
|---|---|
| Language / UI | Swift (swift-tools-version: 6.2, target's SWIFT_VERSION is 6.0) / SwiftUI |
| OCR | Vision.framework (VNRecognizeTextRequest) |
| Project management | Swift Package Manager + xcodegen |
| Deployment target | macOS 26.0 |
| Distribution | Developer ID Application + Notarization → GitHub Releases (.dmg) |
I keep a two-track workflow: swift run for fast feedback while editing source, and xcodegen generate + xcodebuild archive only when cutting a distribution build. The reasoning is that SwiftPM cannot produce a real .app bundle (no Info.plist, no asset catalog compilation, no provisioning), while Xcode-side iteration would mean editing a generated .xcodeproj whose contents I do not want to track.
OCR layer
I call VNRecognizeTextRequest in accurate mode, take the top candidate of each VNRecognizedTextObservation, and convert the bounding box from Vision's normalised (0–1) bottom-left-origin space into pixel coordinates with a top-left origin so they can be written directly into TEI <zone> attributes.
struct OCRLine: Identifiable, Hashable {
    let id = UUID()
    var text: String
    /// pixel coordinates, top-left origin
    var box: CGRect
}

enum OCRService {
    static func recognize(imageURL: URL, language: OCRLanguage) throws -> OCRPageResult {
        guard let nsImage = NSImage(contentsOf: imageURL),
              let cg = nsImage.cgImage(forProposedRect: nil, context: nil, hints: nil) else {
            throw OCRError.cannotLoadImage(imageURL)
        }
        let size = CGSize(width: cg.width, height: cg.height)

        let request = VNRecognizeTextRequest()
        request.recognitionLevel = .accurate
        request.usesLanguageCorrection = true
        switch language {
        case .auto:
            request.automaticallyDetectsLanguage = true
        default:
            request.recognitionLanguages = [language.rawValue]
        }

        let handler = VNImageRequestHandler(cgImage: cg, options: [:])
        try handler.perform([request])

        let lines: [OCRLine] = (request.results ?? []).compactMap { obs in
            guard let cand = obs.topCandidates(1).first else { return nil }
            let bb = obs.boundingBox
            let x = bb.origin.x * size.width
            let y = (1.0 - bb.origin.y - bb.size.height) * size.height
            let w = bb.size.width * size.width
            let h = bb.size.height * size.height
            return OCRLine(text: cand.string, box: CGRect(x: x, y: y, width: w, height: h))
        }
        return OCRPageResult(imageSize: size, lines: lines)
    }
}
Language selection is exposed as the OCRLanguage enum with nine values including .auto; in the auto case I flip automaticallyDetectsLanguage = true. In practice fixing a single language gives noticeably better accuracy than auto-detection on mixed-language pages.
request.perform([request]) is a synchronous call that takes time. Rather than making OCRService.recognize async, I keep it synchronous and let the caller (AppState.runOCRAll) push it onto a background executor explicitly with try await Task.detached(priority: .userInitiated) { try OCRService.recognize(...) }.value. This keeps the main actor free during OCR so progress bars and row indicators update smoothly.
TEI/XML output
Each image becomes one <surface>; each recognised line becomes one <zone> plus one <ab facs="#…"> referring to it. That is the minimum structure I templated out.
private static func facsimile(pages: [TEIPage]) -> String {
    var s = "  <facsimile>\n"
    for (i, page) in pages.enumerated() {
        let surface = "f\(i + 1)"
        let w = Int(page.imageSize.width.rounded())
        let h = Int(page.imageSize.height.rounded())
        s += "    <surface xml:id=\"\(surface)\" ulx=\"0\" uly=\"0\" lrx=\"\(w)\" lry=\"\(h)\">\n"
        s += "      <graphic url=\"\(esc(page.imageURL.lastPathComponent))\" width=\"\(w)px\" height=\"\(h)px\"/>\n"
        for (j, line) in page.lines.enumerated() {
            let zone = "f\(i + 1)_l\(j + 1)"
            let ulx = Int(line.box.origin.x.rounded())
            let uly = Int(line.box.origin.y.rounded())
            let lrx = Int((line.box.origin.x + line.box.size.width).rounded())
            let lry = Int((line.box.origin.y + line.box.size.height).rounded())
            s += "      <zone xml:id=\"\(zone)\" ulx=\"\(ulx)\" uly=\"\(uly)\" lrx=\"\(lrx)\" lry=\"\(lry)\"/>\n"
        }
        s += "    </surface>\n"
    }
    s += "  </facsimile>\n"
    return s
}
A typical output, given a single-page scan of an English vocabulary list, looks like this.
<?xml version="1.0" encoding="UTF-8"?>
<TEI xmlns="http://www.tei-c.org/ns/1.0" xml:lang="en">
  <teiHeader>...</teiHeader>
  <facsimile>
    <surface xml:id="f1" ulx="0" uly="0" lrx="497" lry="643">
      <graphic url="06_table1.png" width="497px" height="643px"/>
      <zone xml:id="f1_l1" ulx="52" uly="36" lrx="114" lry="54"/>
      <zone xml:id="f1_l2" ulx="68" uly="64" lrx="100" lry="82"/>
      <!-- … -->
    </surface>
  </facsimile>
  <text>
    <body>
      <pb n="1" facs="#f1"/>
      <ab facs="#f1_l1">**)</ab>
      <ab facs="#f1_l2">ask</ab>
      <!-- … -->
    </body>
  </text>
</TEI>
The output is well-formed XML and validates against the official TEI All RelaxNG schema (tei_all.rng).
$ xmllint --noout --relaxng /tmp/tei-schema/tei_all.rng aaa.xml
aaa.xml validates
I deliberately do not attach <sp> or <ab type="…"> semantics at this stage; richer multi-layer encoding (the kind required for, say, a five-layer Manchu / Korean transliteration / Korean translation / Chinese reference / Japanese gloss edition of Cing gisun-i Lao Kida) is downstream editorial work that lives outside the tool.
UX decisions
The first iteration packed "Choose folder", "Run OCR" and "Export TEI/XML" into top-right toolbar icons. Early users said the icons were easy to overlook, so I rebuilt the surface around three pieces of feedback.
Empty-state drop zone
When no folder is loaded, the entire window becomes a dashed drop zone with a folder.badge.plus icon and a Choose Folder… button. The branch is at the top of body via a conditional on pages.isEmpty, with the regular NavigationSplitView taking over once a folder is in.
var body: some View {
    Group {
        if state.pages.isEmpty {
            emptyState
        } else {
            NavigationSplitView { sidebar } detail: { detail }
        }
    }
    .onDrop(of: [.fileURL], isTargeted: nil, perform: handleDrop)  // window-wide
}
If a single image is dropped instead of a folder, the parent directory is opened.
Run OCR and Export as the obvious next step
The three primary actions (Choose / Run OCR / Export TEI/XML) live as a vertical action panel at the top of the sidebar, with prominence shifting with state:
- Folder not loaded — the central empty state guides folder selection; the sidebar is hidden.
- Folder loaded, OCR not yet run — Run OCR uses
.borderedProminent, Export is.bordered. - After OCR has produced output — Export TEI/XML becomes
.borderedProminent, Run OCR drops back to.bordered(re-run).
Each row in the sidebar page list is tinted blue while OCR is running and red on failure; a small ProgressView overlays the thumbnail of the page currently being processed, and a ScrollViewReader keeps that page in view.
An earlier draft used a translucent .regularMaterial CTA card overlaid on the image preview. I removed it once the sidebar action panel made the same hint redundant.
Save / export icon and shortcut
square.and.arrow.down is the macOS Receive/Download glyph by Apple convention, not Save. I switched to arrow.down.doc and aligned wording across surfaces.
| Surface | Icon | Label |
|---|---|---|
| Sidebar action panel | arrow.down.doc | Export TEI/XML… |
| File menu (⌘S) | — | Export TEI/XML… |
The File menu is wired through SwiftUI Commands and FocusedValue.
private struct ExportTEIKey: FocusedValueKey { typealias Value = () -> Void }
extension FocusedValues {
    var exportTEIAction: (() -> Void)? {
        get { self[ExportTEIKey.self] }
        set { self[ExportTEIKey.self] = newValue }
    }
}

@main struct TEIScannerApp: App {
    @FocusedValue(\.exportTEIAction) private var exportAction
    var body: some Scene {
        WindowGroup { ContentView() }
            .commands {
                CommandGroup(replacing: .saveItem) {
                    Button("Export TEI/XML…") { exportAction?() }
                        .keyboardShortcut("s", modifiers: .command)
                        .disabled(exportAction == nil)
                }
            }
    }
}
After a successful save, a 4-second toast appears at the bottom of the window with a "Show in Finder" link to NSWorkspace.shared.activateFileViewerSelecting(...).
Distribution pipeline
I wanted both Mac App Store and Developer ID paths to be available, so I keep all credentials in a single .env and drive every step from CLI.
app/
├── .env                  # API key, Bundle ID, Team ID, etc.
├── project.yml           # xcodegen spec
├── exportOptions/
│   ├── AppStore.plist
│   └── DeveloperID.plist
├── scripts/
│   ├── _asc.py           # shared JWT / request helper
│   ├── asc_check.py      # ASC state probe
│   ├── asc_register.py   # register Bundle ID (apps cannot be created via API)
│   ├── archive.sh        # xcodegen + xcodebuild archive
│   ├── export-appstore.sh
│   ├── export-devid.sh   # .dmg + notarize + staple
│   └── build_icon.py
└── Sources/TEIScanner/   # SwiftUI source
Apple-side prerequisites that bit me
A fresh team would hit FORBIDDEN.REQUIRED_AGREEMENTS_MISSING_OR_EXPIRED immediately on the first ASC API call. The cause turned out to be two agreements: the Apple Developer Program License Agreement on the Apple Developer side, and the Free Apps Agreement (which is required even for free apps) on the App Store Connect side. Both have to be signed and current.
A second gotcha: the ASC API exposes only GET / UPDATE on /v1/apps. New app records must be created in the App Store Connect web UI. The Bundle ID resource (/v1/bundleIds), in contrast, supports POST and can be registered via the API.
Auto-generated Developer ID Application certificate
My local keychain held only the Apple Development certificate, but passing -allowProvisioningUpdates to xcodebuild archive caused Xcode to create and fetch a cloud-managed Developer ID Application certificate automatically. I had a manual CSR-and-API path queued up as a fallback, but it was not needed.
Notarization with the API key
xcrun notarytool accepts an API key directly via --key / --key-id / --issuer, so there is no need to register a keychain profile via store-credentials. Values come straight from .env, which makes CI integration straightforward.
xcrun notarytool submit "$DMG_PATH" \
  --key "$KEY_PATH" \
  --key-id "$APP_STORE_API_KEY" \
  --issuer "$APP_STORE_API_ISSUER" \
  --wait
--wait blocks until Apple's side finishes processing, which empirically takes 5–10 minutes for an app of this size, returning Accepted.
.dmg + staple
hdiutil create was enough to build the disk image. I include a symbolic link to /Applications so the drop target is visible in Finder.
DMG_SRC="$(mktemp -d -t teiscanner-dmg)"
ditto "$APP_PATH" "$DMG_SRC/TEIScanner.app"
ln -s /Applications "$DMG_SRC/Applications"
hdiutil create \
  -volname "TEI Scanner" \
  -srcfolder "$DMG_SRC" \
  -ov -format UDZO \
  "$DMG_PATH"
After notarization, xcrun stapler staple is run against both the .dmg and the inner .app, so the bundle works offline without phoning home for the notarization ticket.
Final verification:
$ xcrun stapler validate TEIScanner.dmg
The validate action worked!
$ spctl -a -vv TEIScanner.app
TEIScanner.app: accepted
source=Notarized Developer ID
origin=Developer ID Application: Satoru Nakamura (Q6S8JS6GWV)
How a .dmg actually works
.dmg stands for Apple Disk Image — a file that packages an HFS+ or APFS volume. Double-clicking mounts it as a volume, and Finder lets the user browse it. There are four layers that contribute to how a .dmg distribution looks, and conflating them is the main source of confusion.
| Layer | What it is | Tool |
|---|---|---|
.dmg file's own Finder icon | The icon shown in Downloads before the user mounts the image | fileicon writes xattrs — stripped during HTTP transfer |
| Mounted volume icon | The disk icon in the Finder sidebar / on the desktop after mounting | .VolumeIcon.icns at the volume root + the kHasCustomIcon Finder flag on the root |
| Volume window layout | Window size and position, background image, icon arrangement when the user opens the mounted volume | .DS_Store settings — fiddly to write by hand |
Inner .app icon | The app's icon in /Applications, the Dock, and Spotlight | The app's Assets.xcassets/AppIcon.appiconset |
The naïve hdiutil create -srcfolder ... -format UDZO builds a working .dmg, but dropping .VolumeIcon.icns into the source folder is not enough on its own — the volume root also needs the kHasCustomIcon flag set in its FinderInfo. Doing that by hand means: build read-write, attach, write the FinderInfo with xattr -wx com.apple.FinderInfo "...0400...", detach, then convert to read-only. Layering the window layout (size, background, icon positions) on top means writing a .DS_Store programmatically, which is brittle.
I switched to create-dmg (Homebrew) instead. It is a thin shell + AppleScript wrapper around hdiutil that exposes each of the layers above as a flag.
create-dmg \
  --volname "TEI Scanner" \
  --volicon AppIcon.icns \
  --background docs/dmg-background.png \
  --window-pos 200 120 \
  --window-size 600 400 \
  --icon-size 120 \
  --icon "TEIScanner.app" 150 200 \
  --hide-extension "TEIScanner.app" \
  --app-drop-link 450 200 \
  TEIScanner.dmg \
  TEIScanner.app
The background image is generated by scripts/make_dmg_background.py with Pillow — a warm-cream gradient with a drag arrow and a "Drag TEI Scanner into Applications" caption. Both dmg-background.png (600×400) and dmg-background@2x.png (1200×800) are written so the layout looks crisp on Retina displays.
.dmg icon polish (the file itself)
.dmg distribution involves two distinct icons.
| Where | When it shows | How to set it |
|---|---|---|
| Volume icon (mounted disk image) | Finder window opened after double-clicking the .dmg | Drop .VolumeIcon.icns into the source folder before hdiutil create |
Icon of the .dmg file itself | Downloads folder, browser download UI | fileicon set TEIScanner.dmg AppIcon.icns (using the Homebrew tool fileicon) |
Setting only the first leaves a generic disk-image icon visible until the user mounts. export-devid.sh calls fileicon after stapling so the .dmg file itself carries the brand.
However: the com.apple.ResourceFork and com.apple.FinderInfo extended attributes that fileicon writes are stripped during HTTP transfer (GitHub Releases download, regular browser downloads, and so on — there is no standard way for HTTP to carry extended attributes). Once a user has downloaded the .dmg, their Downloads folder shows the generic disk-image icon again. To preserve the file icon end-to-end you would need to wrap the .dmg in a .zip produced by ditto -c -k --keepParent --rsrc (which carries the xattrs), or distribute as .pkg instead. This project ships .dmg directly, so the file icon falls back to generic on download — the volume icon (after mount) and the inner .app icon are still correct. (hdiutil create is sometimes mistaken for having a -volicon option; it does not — the .VolumeIcon.icns-via--srcfolder path is the supported approach.)
GitHub Releases
gh release create attaches the .dmg directly to the release.
gh release create v0.2.0 \
  --title "v0.2.0 — UX overhaul + app icon" \
  --notes-file RELEASE_NOTES.md \
  build/Export/DeveloperID/TEIScanner.dmg
That covers the distribution loop end-to-end: anyone can download the .dmg and double-click to launch.
Performance notes
The original implementation passed the entire TEI/XML string into a SwiftUI Text view and rebuilt the string on every keystroke in the metadata TextFields. Once the input grew to a few hundred lines, both the typing latency and the rendering cost became noticeable.
Two changes reclaimed that performance.
- Metadata edits are debounced.
scheduleRebuild(after:)waits 300 ms of quiet before rebuilding, coalescing rapid keystrokes into a single rebuild. NSTextView-backed preview.Text(state.xmlPreview)is replaced byCodeTextView, anNSViewRepresentablewrappingNSTextView. SwiftUI'sTextbecomes laggy past a few KB;NSTextViewstays smooth at much larger sizes while preserving monospaced rendering and selection.
App icon
I reused two earlier blog posts on AI-driven app icon generation as a template 1 2, styling the icon to match my existing apps' family — deep navy radial gradient, ivory line art, single accent colour. The composition is an open codex flanked by < > brackets, with one line of body text wrapped in an amber bounding box to evoke a TEI <zone>.
Gemini always inserts a small ✦ watermark in the bottom-right corner, so a Python post-processing step crops symmetrically and resizes. The same script writes the macOS AppIcon.appiconset — five points (16 / 32 / 128 / 256 / 512) at 1× and 2× = ten files, covering seven distinct pixel resolutions (16 / 32 / 64 / 128 / 256 / 512 / 1024).
from PIL import Image

def crop_and_resize(source: str, master_size: int = 1024, margin: int = 130):
    img = Image.open(source)
    w, h = img.size
    cropped = img.crop((margin, margin, w - margin, h - margin))
    return cropped.resize((master_size, master_size), Image.LANCZOS).convert("RGB")
The project.yml side just lists Resources/Assets.xcassets under sources and sets ASSETCATALOG_COMPILER_APPICON_NAME: AppIcon; Xcode picks up the rest.
Outstanding work
Developer ID distribution is fully wired. Mac App Store submission is the obvious next step and warrants a separate post. Open items include:
- Metadata for the App Store (description, keywords, promotional text) via the API
- Screenshot specifications for macOS and
sipsresizing - App Privacy data-use declarations (no API at the time of writing — must be set in the web UI)
- Encryption compliance, pricing, age rating, and review details
- The two-step
reviewSubmissions+reviewSubmissionItemsflow for review submission
I expect the iOS-focused write-up Submitting an iOS App for Review Using Only the App Store Connect API to translate to macOS with relatively few diffs (mainly screenshot screenshotDisplayType values and macOS-specific resolutions). The next post will record those diffs along with whatever surprises the macOS submission flow has.
References
- Apple Vision: Recognizing Text in Images
- TEI Guidelines: Representation of Primary Sources
- Customizing the notarization workflow — Apple Developer
- XcodeGen project.yml reference
- Companion post: Submitting an iOS App for Review Using Only the App Store Connect API