ホーム 記事一覧 ブック DH週間トピックス 検索 このサイトについて
English
IIIFの多角形アノテーションをTEI/XMLで表現する一例

IIIFの多角形アノテーションをTEI/XMLで表現する一例

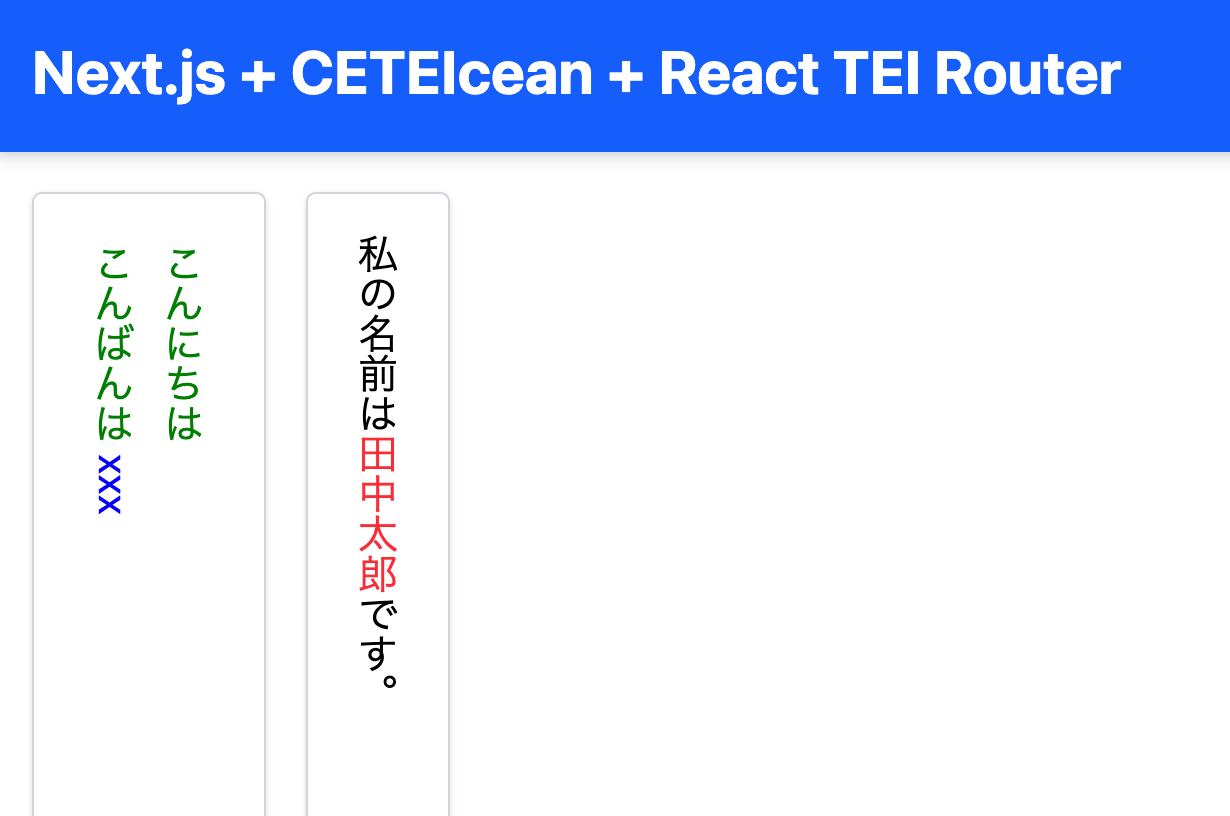
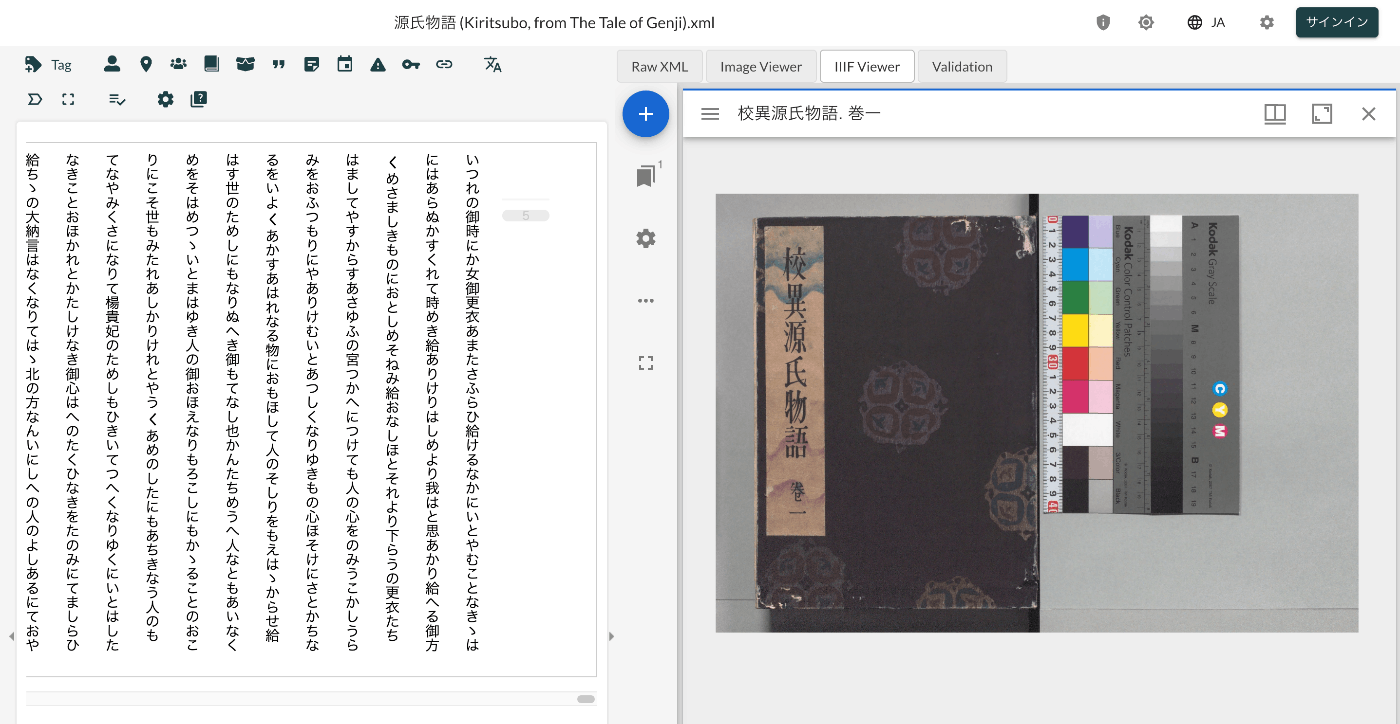
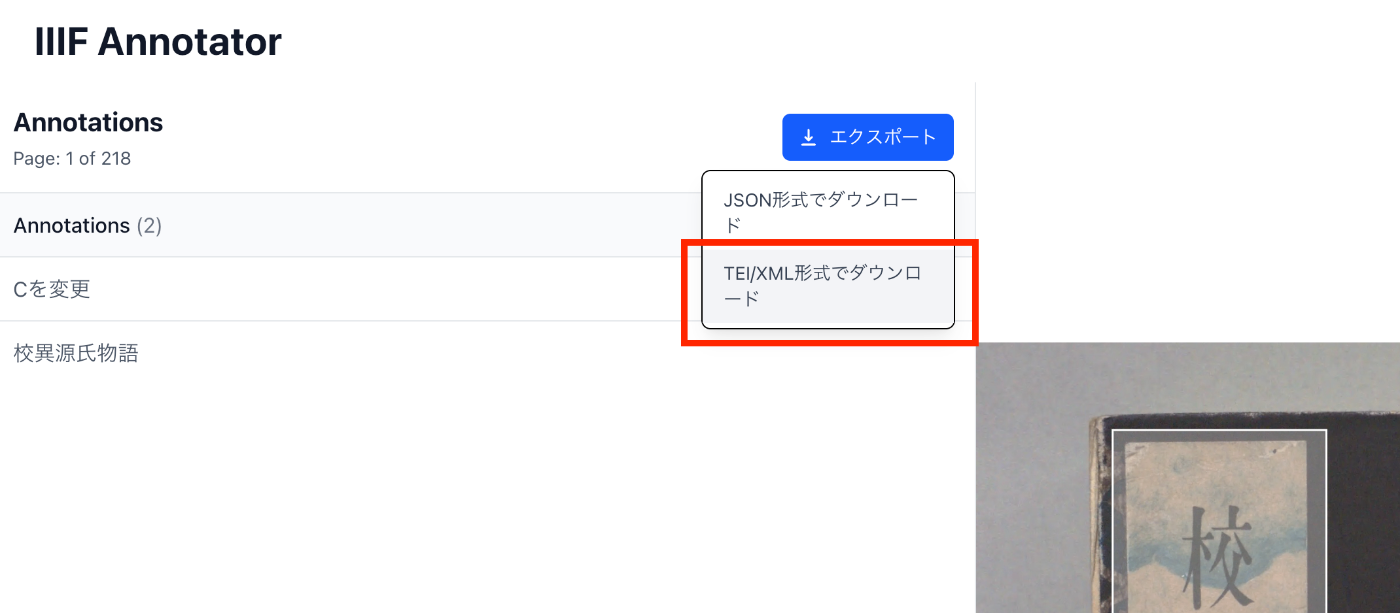
概要 IIIFの多角形アノテーションをTEI/XMLで表現する一例について紹介します。 方法 TEI/XMLでは、zoneタグとpoints属性を使用して、多角形のアノテーションを表現することができます。 https://www.tei-c.org/release/doc/tei-p5-doc/en/html/ref-teidata.point.html 例 動作確認のため、以下の記事で紹介したアノテーションツールに、TEI/XML形式でのエクスポート機能を追加しました。 具体的には、以下のようなダウンロード時のオプションを追加しました。 ダウンロード結果として得られるTEI/XMLの例は以下です。ulx, uly, lrx, lryで矩形を記述しつつ、pointsで多角形の情報を記述しています。 <?xml version="1.0" encoding="utf-8"?> <?xml-model href="http://www.tei-c.org/release/xml/tei/custom/schema/relaxng/tei_all.rng" type="application/xml" schematypens="http://relaxng.org/ns/structure/1.0"?> <?xml-model href="http://www.tei-c.org/release/xml/tei/custom/schema/relaxng/tei_all.rng" type="application/xml" schematypens="http://purl.oclc.org/dsdl/schematron"?> <TEI xmlns="http://www.tei-c.org/ns/1.0"> <teiHeader> <fileDesc> <titleStmt> <title> Title </title> </titleStmt> <publicationStmt> <p> Publication Information </p> </publicationStmt> <sourceDesc> <p> Information about the source </p> </sourceDesc> </fileDesc> </teiHeader> <text> <body> <p> Some text here. </p> </body> </text> <facsimile sameAs="https://dl.ndl.go.jp/api/iiif/3437686/manifest.json"> <surface sameAs="https://dl.ndl.go.jp/api/iiif/3437686/canvas/1"> <graphic url="https://dl.ndl.go.jp/api/iiif/3437686/R0000001/full/full/0/default.jpg" sameAs="https://dl.ndl.go.jp/api/iiif/3437686/R0000001"/> <zone ulx="5314" uly="1983" lrx="5509" lry="2189" ana="Cを変更" points="5314,2087 5412,1984 5510,2087 5412,2190 5314,2087 5314,2087"/> <zone ulx="478" uly="307" lrx="1226" lry="3731" ana="校異源氏物語" points="478,3732 478,308 1227,308 1227,3732 478,3732"/> </surface> <surface sameAs="https://dl.ndl.go.jp/api/iiif/3437686/canvas/3"> <graphic url="https://dl.ndl.go.jp/api/iiif/3437686/R0000003/full/full/0/default.jpg" sameAs="https://dl.ndl.go.jp/api/iiif/3437686/R0000003"/> <zone ulx="2197" uly="3044" lrx="2731" lry="3573" ana="サンプル" points="2209,3045 2198,3551 2729,3575 2732,3062 2209,3045"/> <zone ulx="993" uly="3701" lrx="2849" lry="4095" ana="中央公論社蔵版" points="993,4096 993,3702 2849,3702 2849,4096 993,4096"/> </surface> </facsimile> </TEI> 以下は、Oxygen XML Editorで表示した例です。 ...

CETEIceanとXPathを使って特定の要素にスクロールする

CETEIceanとXPathを使って特定の要素にスクロールする

概要 CETEIceanとXPathを使って特定の要素にスクロールする方法を調べたので備忘録です。 デモ 以下のURLからお試しいただけます。 https://next-ceteicean-router.vercel.app/xpath/ ページにアクセス後、スクロールし、以下のように表示されます。 XPathの取得 上記では、以下の「校異源氏物語テキストDB」のXMLファイルを対象にしています。 https://kouigenjimonogatari.github.io/tei/01.xml そして、以下のXPathを指定しています。 /TEI/text[1]/body[1]/p[1]/seg[267] このXPathの取得にあたっては、Oxygen XML Editorを用いて、対象要素を右クリックして、「Copy XPath」から取得することができました。 スクロールの実装 以下で紹介したアプリをベースにします。 GitHub上のソースコードは以下です。 https://github.com/nakamura196/next-ceteicean-router/blob/main/src/components/xpath/Render.tsx 特に以下の部分で、XPathをCETEIceanによって作成される要素名に変換し、scrollIntoViewによってスクロールしています。 // fetchDataの修正 React.useEffect(() => { const rawXpath = "/TEI/text[1]/body[1]/p[1]/seg[267]"; const xpath = rawXpath .replace(/^\//, "") // 先頭のスラッシュを削除 .replace(/([A-Za-z]+)(?=\/|\[|$)/g, "tei-$1") // tei-プレフィックスを追加 .toLowerCase(); if (teiContentRef.current) { const result = document.evaluate( xpath, teiContentRef.current, null, XPathResult.FIRST_ORDERED_NODE_TYPE, null ); const targetElement = result.singleNodeValue as HTMLElement; if (targetElement) { targetElement.scrollIntoView({ behavior: "smooth", block: "center", inline: "center", }); targetElement.style.backgroundColor = "yellow"; } } }, [teiDoc]); まとめ 他にも良い方法があるかもしれませんが、参考になりましたら幸いです。 ...

TEI/XMLから検索システムを構築する際のDTS(Distributed Text Services)のdts:wrapperの応用例

TEI/XMLから検索システムを構築する際のDTS(Distributed Text Services)のdts:wrapperの応用例

概要 TEI/XMLから検索システムを構築する際のDTS(Distributed Text Services)のdts:wrapperタグの応用例に関するメモです。 DTS(Distributed Text Services)は以下です。 Cayless, H., Clérice, T., Jonathan, R., Scott, I., & Almas, B. Distributed Text Services Specifications (Version 1-alpha) [Computer software]. https://github.com/distributed-text-services/specifications` 参考 DTSの構築例として、以下なども参考になりましたら幸いです。 例 以下の「デジタル延喜式」を例とします。 https://khirin-t.rekihaku.ac.jp/engishiki/ 本システムでは、TEIを用いて作成したXMLデータから、検索時の単位となる部分を抽出し、それをJSON形式のデータに変換した上で検索を行っています。JSONデータの例は以下です。JSON:APIに準拠した記述を採用しています。 http://khirin-t.rekihaku.ac.jp/engishiki/jsonapi/item/39100101.json { "jsonapi": { "version": "1.0", "meta": { "links": { "self": { "href": "http://jsonapi.org/format/1.0/" } } } }, "data": { "type": "item", "id": "39100101", "attributes": { "label": "正親 1 諸王年満条 項1", "jyo": [ "39-1-001 諸王年満" ], "shiki": [ "39-1 正親" ], "vol": [ "39" ], "updated": "2025-03-15", "category": [ "式" ], "manifest": "https://khirin-a.rekihaku.ac.jp/iiif/rekihaku/H-743-74-39/manifest.json", "member": "https://khirin-a.rekihaku.ac.jp/iiif/2/engishiki%2FH-743-74-39/page5069", "thumbnail": "https://khirin-a.rekihaku.ac.jp/iiif/2/engishiki%2FH-743-74-39%2F00002.tif/full/200,/0/default.jpg", "xml": "<?xml version=\"1.0\" encoding=\"UTF-8\"?>\n<TEI xmlns=\"http://www.tei-c.org/ns/1.0\">\n <dts:wrapper xmlns:dts=\"https://w3id.org/api/dts#\">\n <div type=\"original\"><p ana=\"項\" corresp=\"#page5069\" xml:id=\"o-item39100101\">\n 凡諸王年満十二、毎年十二月、\n<orgName sameAs=\"#京職\">京職</orgName>\n移\n<orgName sameAs=\"#宮内省\">宮内省</orgName>\n、\n<orgName sameAs=\"#宮内省\">省</orgName>\n以\n<orgName sameAs=\"#京職\">京職</orgName>\n移、即付\n<orgName sameAs=\"#正親司\">司</orgName>\n令勘会名簿、訖更送\n<orgName sameAs=\"#宮内省\">省</orgName>\n、明年正月待\n<orgName sameAs=\"#太政官\">官</orgName>\n符到、始預賜時服之例、</p></div><div type=\"japanese\"><note type=\"summary\">\n 衣替え手当ての受給年齢に達する皇族への支給開始手続きに関する規定\n </note><p ana=\"項\" corresp=\"engishiki_v39.xml#item39100101 engishiki_v39_en.xml#item39100101\" xml:id=\"ja-item39100101\">\n 皇族の年齢が数えで十二歳に達したら、十二月に\n<ruby>\n<rb>\n 京職\n </rb>\n<rt place=\"right\">\n きょうしき\n </rt>\n</ruby>\n が\n<ruby>\n<rb>\n 宮内省\n </rb>\n<rt place=\"right\">\n くないしょう\n </rt>\n</ruby>\n に通知し、宮内省は京職の通知書類を\n<ruby>\n<rb>\n 正親司\n </rb>\n<rt place=\"right\">\n せいしんし\n </rt>\n</ruby>\n に下して正親司が保管する皇族の台帳と照合させよ。正親司はこの作業が終わったら通知書類を宮内省に送れ。翌年正月に\n<ruby>\n<rb>\n 太政官\n </rb>\n<rt>\n だいじょうかん\n </rt>\n</ruby>\n の通達を受領してから、衣替え手当ての支給を開始せよ。\n</p></div><div type=\"english\"><note type=\"summary\">\n Age of Royal Recipients for Seasonal Clothing\n </note><p ana=\"項\" corresp=\"engishiki_v39.xml#item39100101 engishiki_v39_ja.xml#item39100101\" xml:id=\"en-item39100101\">\n Every year if\n<seg xml:id=\"footnote3910010101\">\n a\n prince or princess\n </seg>\n reaches\n<seg xml:id=\"footnote3910010102\">\n twelve years old\n </seg>\n , the Capital Office should report that\n information via\n<seg xml:id=\"footnote3910010103\">\n a parallel memorandum\n (\n<seg rend=\"italic\">\n i\n </seg>\n )\n</seg>\n to the Ministry of the Royal\n Household in the twelfth month. Then the Ministry should send the\n memorandum to the Royal Family Register Office to check the list against\n their existing roster. After finishing all of these procedures, the\n Royal Family Register Office should return the memorandum to the\n Ministry. The prince or princess in question will receive seasonal\n clothing after the Council of State's order is issued in the following\n New Year.\n</p></div>\n </dts:wrapper>\n</TEI>" } } } 検索結果は以下のように表示されます。校訂文(@type=“original”)、現代語訳(@type=“japanese”)、および英訳(@type=“english”)を表示しています。 ...

Miradorで画像を表示し、CETEIceanでテキストを表示するサンプルアプリ

Miradorで画像を表示し、CETEIceanでテキストを表示するサンプルアプリ

概要 TEI/XMLファイルを読み込み、Miradorで画像を表示し、CETEIceanでテキストを表示するサンプルアプリを作成しました。以下のURLからお試しいただけます。 デモサイト https://nakamura196.github.io/ceteicean-mirador/ 背景 これまでにも、同様の機能を提供するアプリケーションを開発してきました。 Next.js を使用した実装例 XSLT を使用した実装例 今回は、HTMLとプレーンなJavaScriptのみを使用して実装する方法をご紹介します。 対象データ 以下の校異源氏物語テキストDBを対象とします。 https://kouigenjimonogatari.github.io/ 実装方法 ソースコードは以下のリポジトリで公開しています。 https://github.com/nakamura196/ceteicean-mirador 実装のポイント 1. CETEIcean の behaviors を利用した pb タグの処理 以下のコードでは、CETEIcean の behaviors を利用して pb タグのクリック時の挙動を定義しています。 ct.addBehaviors({ tei: { // 不要な要素を非表示 graphic: () => document.createDocumentFragment(), figure: () => document.createDocumentFragment(), // pbタグの処理 pb: function (el) { let pb = document.createElement("tei-pb"); // 属性を引き継ぐ if (el.hasAttribute("n")) { pb.setAttribute("n", el.getAttribute("n")); } // corresp属性からzoneIdを取得 const corresp = el.getAttribute("corresp"); if (corresp) { const zoneId = corresp.replace('#', ''); pb.setAttribute("data-zone-id", zoneId); } // ページ番号を表示 const pageNum = el.getAttribute("n") || ""; pb.textContent = `[Page ${pageNum}]`; // クリックイベントを追加 pb.addEventListener("click", function() { const zoneId = this.getAttribute("data-zone-id"); if (zoneId) { const zoneElement = document.querySelector(`tei-zone[id="${zoneId}"]`); if (zoneElement) { const surfaceElement = zoneElement.closest("tei-surface"); if (surfaceElement && surfaceElement.hasAttribute("sameAs")) { goToPage(surfaceElement.getAttribute("sameAs")); } } } }); return pb; } }, }); 2. Mirador でのページ遷移処理 pb タグをクリックした際に、TEI/XML ファイルから Canvas の URI を取得し、Mirador のページ遷移を実行します。 ...

Next.js + CETEIcean + React TEI Routerを使ったビューア開発

Next.js + CETEIcean + React TEI Routerを使ったビューア開発

概要 Next.js、CETEIcean、React TEI Routerを組み合わせたTEI/XMLビューアの開発についての備忘録です。 背景 CETEIceanは、TEI/XML を HTML5 に変換する JavaScript ライブラリです。 https://github.com/TEIC/CETEIcean そして、React TEI Routerは、CETEIcean をベースに React コンポーネントで TEI/XML を構造化して表示できるライブラリです。以下のように説明されています。 https://github.com/pfefferniels/react-teirouter TEI for React using CETEIcean and routes これらを組み合わせることで、Next.js において TEI/XML をカスタマイズして表示できるビューア を作成しました。 リポジトリ 以下がサンプルリポジトリです。 https://github.com/nakamura196/next-ceteicean-router 実際に動作するデモも用意しています。 https://next-ceteicean-router.vercel.app/ 実装 Next.js のページコンポーネント (page.tsx) CETEIcean を利用して XML を変換し、カスタムコンポーネントで描画します。 import React from "react"; import Render from "@/components/tei"; export default function App() { const xmlContent = `<?xml version="1.0" encoding="UTF-8"?> <TEI xmlns="http://www.tei-c.org/ns/1.0"> <text> <body> <div type="original"> 私の名前は<persName corresp="#id1">田中太郎</persName>です。 </div> <div> <p style="color: green;">こんにちは</p> <p style="color: green;">こんばんは <seg style="color: blue;">xxx</seg> </p> </div> </body> </text> </TEI>`; return <Render xmlContent={xmlContent} />; } TEIレンダリングコンポーネント CETEIcean を使って XML を HTML5 に変換。 TEIRender + TEIRoute を使い、TEI 要素ごとにカスタムコンポーネントを適用。 import { TEIRender, TEIRoute } from "react-teirouter";を使用した上で、要素毎にコンポーネントを用意しています。 ...

XSLTを使いながらTEI/XMLファイルを編集する

XSLTを使いながらTEI/XMLファイルを編集する

概要 XSLTを使いながらTEI/XMLファイルを編集する方法の一例を紹介します。 関連 以下の記事で、VSCodeの拡張機能を使いながら、XSLTの結果をプレビューする方法を紹介しました。 本記事では、上記の拡張機能を使用せず、より単純にXSLTを使いながらTEI/XMLファイルを編集する方法を紹介します。 拡張機能のインストール VSCodeで以下の拡張機能をインストールします。 Live Server https://marketplace.visualstudio.com/items?itemName=ritwickdey.LiveServer Scholarly XML https://marketplace.visualstudio.com/items?itemName=raffazizzi.sxml Auto Close Tag https://marketplace.visualstudio.com/items?itemName=formulahendry.auto-close-tag 加えて、以下の2つの拡張機能が、Scholarly XMLにおいて推奨されています。ただ、私の使い方では不便になってしまう場面もあったので、とりあえず任意とします。 Auto Rename Tag https://marketplace.visualstudio.com/items?itemName=formulahendry.auto-rename-tag Close HTML/XML tag https://marketplace.visualstudio.com/items?itemName=Compulim.compulim-vscode-closetag ファイルのダウンロードなど 以下のサンプルリポジトリを対象にします。 https://github.com/nakamura196/tei-xml-xslt-vscode 以下により、ファイルをダウンロードします。そして、VSCodeで開きます。 git clone https://github.com/nakamura196/tei-xml-xslt-vscode code tei-xml-xslt-vscode そして、画面右下のGo Liveをクリックします。 デフォルトでは、http://127.0.0.1:5500/がブラウザで開かれ、以下のフォルダが表示されます。 そして、teiフォルダ内のexample1.xmlを開くと、以下のように表示されます。 http://127.0.0.1:5500/tei/example1.xml TEI/XMLファイルの編集 VSCodeでTEI/XMLファイルを編集します。 そして、ブラウザで開いているページを更新すると、編集内容が反映されます。 これを繰り返し、TEI/XMLファイルを編集しながらプレビュー結果を確認します。 ファイルの変更 example1.xmlをコピーすることにより、新規のファイルを作成することができます。 またxslファイルは以下のように相対パスで指定されています。 <?xml-stylesheet type="text/xsl" href="../xsl/make-CETEIcean.xsl"?> 新規にxslファイルを作成し、上記の相対パスを変更することにより、他のxslファイルを用いたXSLTを実行できます。 参考 VSCodeでTEI/XMLファイルを編集する場合、Github Copilotなどを使って、AIによるサジェストを受けることができます。 またCursorを使って、AIによるアシストを受けることもできます。XSLファイルの編集にあたっては、AIによるアシストが特に便利でした。 縦書きにしたい。のような自然言語で指示することにより、xslファイルを編集できました。 まとめ 上記の手順はあくまで一例ですが、TEI/XMLファイルの編集にあたり、参考になりましたら幸いです。

VSCodeとXSLTを用いたTEI/XMLのリアルタイムプレビュー

VSCodeとXSLTを用いたTEI/XMLのリアルタイムプレビュー

概要 VSCodeとXSLTを用いたTEI/XMLのリアルタイムプレビュー環境を試作したので、備忘録です。 挙動 動作例は以下です。TEI/XMLファイルを編集し、保存すると、ブラウザの表示内容が更新されます。 https://youtu.be/ZParCRUc5AY?si=-aHHi3bIZGWoJYnP 準備 以下の拡張機能をインストールします。 Live Server Trigger Task on Save TEI/XMLを保存した際に、Trigger Task on SaveによってXSLTを実行し、変換されたHTMLファイルをLive Serverで閲覧します。 リポジトリ サンプルコードを以下に格納しています。 https://github.com/nakamura196/tei-xml-xslt-vscode XSLTを行うにあたり、xslt3をインストールします。 git clone https://github.com/nakamura196/tei-xml-xslt-vscode cd tei-xml-xslt-vscode npm install settings.jsonとtasks.json .vscodeフォルダに、settings.jsonとtasks.jsonを格納しています。 tasks.jsonは以下です。xsl/make-CETEIcean.xslを用いて、XSLTを行うタスクを設定しています。 { "version": "2.0.0", "tasks": [ { "label": "Transform XML with XSLT", "type": "shell", "command": "npx", "args": [ "xslt3", "-xsl:xsl/make-CETEIcean.xsl", "-s:${file}", "-o:${fileDirname}/${fileBasenameNoExtension}.html" ], "presentation": { "reveal": "never", "close": true }, "group": { "kind": "build", "isDefault": true }, "problemMatcher": [] } ] } xsl/make-CETEIcean.xslは、CETEIceanで公開されているXSLファイルです。 https://github.com/TEIC/CETEIcean/blob/master/xslt/make-CETEIcean.xsl 次に、settings.jsonです。teiフォルダ以下のxmlファイルに対して、保存時に上記のタスクを実行します。 { "triggerTaskOnSave.tasks": { "Transform XML with XSLT": ["tei/*.xml"] } } これらの設定により、TEI/XMLファイルを保存時に、同フォルダにHTMLファイルが作成されます。 ...

校異源氏物語テキストDBのTEI/XMLからPDFを作成する

校異源氏物語テキストDBのTEI/XMLからPDFを作成する

概要 校異源氏物語テキストDBは、『校異源氏物語』のテキストデータを公開するデータベースです。 https://kouigenjimonogatari.github.io/ 今回、本DBに以下のようなPDFファイルを追加しました。 https://kouigenjimonogatari.github.io/output/01/main.pdf 本記事は、上記のようなPDFファイルを、XSLTとTeXを使って作成します。 リポジトリのクローン 以下のように、リポジトリをクローンします。 git clone --depth 1 https://github.com/kouigenjimonogatari/kouigenjimonogatari.github.io そして以下のコマンドにより、xslt3をインストールします。 npm i xslt3 https://www.npmjs.com/package/xslt3 XSLファイルの作成 今回は、まずTEI/XMLファイルをTeXファイルに変換します。 以下のようなXSLファイルを作成しました。 https://github.com/kouigenjimonogatari/kouigenjimonogatari.github.io/blob/master/xsl/tex.xsl <?xml version="1.0" encoding="UTF-8"?> <xsl:stylesheet version="1.0" xmlns:xsl="http://www.w3.org/1999/XSL/Transform" xmlns:tei="http://www.tei-c.org/ns/1.0"> <xsl:output method="text" encoding="UTF-8"/> <xsl:template match="/"> \documentclass[a4paper,11pt,landscape]{ltjtarticle} \usepackage{xcolor} \usepackage{luatexja-fontspec} % fontspec を LuaTeX-ja と共に利用 \usepackage[top=2cm,bottom=2cm,left=2cm,right=2cm,textwidth=25cm]{geometry} % スタイル定義 \newcommand{\person}[1]{\textbf{\color{blue}#1}} \newcommand{\place}[1]{\textit{\color{green}#1}} % 日本語フォント設定 \setmainjfont{Noto Serif CJK JP} % 日本語フォントを指定 \title{<xsl:value-of select="//tei:title"/>} \date{} \begin{document} \maketitle % 本文 <xsl:for-each select="//tei:seg"> <xsl:apply-templates/> \par\medskip </xsl:for-each> \end{document} </xsl:template> <!-- 人名の処理 --> <xsl:template match="tei:persName"> \person{<xsl:value-of select="."/>}</xsl:template> <!-- 地名の処理 --> <xsl:template match="tei:placeName"> \place{<xsl:value-of select="."/>}</xsl:template> </xsl:stylesheet> 先にインストールしたxslt3を使って、以下のようにTEI/XMLファイルをTeXファイルに変換できます。 ...

XSLTを使ってIIIFとTEIの対照表示を実現する

XSLTを使ってIIIFとTEIの対照表示を実現する

概要 XSLTを使ってIIIFとTEIの対照表示を実現してみる機会がありましたので、備忘録です。 結果は以下からご確認いただけます。「校異源氏物語テキストDB」を利用しています。 https://kouigenjimonogatari.github.io/xml/xsl/01.xml 背景 TEI/XMLの可視化にあたって、これまでは、TEI XMLをHTMLに変換してブラウザ上で表示するためのJavaScriptライブラリであるCETEICeanを使うことが多かったです。 これらの取り組みではJavaScriptのフレームワークと合わせて、柔軟な開発が可能でした。 しかし、この方法ではTEI/XMLとは別に、ビューアのデプロイが必要であるなど、課題を感じる点もありました。 対策 そこで、XSLTを使ったIIIFとTEIの対照表示に取り組みました。以下のXSLファイルを用意しました。実装にあたっては、ChatGPTを利用しました。 https://github.com/kouigenjimonogatari/kouigenjimonogatari.github.io/blob/master/xsl/mirador.xsl そして、XMLファイルからは、以下のように参照します。相対パスとなっている点は、適宜読み替えてください。 <?xml version="1.0" ?> ... <?xml-stylesheet type="text/xsl" href="../../xsl/mirador.xsl"?> <TEI xmlns="http://www.tei-c.org/ns/1.0"> <teiHeader> <fileDesc> <titleStmt> <title>校異源氏物語・きりつぼ</title> <author>池田亀鑑</author> ... これにより、以下のようなXMLファイルをブラウザで表示すると、 https://kouigenjimonogatari.github.io/xml/xsl/01.xml 以下のように、IIIFとTEIの対照表示を実現することができました。ページのリンクやMiradorビューアの前後ボタンのクリックにより、テキストと画像が同期します。 このようにXSLTによる可視化を行うことにより、別途のビューア開発やデプロイが不要となり、またxslファイルの更新による容易なカスタマイズを実現することができました。 考察 Next.jsのようなフレームワークとCETEIceanを組み合わせてビューアを作成する方法と、本記事で紹介したようなXSLTを使った可視化方法について、ChatGPTに使い分けを聞いてみました。 結果、以下のように、比較的単純な可視化ではXSLT、高度なインタクラションが求められる場合はCETEIcean、を選択するのがよさそうでした。 1. 高度なインタラクションが必要な場合: Next.js + CETEIcean Next.js はReactベースのフレームワークで、クライアントサイドレンダリングやサーバーサイドレンダリング、APIの統合などを柔軟に行えます。Next.jsを使うと、複雑なUIや状態管理、ナビゲーション、動的なデータ処理が必要なアプリケーションの構築が簡単です。 CETEIcean は、TEI XMLをそのままHTMLにレンダリングするためのライブラリで、特にクライアントサイドでTEIを動的に表示したい場合に便利です。CETEIceanを使うと、JavaScriptを使ってTEI要素を直接操作できるため、ユーザーがクリックした際に特定のページに遷移したり、アノテーションの追加など、インタラクティブな機能を実装できます。 利点 : リッチなインタラクション(ページナビゲーション、フィルタリング、ユーザーの操作に応じた動的なUIの更新など)が容易。 コンポーネントベースの設計が可能で、保守性が高く再利用性も高い。 さまざまなJavaScriptライブラリやプラグイン(Mirador、Annotoriousなど)との統合が容易。 2. 単純な表示や静的な構造でよい場合: XSLT XSLT は、XMLデータをHTMLなどに変換するためのテンプレート言語で、サーバーサイドまたはクライアントサイドでの静的な表示に適しています。XSLTを使用すると、TEI XMLをシンプルなHTMLとして表示できます。 利点 : 軽量で設定がシンプル。ブラウザがXSLTをサポートしていれば、特別な環境を必要とせずに、直接HTML表示が可能。 HTMLとして生成されるため、CSSによるスタイルの適用が容易で、簡単なナビゲーションや静的なページリンク程度なら実装も比較的簡単。 静的なレポートや閲覧専用のデータの表示に最適。 判断基準のまとめ 高度な機能やインタラクティブな要素が求められる :Next.js + CETEIcean 例:クリックやスクロールに応じて動的にデータをロード、複数のナビゲーションや検索機能の提供、アノテーションや画像ビューワーの統合。 単純な表示がメイン :XSLT 例:TEIドキュメントをただ表示するだけ、特定の要素にスタイルを適用して閲覧しやすくする、シンプルなページナビゲーション。 まとめ ビューアを使用せずに、TEI/XMLファイルとXSLファイルのみで閲覧環境を実現することは、管理や運用コストの低減にもつながるように思いました。 ...

LEAF WriterのEditor Toolbarをカスタマイズする

LEAF WriterのEditor Toolbarをカスタマイズする

概要 LEAF Writerでは、画面上部にタグの挿入をサポートするボタンが提供されています。本記事では、その編集方法について紹介します。 結果、以下のように、<app><lem>あああ</lem><rdg>いいい</rdg></app>を挿入する機能を追加しました。 https://youtu.be/XMnRP7s2atw 編集 以下のファイルを編集します。 packages/cwrc-leafwriter/src/components/editorToolbar/index.tsx 以下のように、人名や地名のタグをサポートする機能が設定されています。例えば、以下では、organizationに関する記述をコメントアウトしています。 ... const items: (MenuItem | Item)[] = [ { group: 'action', hide: isReadonly, icon: 'insertTag', onClick: () => { if (!container.current) return; const rect = container.current.getBoundingClientRect(); const posX = rect.left; const posY = rect.top + 34; showContextMenu({ // anchorEl: container.current, eventSource: 'ribbon', position: { posX, posY }, useSelection: true, }); }, title: 'Tag', tooltip: 'Add Tag', type: 'button', }, { group: 'action', type: 'divider', hide: isReadonly }, { color: entity.person.color.main, group: 'action', disabled: !isSupported('person'), hide: isReadonly, icon: entity.person.icon, onClick: () => window.writer.tagger.addEntityDialog('person'), title: 'Tag Person', type: 'iconButton', }, { color: entity.place.color.main, group: 'action', disabled: !isSupported('place'), hide: isReadonly, icon: entity.place.icon, onClick: () => window.writer.tagger.addEntityDialog('place'), title: 'Tag Place', type: 'iconButton', }, /* { color: entity.organization.color.main, group: 'action', disabled: !isSupported('organization'), hide: isReadonly, icon: entity.organization.icon, onClick: () => window.writer.tagger.addEntityDialog('organization'), title: 'Tag Organization', type: 'iconButton', }, ... 結果、以下のように選択肢が限定されます。 ...

LEAF WriterをNext.jsから使用する

LEAF WriterをNext.jsから使用する

概要 LEAF WriterをNext.jsから使用する方法について紹介します。 デモ 以下のURLからお試しいただけます。 https://leaf-writer-nextjs.vercel.app/ 以下が画面例です。ヘッダー部分がNext.jsを用いて追加した部分です。エディタ部分はLEAF Writerを使用しています。 ソースコードは以下でご確認いただけます。 https://github.com/nakamura196/leaf-writer-nextjs 使用方法 以下に記載があります。 https://gitlab.com/calincs/cwrc/leaf-writer/leaf-writer/-/tree/main/packages/cwrc-leafwriter?ref_type=heads 注意点として、div containerのidをleaf-writer-containerにする必要があります。これを行わない場合、スタイルが崩れることがわかりました。この点は、今後プルリクエストを送りたいと思います。 # const container = document.getElementById('#leaf-writer'); const container = document.getElementById('#leaf-writer-container'); まとめ LEAF Writerの応用にあたり、参考になりましたら幸いです。

Romaを使ってタグの属性に使用可能な値を限定する

Romaを使ってタグの属性に使用可能な値を限定する

概要 Romaを使ってタグの属性に使用可能な値を限定する方法に関する備忘録です。 背景 以下の記事で、タグに使用可能な属性を限定する方法を記載しました。 例えば、persNameタグには、key属性とtype属性のみを使用可能にする、といった具合です。 本記事では、さらに特定の属性で使用可能な値を限定します。例えば、type属性には、「右傍注」または「左傍注」のいずれかを設定する、といった具合です。 Romaでの設定 以下の記事を参考に、タグの属性の設定を行います。 ここでは、persNameタグにtype属性を設定済みとします。そして、以下のように、鉛筆アイコンをクリックします。 以下のように、属性に関する情報を編集するためのページに遷移します。ここで、「値」という項目において、「右傍注」「左傍注」といった値を登録します。合わせて、必要に応じて「説明」文も追加します。 Oxygen XML Editorでの表示例 rngファイルとしてダウンロードし、それをTEI/XMLからロードすることにより、Oxygen XML Editorでは以下のように表示されました。 LEAF Writerでの表示例 LEAF Writerでは、以下のように、セレクトボックスで選択肢が提示されました。 まとめ TEI/XMLの導入あたり、参考になりましたら幸いです。

校異源氏物語テキストDBで公開するTEI/XMLファイルに対するDTS APIのGitHubリポジトリ

校異源氏物語テキストDBで公開するTEI/XMLファイルに対するDTS APIのGitHubリポジトリ

概要 以下の記事で紹介したAPIのGitHubリポジトリを公開しました。 リポジトリは以下です。 https://github.com/nakamura196/dts-typescript 不完全な点があるかと思いますが、参考になりましたら幸いです。 メモ vercelのrewrite 以下のように設定することで、/へのアクセスを/api/dtsにリダイレクトさせることができました。 { "version": 2, "builds": [ { "src": "src/index.ts", "use": "@vercel/node" } ], "rewrites": [ { "source": "/api/dts(.*)", "destination": "/src/index.ts" } ], "redirects": [ { "source": "/", "destination": "/api/dts", "permanent": true } ] } collectionのID コレクションのIDとして以下を使用しています。 const COLLECTION_ID = "urn:kouigenjimonogatari"; 当初urn:プレフィックスをつけていませんでしたが、以下のMyCapytainライブラリから使用した際、urn:がない場合、/が挿入され、うまくいかないことがありました。 https://github.com/Capitains/MyCapytain まとめ 不完全な実装が多いですが、参考になりましたら幸いです。

校異源氏物語テキストDBで公開するTEI/XMLファイルに対するDTS APIを作成する

校異源氏物語テキストDBで公開するTEI/XMLファイルに対するDTS APIを作成する

概要 校異源氏物語テキストDBで公開するTEI/XMLファイルに対するDTS(Distributed Text Services) APIを作成したので、備忘録です。 背景 校異源氏物語テキストDBは以下です。 https://kouigenjimonogatari.github.io/ TEI/XMLファイルを公開しています。 開発したDTS 開発したDTSは以下です。 https://dts-typescript.vercel.app/api/dts Express.jsをVercelに設置しています。 DTSは以下を参考にしてください。 https://zenn.dev/nakamura196/articles/4233fe80b3e76d MyCapytainライブラリ 以下の記事で、DTSをPythonから利用するライブラリを紹介しました。 https://zenn.dev/nakamura196/articles/1f52f460025274 本ライブラリを使用して、開発したDTSを利用してみます。 Create the resolver With the following line we create the resolver : from MyCapytain.resolvers.dts.api_v1 import HttpDtsResolver resolver = HttpDtsResolver("https://dts-typescript.vercel.app/api/dts") Require metadata : let’s visit the catalog The following code is gonna find each text that is readable by Alpheios # We get the root collection root = resolver.getMetadata() # Then we retrieve dynamically all the readableDescendants : it browse automatically the API until # it does not have seen any missing texts: be careful with this one on huge repositories readable_collections = root.readableDescendants print("We found %s collections that can be parsed" % len(readable_collections)) We found 54 collections that can be parsed Printing the full tree # Note that we could also see and make a tree of the catalog. # If you are not familiar with recursivity, the next lines might be a bit complicated def show_tree(collection, char_number=1): for subcollection_id, subcollection in collection.children.items(): print(char_number*"--" + " " + subcollection.id) show_tree(subcollection, char_number+1) print(root.id) show_tree(root) default -- urn:kouigenjimonogatari ---- urn:kouigenjimonogatari.1 ---- urn:kouigenjimonogatari.2 ---- urn:kouigenjimonogatari.3 ---- urn:kouigenjimonogatari.4 ---- urn:kouigenjimonogatari.5 ---- urn:kouigenjimonogatari.6 ---- urn:kouigenjimonogatari.7 ---- urn:kouigenjimonogatari.8 ---- urn:kouigenjimonogatari.9 ---- urn:kouigenjimonogatari.10 ---- urn:kouigenjimonogatari.11 ---- urn:kouigenjimonogatari.12 ---- urn:kouigenjimonogatari.13 ---- urn:kouigenjimonogatari.14 ---- urn:kouigenjimonogatari.15 ---- urn:kouigenjimonogatari.16 ---- urn:kouigenjimonogatari.17 ---- urn:kouigenjimonogatari.18 ---- urn:kouigenjimonogatari.19 ---- urn:kouigenjimonogatari.20 ---- urn:kouigenjimonogatari.21 ---- urn:kouigenjimonogatari.22 ---- urn:kouigenjimonogatari.23 ---- urn:kouigenjimonogatari.24 ---- urn:kouigenjimonogatari.25 ---- urn:kouigenjimonogatari.26 ---- urn:kouigenjimonogatari.27 ---- urn:kouigenjimonogatari.28 ---- urn:kouigenjimonogatari.29 ---- urn:kouigenjimonogatari.30 ---- urn:kouigenjimonogatari.31 ---- urn:kouigenjimonogatari.32 ---- urn:kouigenjimonogatari.33 ---- urn:kouigenjimonogatari.34 ---- urn:kouigenjimonogatari.35 ---- urn:kouigenjimonogatari.36 ---- urn:kouigenjimonogatari.37 ---- urn:kouigenjimonogatari.38 ---- urn:kouigenjimonogatari.39 ---- urn:kouigenjimonogatari.40 ---- urn:kouigenjimonogatari.41 ---- urn:kouigenjimonogatari.42 ---- urn:kouigenjimonogatari.43 ---- urn:kouigenjimonogatari.44 ---- urn:kouigenjimonogatari.45 ---- urn:kouigenjimonogatari.46 ---- urn:kouigenjimonogatari.47 ---- urn:kouigenjimonogatari.48 ---- urn:kouigenjimonogatari.49 ---- urn:kouigenjimonogatari.50 ---- urn:kouigenjimonogatari.51 ---- urn:kouigenjimonogatari.52 ---- urn:kouigenjimonogatari.53 ---- urn:kouigenjimonogatari.54 Printing details about a specific one # Let's get a random one ! from random import randint # The index needs to be between 0 and the number of collections rand_index = randint(0, len(readable_collections)) collection = readable_collections[rand_index] # Now let's print information ? label = collection.get_label() text_id = collection.id print("Treaing `"+label+"` with id " + text_id) Treaing `総角` with id urn:kouigenjimonogatari.47 What about more detailed informations ? Like the citation scheme ? def recursive_printing_citation_scheme(citation, char_number=1): for subcitation in citation.children: print(char_number*"--" + " " + subcitation.name) recursive_printing_citation_scheme(subcitation, char_number+1) print("Maximum citation depth : ", collection.citation.depth) print("Citation System") recursive_printing_citation_scheme(collection.citation) Maximum citation depth : 1 Citation System -- line Let’s get some references ! reffs = resolver.getReffs(collection.id) print(reffs) # Nice ! DtsReferenceSet (DtsReference https://w3id.org/kouigenjimonogatari/api/items/1587-01.json> [line]>, DtsReference https://w3id.org/kouigenjimonogatari/api/items/1587-02.json> [line]>, DtsReference https://w3id.org/kouigenjimonogatari/api/items/1587-03.json> [line]>, DtsReference https://w3id.org/kouigenjimonogatari/api/items/1587-04.json> [line]>, DtsReference ... Let’s get some random passage ! # Let's get a random one ! from random import randint # The index needs to be between 0 and the number of collections rand_index = randint(0, len(reffs)-1) reff = reffs[rand_index] passage = resolver.getTextualNode(collection.id, reff) print(passage.id, passage.reference) # Let's see the XML here # For that, we need to get the mimetype right : from MyCapytain.common.constants import Mimetypes print(passage.export(Mimetypes.XML.TEI)) urn:kouigenjimonogatari.47 DtsReference https://w3id.org/kouigenjimonogatari/api/items/1640-06.json> [line]> TEI xmlns="http://www.tei-c.org/ns/1.0">dts:fragment xmlns:dts="https://w3id.org/dts/api#"> ... 考察 上記の通り、MyCapytainライブラリの基本操作に対応したDTSを構築することができました。 ...

DTS(Distributed Text Services)を使ってみる

DTS(Distributed Text Services)を使ってみる

概要 DTS(Distributed Text Services)の使用方法を学ぶ機会があり、その備忘録です。 使用するAPI 以下で紹介されているAlpheios を使用します。 https://github.com/distributed-text-services/specifications/?tab=readme-ov-file#known-corpora-accessible-via-the-dts-api トップ https://texts.alpheios.net/api/dts collections, documents, navigationが使えることがわかります。 { "navigation": "/api/dts/navigation", "@id": "/api/dts", "@type": "EntryPoint", "collections": "/api/dts/collections", "@context": "dts/EntryPoint.jsonld", "documents": "/api/dts/document" } Collection Endpoint collections https://texts.alpheios.net/api/dts/collections 2つの下位コレクションが含まれることがわかります。 { "totalItems": 2, "member": [ { "@id": "urn:alpheios:latinLit", "@type": "Collection", "totalItems": 3, "title": "Classical Latin" }, { "@id": "urn:alpheios:greekLit", "@type": "Collection", "totalItems": 4, "title": "Ancient Greek" } ], "title": "None", "@id": "default", "@type": "Collection", "@context": { "dts": "https://w3id.org/dts/api#", "@vocab": "https://www.w3.org/ns/hydra/core#" } } Classical Latin idurn:alpheios:latinLitを指定して、コレクションをClassical Latinに限定します。 https://texts.alpheios.net/api/dts/collections?id=urn:alpheios:latinLit 3つの下位コレクションが含まれることがわかります。 { "totalItems": 3, "member": [ { "@id": "urn:cts:latinLit:phi0472", "@type": "Collection", "totalItems": 1, "title": "Catullus" }, { "@id": "urn:cts:latinLit:phi0620", "@type": "Collection", "totalItems": 1, "title": "Propertius, Sextus" }, { "@id": "urn:cts:latinLit:phi0959", "@type": "Collection", "totalItems": 1, "title": "Ovid" } ], "title": "Classical Latin", "@id": "urn:alpheios:latinLit", "@type": "Collection", "@context": { "dts": "https://w3id.org/dts/api#", "@vocab": "https://www.w3.org/ns/hydra/core#", "ns1": "http://www.w3.org/2004/02/skos/core#" }, "dts:extensions": { "ns1:prefLabel": [ { "@value": "Classical Latin", "@language": "eng" } ] } } Catullus idurn:cts:latinLit:phi0472を指定して、コレクションをCatullusに限定します。 ...

MyCapytainライブラリを試す

MyCapytainライブラリを試す

概要 以下のMyCapytainライブラリを試します。 https://github.com/Capitains/MyCapytain 背景 以下の記事で、CTS(Canonical Text Service)を取り上げました。 以下のページにおいて、CITE, CTS, CapiTainSの説明がなされています。 https://brillpublishers.gitlab.io/documentation-cts/DTS_Guidelines.html The following document is about CITE, a system for the identification of texts and any other object. CTS is the name for the identification system itself. CapiTainS is the name for the software suite built around it. Before we go into details, we need to ask two questions: (機械翻訳)以下の文書は、CITE(テキストおよびその他のオブジェクトを識別するためのシステム)に関するものです。CTSは、この識別システム自体の名前です。CapiTainSは、その周りに構築されたソフトウェアスイートの名前です。詳細に入る前に、2つの質問をする必要があります。 さらに、今回使用するMyCapytainライブラリは以下のように説明されています。 MyCapytain is a python library which provides a large set of methods to interact with Text Services API such as the Canonical Text Services, the Distributed Text Services. It also provides a programming interface to exploit local textual resources developed according to the Capitains Guidelines. ...

Canonical Text Serviceを試す

Canonical Text Serviceを試す

概要 Canonical Text Serviceは、以下のように説明されています。 The Canonical Text Services protocol defines interaction between a client and server providing identification of texts and retrieval of canonically cited passages of texts. (機械翻訳)Canonical Text Services (CTS) プロトコルは、テキストの識別と、正規に引用されたテキストの箇所の取得を提供するクライアントとサーバー間の相互作用を定義しています。 以下のサイトを参考にしています。 http://cts.informatik.uni-leipzig.de/Canonical_Text_Service.html 使用方法 以下を参考にしています。 https://github.com/cite-architecture/cts_spec/blob/master/md/specification.md GetCapabilities サーバーがサポートしているサービスを確認するためのリクエストです。 http://cts.informatik.uni-leipzig.de/pbc/cts/?request=GetCapabilities <GetCapabilities xmlns="http://relaxng.org/ns/structure/1.0" xmlns:a="http://relaxng.org/ns/compatibility/annotations/1.0" xmlns:tei="http://www.tei-c.org/ns/1.0" xmlns:dc="http://purl.org/dc/elements/1.1/" xmlns:ti="http://chs.harvard.edu/xmlns/cts"> <request>GetCapabilities</request> <reply> <TextInventory tiversion="5.0.rc.1"> <corpuslicense>Public Domain</corpuslicense> <corpussource>http://paralleltext.info/data/</corpussource> <corpuslanguage>arb,ceb,ces,cym,deu,eng,fin,fra,ita,mya,rus,tgl,ukr</corpuslanguage> <corpusname>Parallel Bible Corpus</corpusname> <corpusdescription>The Bible corpus contains 1169 unique translations, which have been assigned 906 different ISO-639-3 codes. This CTS instance contains 20 bible translations from PBC that are available as Public Domain.</corpusdescription> <textgroup urn="urn:cts:pbc:bible"> <groupname>bible</groupname> <edition urn="urn:cts:pbc:bible.parallel.arb.norm:"> <title>The Bible in Arabic</title> <license>Public Domain</license> <source>http://paralleltext.info/data/ retrieved via Canonical Text Service http://cts.informatik.uni-leipzig.de/pbc/cts/</source> <publicationDate>1865</publicationDate> <language>arb</language> <contentType>xml</contentType> </edition> <edition urn="urn:cts:pbc:bible.parallel.ceb.bugna:"> <title>Cebuano Ang Biblia (Bugna Version)</title> <license>Public Domain</license> <source>http://paralleltext.info/data/ retrieved via Canonical Text Service http://cts.informatik.uni-leipzig.de/pbc/cts/</source> <publicationDate>1917</publicationDate> <language>ceb</language> <contentType>xml</contentType> </edition> <edition urn="urn:cts:pbc:bible.parallel.ces.kralicka:"> <title>Czech Bible Kralicka. Version of 1613</title> <license>Public Domain</license> <source>http://paralleltext.info/data/ retrieved via Canonical Text Service http://cts.informatik.uni-leipzig.de/pbc/cts/</source> <publicationDate>1613</publicationDate> <language>ces</language> <contentType>xml</contentType> </edition> <edition urn="urn:cts:pbc:bible.parallel.cym.morgan1804:"> <title>Beibl William Morgan. William Morgan Bible in Welsh.</title> <license>Public Domain</license> <source>http://paralleltext.info/data/ retrieved via Canonical Text Service http://cts.informatik.uni-leipzig.de/pbc/cts/</source> <publicationDate>1804</publicationDate> <language>cym</language> <contentType>xml</contentType> </edition> <edition urn="urn:cts:pbc:bible.parallel.deu.elberfelder1871:"> <title>Die Bibel in Deutsch. Elberfelder Version von 1871. The Bible in German, Elberfelder Version of 1871</title> <license>´Public Domain</license> <source>http://paralleltext.info/data/ retrieved via Canonical Text Service http://cts.informatik.uni-leipzig.de/pbc/cts/</source> <publicationDate>1871</publicationDate> <language>deu</language> <contentType>xml</contentType> </edition> <edition urn="urn:cts:pbc:bible.parallel.deu.elberfelder1905:"> <title>Die Bibel in Deutsch. Elberfelder 1905. The Bible in German</title> <license>Public Domain</license> <source>http://paralleltext.info/data/ retrieved via Canonical Text Service http://cts.informatik.uni-leipzig.de/pbc/cts/</source> <publicationDate>1905</publicationDate> <language>deu</language> <contentType>xml</contentType> </edition> <edition urn="urn:cts:pbc:bible.parallel.deu.luther1545:"> <title>Die Bibel in Deutsch. Luther Version von 1545. The Bible in German. Luther version of 1545.</title> <license>Public Domain</license> <source>http://paralleltext.info/data/ retrieved via Canonical Text Service http://cts.informatik.uni-leipzig.de/pbc/cts/</source> <publicationDate>1545</publicationDate> <language>deu</language> <contentType>xml</contentType> </edition> <edition urn="urn:cts:pbc:bible.parallel.deu.luther1545letztehand:"> <title>Luther 1545 (Letzte Hand). The Bible in German</title> <license>Public Domain</license> <source>http://paralleltext.info/data/ retrieved via Canonical Text Service http://cts.informatik.uni-leipzig.de/pbc/cts/</source> <publicationDate>1545</publicationDate> <language>deu</language> <contentType>xml</contentType> </edition> <edition urn="urn:cts:pbc:bible.parallel.deu.luther1912:"> <title>Die Bibel in Deutsch. Luther Version von 1912. The Bible in German. Luther version of 1912.</title> <license>public Domain</license> <source>http://paralleltext.info/data/ retrieved via Canonical Text Service http://cts.informatik.uni-leipzig.de/pbc/cts/</source> <publicationDate>1912</publicationDate> <language>deu</language> <contentType>xml</contentType> </edition> <edition urn="urn:cts:pbc:bible.parallel.eng.darby:"> <title>The Bible in English. Darby Translation.</title> <license>Public Domain</license> <publicationDate>1890</publicationDate> <language>eng</language> <contentType>xml</contentType> </edition> <edition urn="urn:cts:pbc:bible.parallel.eng.kingjames:"> <title>King James Version of the Christian Bible</title> <license>Public Domain</license> <source>http://paralleltext.info/data/ retrieved via Canonical Text Service http://cts.informatik.uni-leipzig.de/pbc/cts/</source> <publicationDate>1611</publicationDate> <language>eng</language> <contentType>xml</contentType> </edition> <edition urn="urn:cts:pbc:bible.parallel.fin.1766:"> <title>Pyhä Raamattu. Version of 1776. The Bible in Finnish</title> <license>Public Domain</license> <source>http://paralleltext.info/data/ retrieved via Canonical Text Service http://cts.informatik.uni-leipzig.de/pbc/cts/</source> <publicationDate>1776</publicationDate> <language>fin</language> <contentType>xml</contentType> </edition> <edition urn="urn:cts:pbc:bible.parallel.fra.davidmartin:"> <title>The Bible in French. David Martin Version.</title> <license>Public Domain</license> <source>http://paralleltext.info/data/ retrieved via Canonical Text Service http://cts.informatik.uni-leipzig.de/pbc/cts/</source> <publicationDate>1744</publicationDate> <language>fra</language> <contentType>xml</contentType> </edition> <edition urn="urn:cts:pbc:bible.parallel.fra.kingjames:"> <title>The Bible in French. King James Version.</title> <license>Public Domain</license> <source>http://paralleltext.info/data/ retrieved via Canonical Text Service http://cts.informatik.uni-leipzig.de/pbc/cts/</source> <publicationDate>1881</publicationDate> <language>fra</language> <contentType>xml</contentType> </edition> <edition urn="urn:cts:pbc:bible.parallel.fra.louissegond:"> <title>The Bible in French. Louis Segond Version.</title> <license>Public Domain</license> <source>http://paralleltext.info/data/ retrieved via Canonical Text Service http://cts.informatik.uni-leipzig.de/pbc/cts/</source> <publicationDate>1910</publicationDate> <language>fra</language> <contentType>xml</contentType> </edition> <edition urn="urn:cts:pbc:bible.parallel.ita.diodati:"> <title>The Bible in Italian. Giovanni Diodati Bibbia Version.</title> <license>Public Domain</license> <source>http://paralleltext.info/data/ retrieved via Canonical Text Service http://cts.informatik.uni-leipzig.de/pbc/cts/</source> <publicationDate>1649</publicationDate> <language>ita</language> <contentType>xml</contentType> </edition> <edition urn="urn:cts:pbc:bible.parallel.mya.1835:"> <title>The New Testament in Myanmar</title> <license>Public Domain</license> <source>http://paralleltext.info/data/ retrieved via Canonical Text Service http://cts.informatik.uni-leipzig.de/pbc/cts/</source> <publicationDate>1835</publicationDate> <language>mya</language> <contentType>xml</contentType> </edition> <edition urn="urn:cts:pbc:bible.parallel.rus.synodal:"> <title>Синодальный перевод. The Synodal Bible in Russian.</title> <license>Public Domain</license> <source>http://paralleltext.info/data/ retrieved via Canonical Text Service http://cts.informatik.uni-leipzig.de/pbc/cts/</source> <publicationDate>1876</publicationDate> <language>rus</language> <contentType>xml</contentType> </edition> <edition urn="urn:cts:pbc:bible.parallel.tgl.1905:"> <title>The Bible in Tagalog.</title> <license>Public Domain</license> <source>http://paralleltext.info/data/ retrieved via Canonical Text Service http://cts.informatik.uni-leipzig.de/pbc/cts/</source> <publicationDate>1905</publicationDate> <language>tgl</language> <contentType>xml</contentType> </edition> <edition urn="urn:cts:pbc:bible.parallel.ukr.2009:"> <title>Ukrainian Version. The Bible in Ukranian.</title> <license>Public Domain</license> <source>http://paralleltext.info/data/ retrieved via Canonical Text Service http://cts.informatik.uni-leipzig.de/pbc/cts/</source> <publicationDate>2009</publicationDate> <language>ukr</language> <contentType>xml</contentType> </edition> </textgroup> </TextInventory> </reply> </GetCapabilities> GetPassage 指定したURN(Uniform Resource Name)に基づいて、特定のテキストの一部を取得します。 ...

LEAF Writer: Miradorを追加する

LEAF Writer: Miradorを追加する

概要 LEAF Writerのカスタマイズ方法に関する調査記録です。 https://gitlab.com/calincs/cwrc/leaf-writer/leaf-writer 今回は以下のように、Miradorを追加します。 方法 以下を参考にしてください。 https://gitlab.com/nakamura196/leaf-writer/-/commit/377438739cdeb0a7b770ee9d4b9fea86081179d8 修正が必要なファイルは以下です。 import $ from 'jquery'; import 'jquery-ui'; import Writer from '../../../Writer'; // @ts-ignore import Mirador from 'mirador'; interface IiifViewerProps { attribute?: string; parentId: string; tag?: string; writer: Writer; } class IiifViewer { readonly writer: Writer; readonly id: string; readonly tagName: string; readonly attrName: string; // eslint-disable-next-line @typescript-eslint/no-explicit-any, @typescript-eslint/no-redundant-type-constituents miradorInstance: any | null; $pageBreaks: unknown; currentIndex = -1; ignoreScroll = false; constructor({ attribute, parentId, tag, writer }: IiifViewerProps) { this.writer = writer; this.id = `${parentId}_iiifViewer`; this.tagName = tag ?? 'pb'; // page break element name this.attrName = attribute ?? 'facs'; // attribute that stores the image URL $(`#${parentId}`).append(` <div id="${this.id}" style="position: absolute; top: 0; bottom: 0; left: 0; right: 0"></div> `); this.writer.event('loadingDocument').subscribe(() => this.reset()); this.writer.event('documentLoaded').subscribe((success: boolean, body: HTMLElement) => { console.log('documentLoaded', success, body); if (!success) return; this.processDocument(body); }); this.writer.event('writerInitialized').subscribe(() => { if (!this.writer.editor) return; }); } private processDocument(doc: HTMLElement) { // (doc).find const $facsimile = $(doc).find(`*[_tag="facsimile"]`); const manifestUri = $facsimile.attr('sameas'); const config = { id: this.id, windows: [ { loadedManifest: manifestUri, }, ], window: { sideBarOpen: false, }, }; // eslint-disable-next-line @typescript-eslint/no-unsafe-assignment, @typescript-eslint/no-unsafe-call, @typescript-eslint/no-unsafe-member-access this.miradorInstance = Mirador.viewer(config); } reset() { this.$pageBreaks = null; this.currentIndex = -1; } } export default IiifViewer; 以下の箇所で、<facsimile sameAs="https://dl.ndl.go.jp/api/iiif/3437686/manifest.json">の情報を取得しています。 ...

LEAF Writer: サンプルデータの追加方法

LEAF Writer: サンプルデータの追加方法

概要 LEAF Writerのカスタマイズ方法に関する調査記録です。 https://gitlab.com/calincs/cwrc/leaf-writer/leaf-writer 今回はサンプルデータの追加方法に関する備忘録です。以下のように、独自のサンプルデータを追加します。 方法 以下を参考にしてください。 https://gitlab.com/nakamura196/leaf-writer/-/commit/c4e98090c94874037980819c9672eea10814eedb samples.jsonの更新に加えて、必須ではありませんが、アイコンを追加するため、apps/commons/src/icons/index.tsxも更新する必要がありました。 結果 以下のように、サンプルデータからエディタ環境を開くことができました。 まとめ LEAF Writerの理解にあたり、参考になりましたら幸いです。

LEAF Writer: Image Viewerの使い方

LEAF Writer: Image Viewerの使い方

概要 LEAF Writerでは、以下のように、テキストと画像を並列表示する機能を提供します。画像のページをおくると、テキストも連動して動作する機能も提供されています。 このImage Viewer部分に画像を表示するための、TEI/XMLの記述例を紹介します。 方法 以下のように、pbタグを指定します。 https://github.com/kouigenjimonogatari/kouigenjimonogatari.github.io/blob/master/xml/lw/01.xml 具体的には、以下です。 ... <pb corresp="#zone_0005" facs="https://dl.ndl.go.jp/api/iiif/3437686/R0000022/0,0,3445,4706/full/0/default.jpg" n="5"/> ... pb要素のfacs属性に指定された画像が、Image Viewer部分に表示されるようでした。 まとめ 近年、TEIとIIIFを組み合わせて利用するケースも多いです。 https://github.com/TEI-EAJ/jp_guidelines/wiki/IIIF画像とのリンク 上記のような記法に基づき、IIIF Image APIと連動するようなLEAF WriterのImage Viewerの開発にも取り組みたいと思います。 またその延長として、Oxygen XML Editorのアノテーション機能のようなツールも用意できればと思います。 LEAF Writerの利用にあたり、参考になりましたら幸いです。