ホーム 記事一覧 ブック DH週間トピックス 検索 このサイトについて
English
Azure OpenAI Whisper + Speech Services で動画に英語字幕・音声を自動生成する

Azure OpenAI Whisper + Speech Services で動画に英語字幕・音声を自動生成する

日本語の動画に英語字幕と英語音声を自動で付与する方法をまとめました。Azure OpenAI ServiceのWhisperとSpeech Servicesを使用します。 概要 今回の目的は、日本語音声の動画を以下のように多言語対応させることです: 日本語版 : 元の動画(日本語音声、字幕なし) 英語版 : 英語音声 + 英語字幕 使用サービス サービス 用途 Azure OpenAI Service (Whisper) 日本語音声 → 英語テキストへの翻訳 Azure Speech Services (TTS) 英語テキスト → 英語音声の合成 FFmpeg 音声抽出・動画結合 手順 1. 環境準備 必要なツール # FFmpegのインストール(macOS) brew install ffmpeg # Pythonライブラリ pip install python-dotenv requests Azure設定(.env) AZURE_OPENAI_ENDPOINT=https://xxxxx.openai.azure.com AZURE_OPENAI_API_KEY=your-api-key AZURE_OPENAI_DEPLOYMENT_NAME=whisper AZURE_OPENAI_API_VERSION=2024-06-01 2. 動画から音声を抽出 Azure Whisper APIには25MBのファイルサイズ制限があるため、音声を圧縮して抽出します。 ffmpeg -i input.mp4 -vn -acodec libmp3lame -b:a 64k -ar 16000 audio.mp3 3. Whisperで英語字幕を生成 Azure OpenAI ServiceのWhisper APIを使用して、日本語音声を英語に翻訳しながら文字起こしします。 ...

音声資料に関するIIIFマニフェストファイルに画像を追加する

音声資料に関するIIIFマニフェストファイルに画像を追加する

概要 以下のAudio Presentation with Accompanying Imageを試した結果の備忘録です。 https://iiif.io/api/cookbook/recipe/0014-accompanyingcanvas/ 
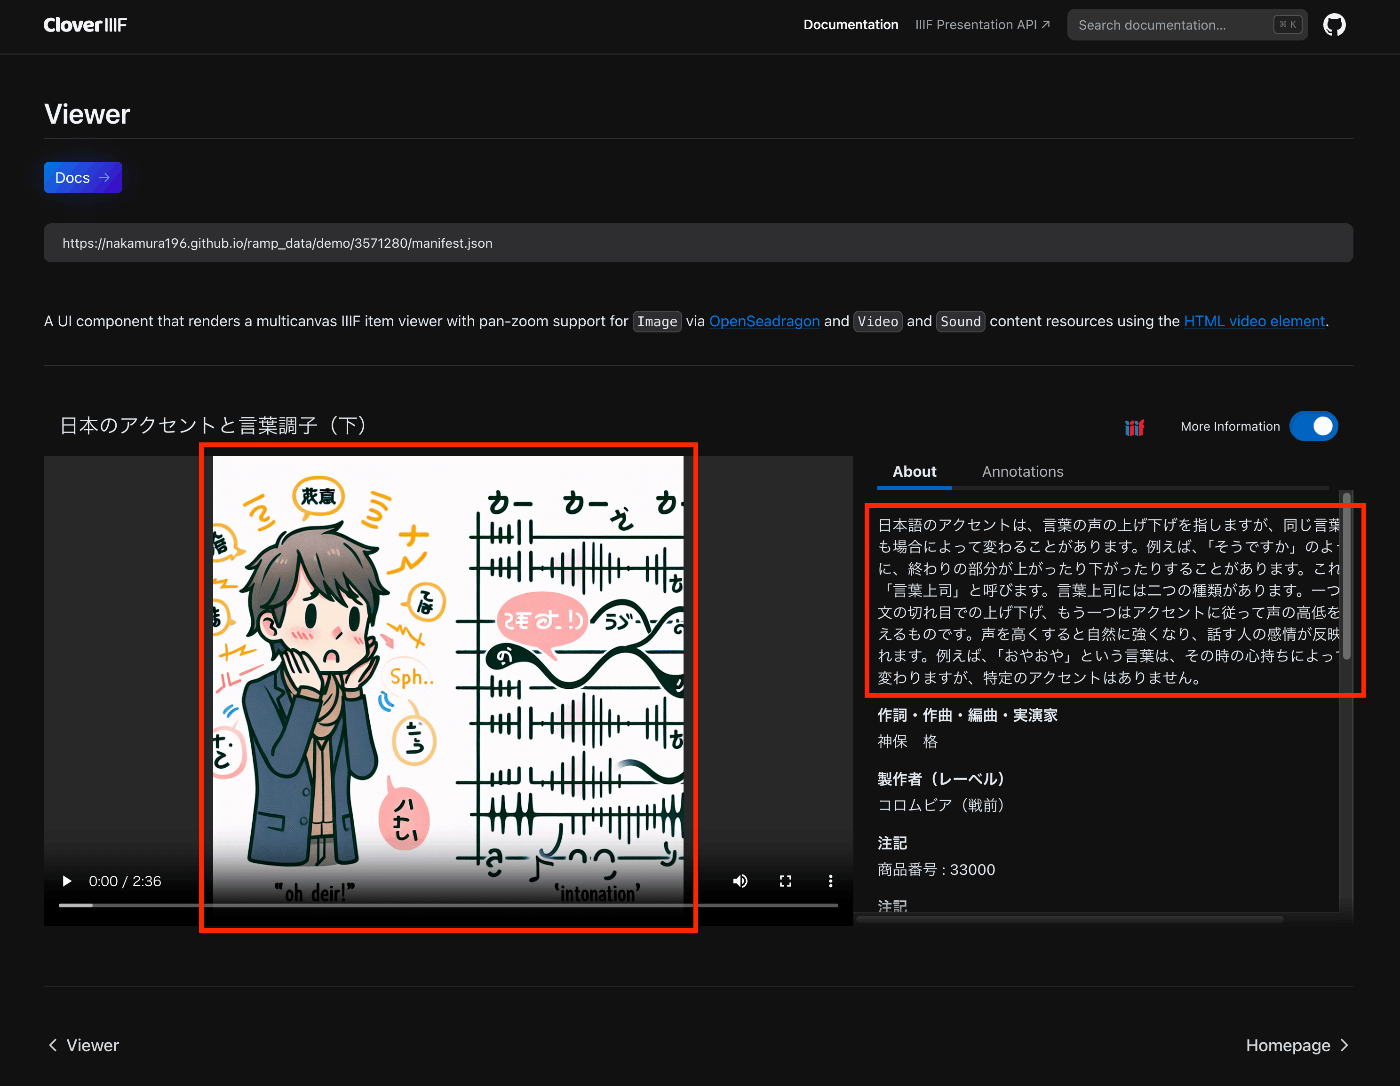
以下はCloverで表示した例ですが、設定した画像がプレイヤーに表示されます。 https://samvera-labs.github.io/clover-iiif/docs/viewer/demo?iiif-content=https://nakamura196.github.io/ramp_data/demo/3571280/manifest.json マニフェストファイルの記述 以下に例を格納しています。 https://github.com/nakamura196/ramp_data/blob/main/docs/demo/3571280/manifest.json 具体的には、以下のように、CanvasにaccompanyingCanvasを追加する必要がありました。 { "id": "https://nakamura196.github.io/ramp_data/demo/3571280/canvas", "type": "Canvas", "duration": 156.07999999999998, "accompanyingCanvas": { "id": "https://nakamura196.github.io/ramp_data/demo/3571280/canvas/accompanying", "type": "Canvas", "height": 1024, "width": 1024, "items": [ { "id": "https://nakamura196.github.io/ramp_data/demo/3571280/canvas/accompanying/annotation/page", "type": "AnnotationPage", "items": [ { "id": "https://nakamura196.github.io/ramp_data/demo/3571280/canvas/accompanying/annotation/image", "type": "Annotation", "motivation": "painting", "body": { "id": "https://nakamura196.github.io/ramp_data/demo/3571280/3571280_summary_image.jpg", "type": "Image", "height": 1024, "width": 1024, "format": "image/jpeg" }, "target": "https://nakamura196.github.io/ramp_data/demo/3571280/canvas/accompanying/annotation/page" } ] } ] }, わかりにくいですが、iiif_prezi3を使った記述例です。create_accompanying_canvas()によってaccompanyingCanvasを作成し、それをcanvasに関連づけています。 def add_accompanying_image(self): if self.verbose: print("Adding accompanying image") print(self.image_path) if os.path.exists(self.image_path): accompanyingCanvas = self.create_accompanying_canvas() self.canvas.accompanyingCanvas = accompanyingCanvas def create_accompanying_canvas(self): im = Image.open(self.image_path) w, h = im.size accompanyingCanvas = iiif_prezi3.Canvas(id=f"{self.prefix}/canvas/accompanying") anno_page, anno = self.create_image_annotation(w, h) accompanyingCanvas.set_hwd(height=h, width=w) accompanyingCanvas.add_item(anno_page) return accompanyingCanvas def create_image_annotation(self, width, height): anno_page = iiif_prezi3.AnnotationPage(id=f"{self.prefix}/canvas/accompanying/annotation/page") anno = iiif_prezi3.Annotation( id=f"{self.prefix}/canvas/accompanying/annotation/image", motivation="painting", body=iiif_prezi3.ResourceItem( id=f"{self.prefix}/{self.item_id}_summary_image.{self.image_format}", type="Image", format="image/jpeg", height=height, width=width ), target=anno_page.id ) anno_page.add_item(anno) return anno_page, anno (参考)画像ファイルの作成 国立国会図書館 歴史的音源(れきおん)では、画像データは提供されていないため、Dall-E 3を使用してサンプル画像を作成しました。 ...

IIIF Audio/Visual: 複数のvttファイルを記述する

IIIF Audio/Visual: 複数のvttファイルを記述する

概要 IIIFを用いたAudio/Visual資料の記述について、複数のvttファイルを記述する方法に関する備忘録です。 ここでは、以下のように、日英の文字起こしテキストを記述します。 https://ramp.avalonmediasystem.org/?iiif-content=https://nakamura196.github.io/ramp_data/demo/3571280/manifest.json マニフェストファイルの記述 以下に例を格納しています。 https://github.com/nakamura196/ramp_data/blob/main/docs/demo/3571280/manifest.json 以下の記事も参考にしてください。 具体的には、以下のように複数のアノテーションとして記述することで、rampビューアによって正しく処理されました。 ... "annotations": [ { "id": "https://nakamura196.github.io/ramp_data/demo/3571280/canvas/page/2", "type": "AnnotationPage", "items": [ { "id": "https://nakamura196.github.io/ramp_data/demo/3571280/canvas/annotation/webvtt", "type": "Annotation", "label": { "ja": [ "日本語 (machine-generated)" ] }, "motivation": "supplementing", "body": { "id": "https://nakamura196.github.io/ramp_data/demo/3571280/3571280.vtt", "type": "Text", "format": "text/vtt", "label": { "ja": [ "日本語 (machine-generated)" ] } }, "target": "https://nakamura196.github.io/ramp_data/demo/3571280/canvas" }, { "id": "https://nakamura196.github.io/ramp_data/demo/3571280/canvas/annotation/webvtt/2", "type": "Annotation", "label": { "ja": [ "English (machine-generated)" ] }, "motivation": "supplementing", "body": { "id": "https://nakamura196.github.io/ramp_data/demo/3571280/3571280_en.vtt", "type": "Text", "format": "text/vtt", "label": { "ja": [ "English (machine-generated)" ] } }, "target": "https://nakamura196.github.io/ramp_data/demo/3571280/canvas" } ] } ] ... なお、Cloverでは、2つの文字起こしテキストが連続して表示されました。 ...

字幕付きの音声ファイルをIIIFビューアで表示する

字幕付きの音声ファイルをIIIFビューアで表示する

概要 字幕付きの音声ファイルをIIIFビューアで表示する機会がありましたので、備忘録です。 国立国会図書館 歴史的音源で公開されている「日本のアクセントと言葉調子(下)」を対象に、OpenAIのSpeech to textを使用しています。文字起こし結果には誤りが含まれていますので、その点はご注意ください。 以下は、Rampでの表示例です。 https://ramp.avalonmediasystem.org/?iiif-content=https://nakamura196.github.io/ramp_data/demo/3571280/manifest.json 以下は、Cloverでの表示例です。 https://samvera-labs.github.io/clover-iiif/docs/viewer/demo?iiif-content=https://nakamura196.github.io/ramp_data/demo/3571280/manifest.json 以下は、Aviaryでの表示例です。こちらについては、残念ながら今回使用したマニフェストファイルの形式では、文字起こしテキストは表示できませんでした。 https://iiif.aviaryplatform.com/player?manifest=https://nakamura196.github.io/ramp_data/demo/3571280/manifest.json 以下、これらのマニフェストファイルの作成方法について紹介します。 mp4ファイルの準備 以下の記事を参考に、mp4ファイルを取得します。 vttファイルの作成 OpenAIのAPIを使用して、文字起こしを行います。 from openai import OpenAI client = OpenAI(api_key=os.getenv("OPENAI_API_KEY")) audio_file= open(output_mp4_path, "rb") transcript = client.audio.transcriptions.create( model="whisper-1", file=audio_file, response_format="vtt") with open(output_vtt_path, "w", encoding="utf-8") as file: file.write(transcript) マニフェストファイルの作成 不完全なコードですが、以下のようなプログラムによって、マニフェストファイルを作成します。 from iiif_prezi3 import Manifest, AnnotationPage, Annotation, ResourceItem, config from moviepy.editor import VideoFileClip def get_video_duration(filename): with VideoFileClip(filename) as video: return video.duration config.configs['helpers.auto_fields.AutoLang'].auto_lang = "ja" duration=get_video_duration(mp4_path) manifest = Manifest(id=f"{prefix}/manifest.json", label=label) canvas = manifest.make_canvas(id=f"{prefix}/canvas", duration=duration) anno_body = ResourceItem(id=mp4_url, type="Sound", format="audio/mp4", duration=duration) anno_page = AnnotationPage(id=f"{prefix}/canvas/page") anno = Annotation(id=f"{prefix}/canvas/page/annotation", motivation="painting", body=anno_body, target=canvas.id) anno_page.add_item(anno) canvas.add_item(anno_page) # VTT URLを追加 vtt_body = ResourceItem(id=vtt_url, type="Text", format="text/vtt") vtt_anno = Annotation( id=f"{prefix}/canvas/annotation/webvtt", motivation="supplementing", body=vtt_body, target=canvas.id, label = "WebVTT Transcript (machine-generated)" ) vtt_anno_page = AnnotationPage(id=f"{prefix}/canvas/page/2") vtt_anno_page.add_item(vtt_anno) canvas.annotations = [vtt_anno_page] with open(output_path, "w") as f: f.write(manifest.json(indent=2)) ライブラリとして、iiif-prezi3を使用しています。以下の記事も参考にしてください。 ...