ホーム 記事一覧 ブック DH週間トピックス 検索 このサイトについて
English
Next.js 15対応 多言語・ダークモード対応SSGテンプレート

Next.js 15対応 多言語・ダークモード対応SSGテンプレート

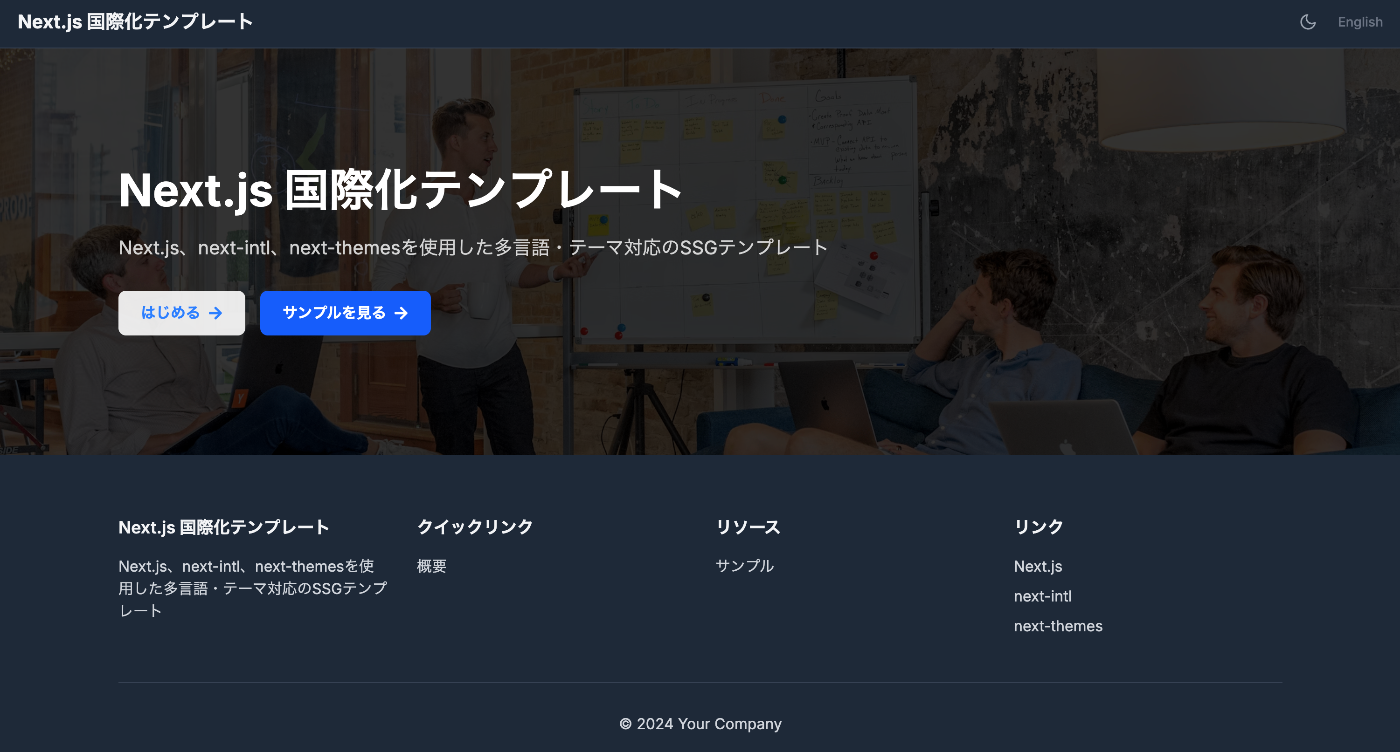
この記事は人間が実装を確認し、AIが記事を作成しました。 概要 このテンプレートは、Next.js 15を使用した静的サイト生成(SSG)に対応し、多言語対応とダークモードを標準装備したWebアプリケーション開発の出発点です。TypeScript、Tailwind CSS、next-intl、next-themesを組み合わせています。 https://nextjs-i18n-themes-ssg-template.vercel.app/ja/ 主な機能 1. 静的サイト生成(SSG) output: 'export'によるフルスタティックエクスポート 高速なページロードとSEO最適化 ホスティングコストの削減 2. 国際化対応(i18n) next-intlによる完全な多言語サポート 日本語・英語対応(簡単に言語追加可能) URLベースの言語切り替え(/ja/about、/en/about) 型安全な翻訳キー 3. ダークモード next-themesによるシステム連動ダークモード ユーザーの好みを自動検出 スムーズなテーマ切り替えアニメーション LocalStorageによる設定の永続化 4. 開発者体験の向上 TypeScriptによる型安全性 Tailwind CSSによる効率的なスタイリング ESLintによるコード品質管理 統一されたコンポーネント構造 技術スタック { "dependencies": { "next": "^15.4.4", "react": "^19.1.0", "next-intl": "^4.3.4", "next-themes": "^0.4.6", "tailwindcss": "^4.1.11", "@tailwindcss/typography": "^0.5.16" } } プロジェクト構造 src/ ├── app/ │ ├── [locale]/ │ │ ├── layout.tsx # ルートレイアウト │ │ ├── page.tsx # ホームページ │ │ ├── about/ # Aboutページ │ │ └── example/ # サンプルページ │ ├── icon.svg # ファビコン │ └── sitemap.ts # サイトマップ生成 ├── components/ │ ├── layout/ # レイアウトコンポーネント │ │ ├── Header.tsx │ │ ├── Footer.tsx │ │ ├── PageLayout.tsx │ │ ├── ToggleTheme.tsx │ │ └── ToggleLanguage.tsx │ └── page/ # ページ固有コンポーネント ├── i18n/ │ └── routing.ts # i18n設定 └── messages/ # 翻訳ファイル ├── en.json └── ja.json 特徴的な実装 1. sitemap.ts の静的エクスポート対応 export const dynamic = 'force-static'; export const revalidate = false; export default function sitemap(): MetadataRoute.Sitemap { // 実装 } 2. 統一されたページレイアウト <PageLayout breadcrumbItems={breadcrumbItems} title={t('title')} description={t('description')} > <YourContent /> </PageLayout> 3. 環境変数による設定 # .env.example NEXT_PUBLIC_SITE_URL=http://localhost:3000 NEXT_PUBLIC_BASE_PATH= 使い方 インストール git clone [repository-url] cd nextjs-i18n-themes-ssg-template npm install 開発 npm run dev ビルド npm run build カスタマイズポイント 言語追加 : src/i18n/routing.tsとmessages/ディレクトリ ページ追加 : src/app/[locale]/配下に新規ディレクトリ テーマカスタマイズ : tailwind.config.jsとグローバルCSS メタデータ : 各ページのgenerateMetadata関数 ベストプラクティス コンポーネント命名 : PascalCaseを使用 翻訳キー : ネストした構造で整理 型安全性 : TypeScriptの型を最大限活用 パフォーマンス : 静的生成を活用したキャッシュ戦略 まとめ 国際化対応とダークモード機能を標準装備し、SEOに最適化された静的サイトを素早く構築できるよう目指しています。開発者の生産性を向上させながら、エンドユーザーに優れた体験を提供していきたいと思います。 ...

aleph-r3fを試す

aleph-r3fを試す

概要 以下の記事で、Aleph 3D viewerを紹介しました。 その後調べた結果、以下のリポジトリの存在も知りました。 https://github.com/aleph-viewer/aleph-r3f 以下のように説明されており、react-three-fiberとshadcn/uiを使用している点に違いがあるようでした。 Aleph is a 3D object viewer and annotation/measurement tool built with react-three-fiber and shadcn/ui 以下のように、アノテーション付与機能なども改良されているようでした。 今回の記事でも、菊池市デジタルアーカイブで公開されている「石淵家地球儀」の3Dデータを使用します。 https://adeac.jp/kikuchi-city/catalog/e0001 使い方 以下で閲覧いただけます。 https://iiif-aleph-r3f.vercel.app/ アノテーションタブで、アノテーションの付与を行うことができました。 アノテーションデータのインポート/エクスポートを行うことができ、JSON形式でのエクスポート結果は以下でした。 [ { "position": { "x": -0.06690392681702004, "y": 0.6256817352784154, "z": -0.7424544387001097 }, "normal": { "x": -0.11627753958254597, "y": 0.6430031011979032, "z": -0.7569851687044529 }, "cameraPosition": { "x": -0.15922188799592055, "y": 1.1767071158114843, "z": -1.4378842144444104 }, "cameraTarget": { "x": -0.0023649930953979492, "y": -0.0009789466857910165, "z": -0.011684000492095947 }, "rotation": { "isEuler": true, "_x": 0, "_y": 0, "_z": 0, "_order": "XYZ" }, "label": "大西洋", "description": "初めてのアノテーション" } ] カスタマイズ 「石淵家地球儀」を表示するにあたり、以下のようにソースコードを編集する必要がありました。 import './App.css'; import { useEffect, useRef } from 'react'; ... const [{ src }, _setLevaControls] = useControls(() => ({ src: { options: { // 'Measurement Cube': { // url: 'https://cdn.glitch.global/afd88411-0206-477e-b65f-3d1f201de994/measurement_cube.glb?v=1710500461208', // label: 'Measurement Cube', // }, 石淵家地球儀: 'https://sukilam.aws.ldas.jp/files/original/253efdf34478459954ae04f6b3befa5f3822ed59.glb', 'Flight Helmet': 'https://raw.githubusercontent.com/KhronosGroup/glTF-Sample-Assets/main/Models/FlightHelmet/glTF/FlightHelmet.gltf', ... また、Vercelへのデプロイにあたり、以下のように、tailwind.config.jsを修正する必要がありました。 ...

ZoteroのAPIをNext.jsから使う

ZoteroのAPIをNext.jsから使う

概要 ZoteroのAPIをNext.jsから使う方法を調べましたので、備忘録です。結果、以下のアプリケーションを作成しました。 https://zotero-rouge.vercel.app/ ライブラリ 以下のライブラリを使用しました。 https://github.com/tnajdek/zotero-api-client API Keyなどの取得 以下の記事を参考にしてください。 使い方 コレクション一覧 // app/api/zotero/collections/route.js import { NextResponse } from "next/server"; import api from "zotero-api-client"; import { prisma } from "@/lib/prisma"; import { decrypt } from "../../posts/encryption"; import { getSession } from "@auth0/nextjs-auth0"; async function fetchZoteroCollections( zoteroApiKey: string, zoteroUserId: string ) { const myapi = api(zoteroApiKey).library("user", zoteroUserId); const collectionsResponse = await myapi.collections().get(); return collectionsResponse.raw; } 特定のコレクション // app/api/zotero/collection/[id]/route.ts import { NextResponse } from "next/server"; import api from "zotero-api-client"; import { prisma } from "@/lib/prisma"; import { decrypt } from "@/app/api/posts/encryption"; import { getSession } from "@auth0/nextjs-auth0"; async function fetchZoteroCollection( zoteroApiKey: string, zoteroUserId: string, collectionId: string ) { const myapi = api(zoteroApiKey).library("user", zoteroUserId); const collectionResponse = await myapi.collections(collectionId).get(); return collectionResponse.raw; } 特定のコレクション内のアイテム一覧 // app/api/zotero/collection/[id]/items/route.ts import { NextResponse, NextRequest } from "next/server"; import api from "zotero-api-client"; import { prisma } from "@/lib/prisma"; import { decrypt } from "@/app/api/posts/encryption"; import { getSession } from "@auth0/nextjs-auth0"; async function fetchZoteroCollection( zoteroApiKey: string, zoteroUserId: string, collectionId: string ) { const myapi = api(zoteroApiKey).library("user", zoteroUserId); const collectionResponse = await myapi .collections(collectionId) .items() .get(); return collectionResponse.raw; 参考 アプリケーションはVercelにホスティングされており、データベースにはVercel Postgres、ORMにはPrismaを使用しました。UIはTailwind CSSで構築され、ChatGPTのデザイン提案を使用しました。また、認証にはAuth0を採用しています。 まとめ ZoteroのAPI利用にあたり、参考になりましたら幸いです。 ...