ホーム 記事一覧 ブック DH週間トピックス 検索 このサイトについて
English
Azure OpenAI Assistants APIを用いたアプリをGradioとNext.jsで作成する

Azure OpenAI Assistants APIを用いたアプリをGradioとNext.jsで作成する

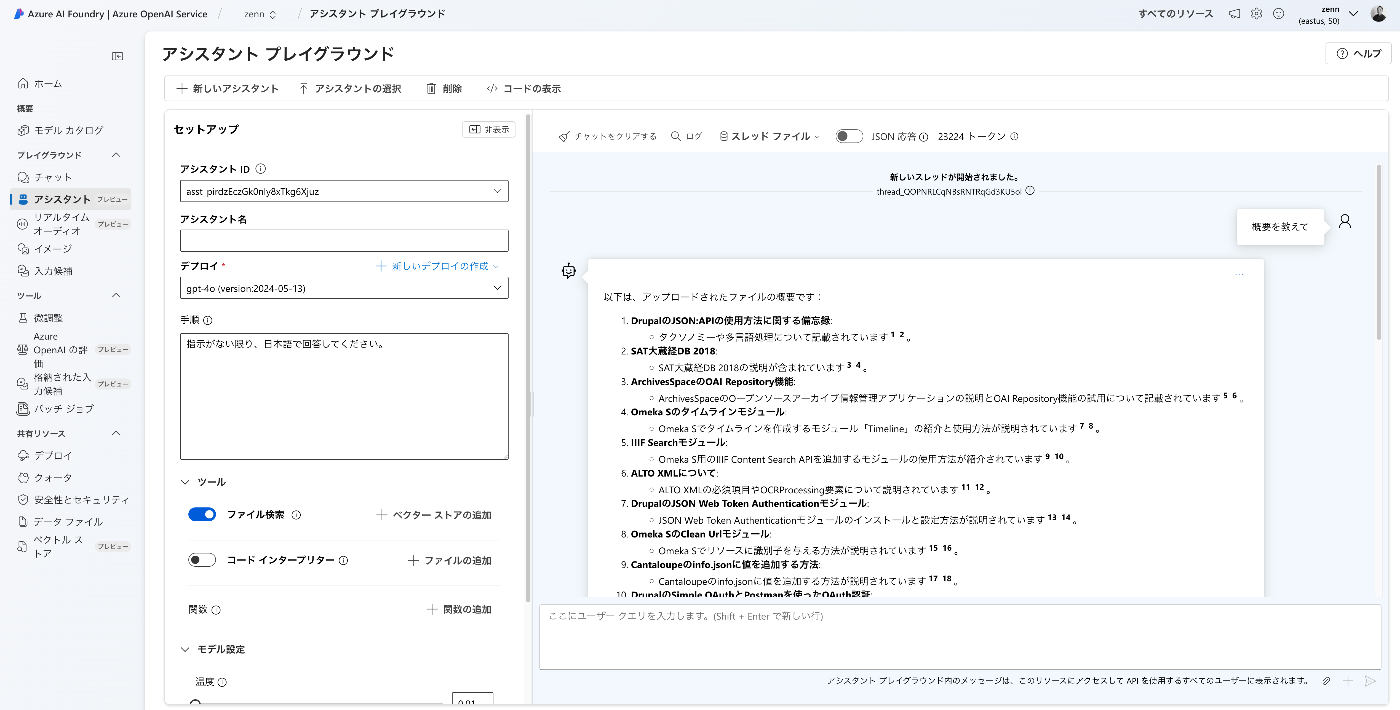
概要 Azure OpenAI Assistants APIを用いたアプリをGradioとNext.jsで作成したので、備忘録です。 対象データ Zennで公開している記事を対象にしました。まず以下により、一括ダウンロードしました。 import requests from bs4 import BeautifulSoup import os from tqdm import tqdm page = 1 urls = [] while 1: url = f"https://zenn.dev/api/articles?username=nakamura196&page={page}" response = requests.get(url) data = response.json() articles = data['articles'] if len(articles) == 0: break for article in articles: urls.append("https://zenn.dev" + article['path']) page += 1 for url in tqdm(urls): text_opath = f"data/text/{url.split('/')[-1]}.txt" if os.path.exists(text_opath): continue response = requests.get(url) soup = BeautifulSoup(response.text, "html.parser") html = soup.find(class_="znc") txt = html.get_text() os.makedirs(os.path.dirname(text_opath), exist_ok=True) with open(text_opath, "w") as f: f.write(txt) ベクトルストアへの登録 以下のようなコードにより、データファイルをアップロードします。 import os from dotenv import load_dotenv from openai import AzureOpenAI from glob import glob from tqdm import tqdm load_dotenv(override=True) client = AzureOpenAI( azure_endpoint = os.getenv("AZURE_OPENAI_ENDPOINT_ZENN"), api_key=os.getenv("AZURE_OPENAI_API_KEY_ZENN"), api_version="2024-05-01-preview" ) # ベクトルストアの作成または取得 is_create_vector_store = True vector_store_name = "Vector Store" if is_create_vector_store: vector_store = client.beta.vector_stores.create(name=vector_store_name) # Create a vector store caled "Financial Statements" vector_stores = client.beta.vector_stores.list() for vector_store in vector_stores: if vector_store.name == vector_store_name: vector_store_id = vector_store.id break # 登録済みデータファイルの取得 response = client.files.list(purpose="assistants") items = response.data filenames = [] for item in items: filename = item.filename filenames.append(filename) filenames.sort() # アップロード ## 定数設定 BATCH_SIZE = 100 vector_store_id = "vs_UELnIBkcROD3o4XKX2CcpVjo" ## ファイル一覧取得とソート files = glob("./data/text/*.txt") files.sort() ## アップロード済みファイルを確認済みと仮定 file_streams = [] for file in tqdm(files): filename = os.path.basename(file) if filename in filenames: # アップロード済みのファイルをスキップ continue ## ファイルをストリームとして開く file_streams.append(open(file, "rb")) ## バッチサイズに達したらアップロード処理 if len(file_streams) == BATCH_SIZE: try: client.beta.vector_stores.file_batches.upload_and_poll( vector_store_id=vector_store_id, files=file_streams ) except Exception as e: print(f"Error processing batch: {e}") finally: file_streams = [] # ストリームリセット ## 残りのファイルを処理 if file_streams: try: client.beta.vector_stores.file_batches.upload_and_poll( vector_store_id=vector_store_id, files=file_streams ) except Exception as e: print(f"Error processing remaining files: {e}") アシスタント プレイグラウンド 「アシスタント プレイグラウンド」を用いて、挙動を確認します。 ...

Azure OpenAIとLlamaIndexとGradioを用いたRAG型チャットの作成

Azure OpenAIとLlamaIndexとGradioを用いたRAG型チャットの作成

概要 Azure OpenAIとLlamaIndexとGradioを用いたRAG型チャットの作成を試みたので、備忘録です。 Azure OpenAI Azure OpenAIを作成します。 その後、「エンドポイント:エンドポイントを表示するには、ここをクリックします」をクリックして、エンドポイントとキーを控えておきます。 その後、Azure OpenAI Serviceに移動します。 「モデルカタログ」に移動して、「gpt-4o」と「text-embedding-3-small」をデプロイします。 結果、以下のように表示されます。 テキストのダウンロード 今回は、青空文庫で公開されている源氏物語を対象とします。 https://www.aozora.gr.jp/index_pages/person52.html 以下により、一括ダウンロードします。 import requests from bs4 import BeautifulSoup import os url = "https://genji.dl.itc.u-tokyo.ac.jp/data/info.json" response = requests.get(url).json() selections = response["selections"] for selection in selections: members = selection["members"] for member in members: aozora_urls = [] for metadata in member["metadata"]: if metadata["label"] == "aozora": aozora_urls = metadata["value"].split(", ") for aozora_url in aozora_urls: filename = aozora_url.split("/")[-1].split(".")[0] opath = f"data/text/{filename}.txt" if os.path.exists(opath): continue # pass response = requests.get(aozora_url) response.encoding = response.apparent_encoding soup = BeautifulSoup(response.text, "html.parser") div = soup.find("div", class_="main_text") txt = div.get_text().strip() os.makedirs(os.path.dirname(opath), exist_ok=True) with open(opath, "w") as f: f.write(txt) Indexの作成 環境変数を用意します。 ...

OpenAIでストレージ内のすべてのファイルを削除する

OpenAIでストレージ内のすべてのファイルを削除する

概要 OpenAIでストレージ内のすべてのファイルを削除する方法に関する備忘録です。 以下のページが参考になりました。 https://community.openai.com/t/deleting-everything-in-storage/664945 背景 以下のようなコードによってアップロードした複数ファイルを一括削除したいケースがありました。 file_paths = glob("data/txt/*.txt") file_streams = [open(path, "rb") for path in file_paths] # Use the upload and poll SDK helper to upload the files, add them to the vector store, # and poll the status of the file batch for completion. file_batch = client.beta.vector_stores.file_batches.upload_and_poll( vector_store_id=vector_store.id, files=file_streams ) # You can print the status and the file counts of the batch to see the result of this operation. print(file_batch.status) print(file_batch.file_counts) 方法 以下のコードを実行することに、一括削除を行うことができました。 ...

音声資料に関するIIIFマニフェストファイルに画像を追加する

音声資料に関するIIIFマニフェストファイルに画像を追加する

概要 以下のAudio Presentation with Accompanying Imageを試した結果の備忘録です。 https://iiif.io/api/cookbook/recipe/0014-accompanyingcanvas/ 以下はCloverで表示した例ですが、設定した画像がプレイヤーに表示されます。 https://samvera-labs.github.io/clover-iiif/docs/viewer/demo?iiif-content=https://nakamura196.github.io/ramp_data/demo/3571280/manifest.json マニフェストファイルの記述 以下に例を格納しています。 https://github.com/nakamura196/ramp_data/blob/main/docs/demo/3571280/manifest.json 具体的には、以下のように、CanvasにaccompanyingCanvasを追加する必要がありました。 { "id": "https://nakamura196.github.io/ramp_data/demo/3571280/canvas", "type": "Canvas", "duration": 156.07999999999998, "accompanyingCanvas": { "id": "https://nakamura196.github.io/ramp_data/demo/3571280/canvas/accompanying", "type": "Canvas", "height": 1024, "width": 1024, "items": [ { "id": "https://nakamura196.github.io/ramp_data/demo/3571280/canvas/accompanying/annotation/page", "type": "AnnotationPage", "items": [ { "id": "https://nakamura196.github.io/ramp_data/demo/3571280/canvas/accompanying/annotation/image", "type": "Annotation", "motivation": "painting", "body": { "id": "https://nakamura196.github.io/ramp_data/demo/3571280/3571280_summary_image.jpg", "type": "Image", "height": 1024, "width": 1024, "format": "image/jpeg" }, "target": "https://nakamura196.github.io/ramp_data/demo/3571280/canvas/accompanying/annotation/page" } ] } ] }, わかりにくいですが、iiif_prezi3を使った記述例です。create_accompanying_canvas()によってaccompanyingCanvasを作成し、それをcanvasに関連づけています。 def add_accompanying_image(self): if self.verbose: print("Adding accompanying image") print(self.image_path) if os.path.exists(self.image_path): accompanyingCanvas = self.create_accompanying_canvas() self.canvas.accompanyingCanvas = accompanyingCanvas def create_accompanying_canvas(self): im = Image.open(self.image_path) w, h = im.size accompanyingCanvas = iiif_prezi3.Canvas(id=f"{self.prefix}/canvas/accompanying") anno_page, anno = self.create_image_annotation(w, h) accompanyingCanvas.set_hwd(height=h, width=w) accompanyingCanvas.add_item(anno_page) return accompanyingCanvas def create_image_annotation(self, width, height): anno_page = iiif_prezi3.AnnotationPage(id=f"{self.prefix}/canvas/accompanying/annotation/page") anno = iiif_prezi3.Annotation( id=f"{self.prefix}/canvas/accompanying/annotation/image", motivation="painting", body=iiif_prezi3.ResourceItem( id=f"{self.prefix}/{self.item_id}_summary_image.{self.image_format}", type="Image", format="image/jpeg", height=height, width=width ), target=anno_page.id ) anno_page.add_item(anno) return anno_page, anno (参考)画像ファイルの作成 国立国会図書館 歴史的音源(れきおん)では、画像データは提供されていないため、Dall-E 3を使用してサンプル画像を作成しました。 ...

IIIF Audio/Visual: 複数のvttファイルを記述する

IIIF Audio/Visual: 複数のvttファイルを記述する

概要 IIIFを用いたAudio/Visual資料の記述について、複数のvttファイルを記述する方法に関する備忘録です。 ここでは、以下のように、日英の文字起こしテキストを記述します。 https://ramp.avalonmediasystem.org/?iiif-content=https://nakamura196.github.io/ramp_data/demo/3571280/manifest.json マニフェストファイルの記述 以下に例を格納しています。 https://github.com/nakamura196/ramp_data/blob/main/docs/demo/3571280/manifest.json 以下の記事も参考にしてください。 具体的には、以下のように複数のアノテーションとして記述することで、rampビューアによって正しく処理されました。 ... "annotations": [ { "id": "https://nakamura196.github.io/ramp_data/demo/3571280/canvas/page/2", "type": "AnnotationPage", "items": [ { "id": "https://nakamura196.github.io/ramp_data/demo/3571280/canvas/annotation/webvtt", "type": "Annotation", "label": { "ja": [ "日本語 (machine-generated)" ] }, "motivation": "supplementing", "body": { "id": "https://nakamura196.github.io/ramp_data/demo/3571280/3571280.vtt", "type": "Text", "format": "text/vtt", "label": { "ja": [ "日本語 (machine-generated)" ] } }, "target": "https://nakamura196.github.io/ramp_data/demo/3571280/canvas" }, { "id": "https://nakamura196.github.io/ramp_data/demo/3571280/canvas/annotation/webvtt/2", "type": "Annotation", "label": { "ja": [ "English (machine-generated)" ] }, "motivation": "supplementing", "body": { "id": "https://nakamura196.github.io/ramp_data/demo/3571280/3571280_en.vtt", "type": "Text", "format": "text/vtt", "label": { "ja": [ "English (machine-generated)" ] } }, "target": "https://nakamura196.github.io/ramp_data/demo/3571280/canvas" } ] } ] ... なお、Cloverでは、2つの文字起こしテキストが連続して表示されました。 ...

字幕付きの音声ファイルをIIIFビューアで表示する

字幕付きの音声ファイルをIIIFビューアで表示する

概要 字幕付きの音声ファイルをIIIFビューアで表示する機会がありましたので、備忘録です。 国立国会図書館 歴史的音源で公開されている「日本のアクセントと言葉調子(下)」を対象に、OpenAIのSpeech to textを使用しています。文字起こし結果には誤りが含まれていますので、その点はご注意ください。 以下は、Rampでの表示例です。 https://ramp.avalonmediasystem.org/?iiif-content=https://nakamura196.github.io/ramp_data/demo/3571280/manifest.json 以下は、Cloverでの表示例です。 https://samvera-labs.github.io/clover-iiif/docs/viewer/demo?iiif-content=https://nakamura196.github.io/ramp_data/demo/3571280/manifest.json 以下は、Aviaryでの表示例です。こちらについては、残念ながら今回使用したマニフェストファイルの形式では、文字起こしテキストは表示できませんでした。 https://iiif.aviaryplatform.com/player?manifest=https://nakamura196.github.io/ramp_data/demo/3571280/manifest.json 以下、これらのマニフェストファイルの作成方法について紹介します。 mp4ファイルの準備 以下の記事を参考に、mp4ファイルを取得します。 vttファイルの作成 OpenAIのAPIを使用して、文字起こしを行います。 from openai import OpenAI client = OpenAI(api_key=os.getenv("OPENAI_API_KEY")) audio_file= open(output_mp4_path, "rb") transcript = client.audio.transcriptions.create( model="whisper-1", file=audio_file, response_format="vtt") with open(output_vtt_path, "w", encoding="utf-8") as file: file.write(transcript) マニフェストファイルの作成 不完全なコードですが、以下のようなプログラムによって、マニフェストファイルを作成します。 from iiif_prezi3 import Manifest, AnnotationPage, Annotation, ResourceItem, config from moviepy.editor import VideoFileClip def get_video_duration(filename): with VideoFileClip(filename) as video: return video.duration config.configs['helpers.auto_fields.AutoLang'].auto_lang = "ja" duration=get_video_duration(mp4_path) manifest = Manifest(id=f"{prefix}/manifest.json", label=label) canvas = manifest.make_canvas(id=f"{prefix}/canvas", duration=duration) anno_body = ResourceItem(id=mp4_url, type="Sound", format="audio/mp4", duration=duration) anno_page = AnnotationPage(id=f"{prefix}/canvas/page") anno = Annotation(id=f"{prefix}/canvas/page/annotation", motivation="painting", body=anno_body, target=canvas.id) anno_page.add_item(anno) canvas.add_item(anno_page) # VTT URLを追加 vtt_body = ResourceItem(id=vtt_url, type="Text", format="text/vtt") vtt_anno = Annotation( id=f"{prefix}/canvas/annotation/webvtt", motivation="supplementing", body=vtt_body, target=canvas.id, label = "WebVTT Transcript (machine-generated)" ) vtt_anno_page = AnnotationPage(id=f"{prefix}/canvas/page/2") vtt_anno_page.add_item(vtt_anno) canvas.annotations = [vtt_anno_page] with open(output_path, "w") as f: f.write(manifest.json(indent=2)) ライブラリとして、iiif-prezi3を使用しています。以下の記事も参考にしてください。 ...