ホーム 記事一覧 ブック DH週間トピックス 検索 このサイトについて
English
Universal Viewer 4.xの「Unknown content type」エラーとローカルホスティングによる対処

Universal Viewer 4.xの「Unknown content type」エラーとローカルホスティングによる対処

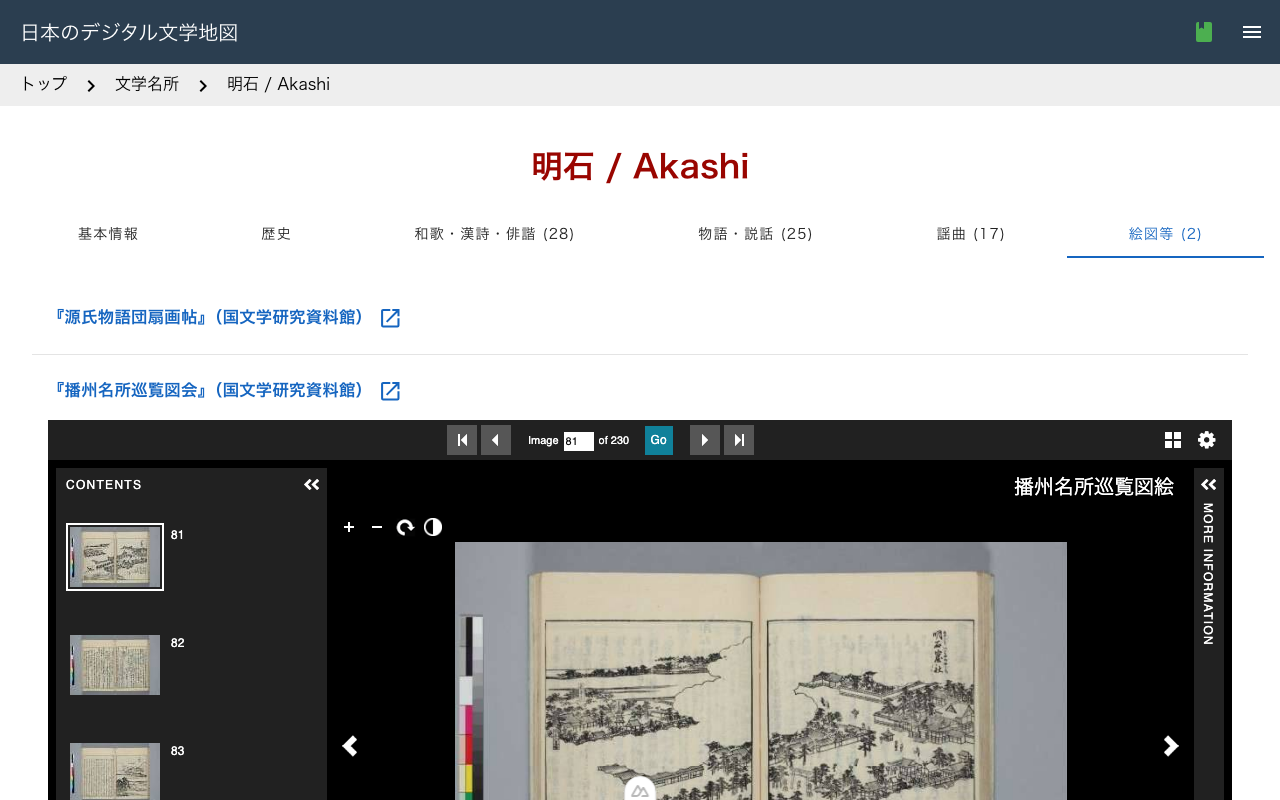
発生した問題 Nuxt 3プロジェクトでIIIFマニフェストの画像を表示するために、Universal Viewer(UV)をiframeで埋め込んでいました。従来は外部の https://universalviewer.io/uv.html を参照していましたが、ある時点からビューアが表示されなくなりました。 ブラウザのコンソールには以下のエラーが出力されます。 SES Removing unpermitted intrinsics UV.js:2 Unknown content type 原因の調査 universalviewer.ioのリダイレクト まず確認したところ、universalviewer.io は universalviewer.dev にリダイレクトされるようになっていました。 <meta http-equiv="refresh" content="0; url=https://universalviewer.dev/uv.html"> リダイレクト先の universalviewer.dev/uv.html でも同じ「Unknown content type」エラーが発生します。公式サイト自体で問題が再現する状態でした。 埋め込み用HTMLの初期化方式の違い UV 4.xには2つのHTMLファイルが同梱されています。 uv.html:iframe埋め込み用。IIIFURLAdapter(true)(embeddedモード)で初期化 index.html:デモページ。IIIFURLAdapter()(通常モード)で初期化し、iiifManifestIdを明示的に渡す uv.htmlの埋め込みモードでは、IIIF Presentation API 2.0のマニフェストを読み込んだ際にコンテンツタイプの判定に失敗し、「Unknown content type」が発生するようです。 一方、デモページ(index.html)と同じ初期化方式を使うと正常に動作します。Netlifyにデプロイされた uv-v4.netlify.app で確認できました。 https://uv-v4.netlify.app/#?manifest=https://kokusho.nijl.ac.jp/biblio/200017711/manifest&cv=80 URLパラメータの形式 もうひとつの違いは、URLパラメータの渡し方です。 uv.html(埋め込み用):?manifest=...#?cv=...(クエリパラメータ+ハッシュ) index.html(デモ用):#?manifest=...&cv=...(ハッシュパラメータのみ) 動作する方式はハッシュパラメータのみで完結する形式でした。 対処方法 1. UV 4.2.1をローカルに配置 npmパッケージからUV 4.2.1の必要ファイルを public/uv/ に配置しました。 npm pack universalviewer@4.2.1 tar xzf universalviewer-4.2.1.tgz 最終的に必要なファイルは以下の4点です。 public/uv/ ├── umd/ # UV本体 + チャンクJS(約190ファイル) ├── uv.css # スタイルシート ├── uv.html # 埋め込みページ(カスタム版) └── uv-iiif-config.json # IIIF設定 cjs/、esm/、デモ用のindex.htmlやコレクションJSONは不要です。 ...

schema.org 構造化データで Google Search Console のインデックス問題を改善する

schema.org 構造化データで Google Search Console のインデックス問題を改善する

はじめに Digital Literary Map of Japan(日本のデジタル文学地図)の開発において、Google Search Console で「クロール済み - インデックス未登録」のページが391件報告されていました。Google がページをクロールしているにもかかわらず、インデックスに登録しないのはなぜでしょうか。 その対策の一つとして、schema.org 構造化データの導入を行いました。本記事では、構造化データとは何か、どのように実装したか、そしてどのような効果が期待できるかを解説します。 構造化データとは Web ページには通常、HTML で書かれたコンテンツがあります。人間はそれを見て「これは場所の情報だ」「これは住所だ」と理解できますが、検索エンジンのクローラーにとっては、すべてが単なるテキストの羅列にすぎません。 構造化データは、ページのコンテンツが何を意味するのかを、機械可読な形式で検索エンジンに伝える仕組みです。schema.org という標準的な語彙を用い、JSON-LD(JSON for Linking Data)形式で HTML に埋め込みます。 たとえば、「明石」という文学名所のページを考えてみましょう。HTML だけでは、Google は「明石」が場所なのか、人名なのか、作品名なのかを確実に判断できません。構造化データを追加すると、「これは日本の兵庫県にある緯度34.64、経度134.99の場所で、歌枕として知られている」という情報を明示的に伝えられます。 JSON-LD の基本構造 構造化データは HTML の <script type="application/ld+json"> タグ内に記述します。 <script type="application/ld+json"> { "@context": "https://schema.org", "@type": "Place", "name": "明石", "alternateName": "Akashi", "geo": { "@type": "GeoCoordinates", "latitude": 34.649312, "longitude": 134.992637 } } </script> 各プロパティの意味は以下のとおりです。 @context : 語彙の定義元です。常に https://schema.org を指定します @type : データの種類です。Place、WebSite、Dataset など、schema.org で定義された型を指定します その他のプロパティ : 型に応じた具体的な情報を記述します 実際に導入した構造化データの種類 1. Place(場所)- 文学名所の詳細ページ 文学名所の各ページ(約300件 × 日英2言語)に、Place 型の構造化データを追加しました。 ...

IIIF Georeference Viewer:地理参照コンテンツを地図上で可視化するツール

IIIF Georeference Viewer:地理参照コンテンツを地図上で可視化するツール

はじめに デジタルアーカイブや人文学研究の分野では、歴史地図や古写真などの資料を地理的な文脈の中で閲覧したいというニーズが増えています。IIIF(International Image Interoperability Framework)は画像の相互運用性を高めるための国際標準ですが、近年ではIIIF Georeference Extensionによって、IIIF画像に地理座標情報を付与できるようになりました。 今回紹介する IIIF Georeference Viewer(iiif_geo)は、こうした地理参照付きIIIFコンテンツを対話的な地図上で可視化するためのWebアプリケーションです。 IIIF Georeference Extensionとは IIIF Georeference Extensionは、IIIFマニフェストやキャンバスに地理座標情報を埋め込むための仕様です。これにより、歴史地図などのIIIF画像を現代の地図上に正確に重ね合わせることが可能になります。 従来、歴史地図のジオリファレンスにはGIS専用ソフトウェアが必要でしたが、この拡張仕様を活用することで、Webブラウザ上で手軽に地理参照コンテンツを閲覧・比較できるようになります。 IIIF Georeference Viewerの機能 動的なURL読み込み クエリパラメータを使って、任意のIIIFマニフェストやGeoJSONファイルをURLから直接読み込むことができます。例えば以下のようなURLでデモを確認できます。 デモサイト: https://nakamura196.github.io/iiif_geo/ 対応するデータ形式 IIIF Manifest — IIIF Presentation API 3.0のマニフェスト IIIF Canvas — 個別のキャンバスオブジェクト Linked Places Format — 歴史的な地名データの標準フォーマット GeoJSON — 広く使われている地理データフォーマット インタラクティブな地図表示 LeafletおよびMapLibre GLを使用した地図表示では、マーカーのクラスタリングによって大量のポイントデータも効率的に表示できます。ベースマップの切り替えも可能で、航空写真や地理院タイルなど複数の背景地図を選択できます。 分割ペインレイアウト 画面を分割して、左側に地図、右側にIIIF画像のディープズーム表示(OpenSeadragon)を配置するレイアウトに対応しています。歴史地図と現代地図を並べて比較する際に便利です。 ディープズーム OpenSeadragonによる高解像度画像のディープズームに対応しています。巨大な歴史地図でも、細部まで拡大して閲覧することが可能です。 多言語対応 日本語と英語のバイリンガルUIを備えており、国際的な利用にも対応しています。 技術スタック 本ツールは以下の技術で構成されています。 技術 用途 Nuxt 4 / Vue 3 アプリケーションフレームワーク Leaflet 2Dタイル地図表示 MapLibre GL ベクタータイル地図表示 OpenSeadragon IIIF画像のディープズーム GitHub Pages ホスティング Nuxt 4の静的サイト生成(SSG)機能を利用してGitHub Pagesにデプロイしているため、サーバーサイドの運用コストが不要です。 ...

Nuxt Content + trailingSlash設定で静的ファイルへのリンクが404になる問題と解決策

Nuxt Content + trailingSlash設定で静的ファイルへのリンクが404になる問題と解決策

概要 Nuxt 3/4 + Nuxt Content の環境で trailingSlash: "append" を設定している場合、コンテンツ内のPDFや画像などの静的ファイルへのリンクが404エラーになることがあります。 発生条件 以下の条件がすべて揃った場合に発生します: Nuxt 3/4 + Nuxt Content を使用 nuxt.config.ts で trailingSlash: "append" を設定 Markdownやコンテンツ内に静的ファイル(PDF、画像など)へのリンクがある 問題の詳細 症状 コンテンツ内で以下のようなリンクを記述した場合: <a href="/uploads/document.pdf">資料をダウンロード</a> 生成されるHTMLでは、リンクが以下のように変換されてしまいます: /uploads/document.pdf/ 末尾に / が追加されるため、静的ファイルにアクセスできず404エラーになります。 原因 Nuxt Content では、Markdown内の <a> タグは ProseA コンポーネントに変換されます。 デフォルトの ProseA コンポーネント(@nuxtjs/mdc パッケージ内)は以下のような実装になっています: <template> <NuxtLink :href="props.href" :target="props.target"> <slot /> </NuxtLink> </template> NuxtLink を使用しているため、nuxt.config.ts の trailingSlash 設定の影響を受けます。 // nuxt.config.ts export default defineNuxtConfig({ experimental: { defaults: { nuxtLink: { trailingSlash: "append", // この設定が原因 }, }, }, }); 解決策 カスタムの ProseA コンポーネントを作成し、静的ファイルへのリンクの場合は通常の <a> タグを使用するようにします。 ...

Nuxt 3 プロジェクトのパッケージ更新まとめ

Nuxt 3 プロジェクトのパッケージ更新まとめ

概要 Nuxt 3.2.3 から 3.20.2 へのメジャーアップデートを含む、依存パッケージの大規模更新を実施しました。 主要なパッケージ更新 パッケージ 更新前 更新後 nuxt 3.2.3 3.20.2 @nuxt/content 2.5.2 3.11.0 @nuxtjs/i18n 8.0.0-beta.10 10.2.1 vuetify 3.1.8 3.7.6 sass 1.58.3 1.83.4 @mdi/js 7.1.96 7.4.47 新規追加パッケージ better-sqlite3: ^12.5.0 - @nuxt/content v3 の依存 vue-i18n: ^11.0.0 - i18n モジュールの依存 対応が必要だった変更点 1. @nuxt/content v3 への移行 content.config.ts の新規作成が必要になりました。 // content.config.ts import { defineContentConfig, defineCollection } from '@nuxt/content' export default defineContentConfig({ collections: { content: defineCollection({ type: 'page', source: '**/*.md' }) } }) 2. @nuxtjs/i18n v10 への移行 nuxt.config.ts の変更点 // Before i18n: { locales: [ { code: "ja", iso: "ja_JP", file: "ja.js" }, { code: "en", iso: "en-US", file: "en.js" }, ], langDir: "locales/", vueI18n: { fallbackLocale: lang, }, } // After i18n: { locales: [ { code: "ja", language: "ja-JP", file: "ja.js" }, // iso → language { code: "en", language: "en-US", file: "en.js" }, ], bundle: { optimizeTranslationDirective: false, runtimeOnly: true, }, langDir: "locales", // 末尾スラッシュ削除 vueI18n: "./i18n.config.ts", // 外部ファイル化 } i18n.config.ts の新規作成 export default defineI18nConfig(() => ({ legacy: false, fallbackLocale: "ja", })); localesフォルダの移動 locales/ → i18n/locales/ ...

Nuxt 4 SSGでローカルJSONファイルを正しく読み込む方法

Nuxt 4 SSGでローカルJSONファイルを正しく読み込む方法

はじめに Nuxt 4でStatic Site Generation (SSG) を行う際、ローカルのJSONファイルからデータを読み込んで静的ページを生成したいケースがあります。しかし、Next.jsのgetStaticPropsのようにシンプルにはいかず、いくつかのハマりポイントがあります。 本記事では、試行錯誤の末に見つけた正しいアプローチを紹介します。 問題:なぜ単純なfsの読み込みでは動かないのか 最初に試したアプローチ(失敗) // ❌ これは動かない const fetchLocalData = async (filePath: string) => { if (import.meta.server) { const fs = await import('fs'); const path = await import('path'); const fullPath = path.resolve(process.cwd(), 'public/data', filePath); const data = fs.readFileSync(fullPath, 'utf-8'); return JSON.parse(data); } // クライアントサイド const response = await fetch(`/data/${filePath}`); return await response.json(); }; このアプローチには以下の問題があります: process.cwd()がビルド環境で異なる: ローカル開発とVercel等のビルド環境では作業ディレクトリが異なる Nitroのプリレンダリング時にファイルが見つからない : SSG時、Nitroは独自のコンテキストで動作する useAsyncDataなしでは、クライアントサイドでも実行される : SSGの意味がなくなる 解決策:Nitro Storage API + Server APIルート + useAsyncData アーキテクチャ [SSGビルド時] Page Component ↓ useAsyncData Server API Route (/api/local-data/[...path]) ↓ useStorage (Nitro Storage API) public/data/*.json [生成されたHTML] _payload.json にデータが埋め込まれる → クライアントサイドでのJSON読み込み不要 Step 1: nuxt.config.tsでserverAssetsを設定 // nuxt.config.ts export default defineNuxtConfig({ nitro: { prerender: { crawlLinks: true, failOnError: false, }, // Nitro Storage APIでpublic/dataをサーバーアセットとしてマウント serverAssets: [{ baseName: 'data', dir: './public/data' }], }, routeRules: { '/**': { prerender: true }, }, }); Step 2: Server APIルートを作成(Nitro Storage + fsフォールバック) // server/api/local-data/[...path].ts import { readFileSync, existsSync } from 'fs'; import { resolve } from 'path'; export default defineEventHandler(async (event) => { const pathParam = getRouterParam(event, 'path'); if (!pathParam) { throw createError({ statusCode: 400, message: 'Path is required' }); } const filePath = Array.isArray(pathParam) ? pathParam.join('/') : pathParam; // セキュリティ: パストラバーサル防止 if (filePath.includes('..')) { throw createError({ statusCode: 400, message: 'Invalid path' }); } // Nitro Storage APIを使用 // nuxt.config.tsのserverAssetsで定義した'data'ストレージにアクセス const storage = useStorage('assets:data'); // ファイルパスをストレージキーに変換(/を:に置換) const storageKey = filePath.replace(/\//g, ':'); // Storage APIで取得を試みる if (await storage.hasItem(storageKey)) { const data = await storage.getItem(storageKey); return data; } // フォールバック: 開発環境向けにfsで直接読み込み const fsPath = resolve(process.cwd(), 'public/data', filePath); if (existsSync(fsPath)) { const data = readFileSync(fsPath, 'utf-8'); return JSON.parse(data); } throw createError({ statusCode: 404, message: `File not found: ${filePath}` }); }); Nitro Storage APIを使うメリット: ...

Nuxt i18nのブラウザ言語検出を無効化する方法

Nuxt i18nのブラウザ言語検出を無効化する方法

概要 (ChatGPTによる作成) Nuxt i18nモジュールでは、ユーザーのブラウザ言語を検出して、適切な言語のページにリダイレクトする機能があります。しかし、特定の状況ではこの機能を無効化したい場合もあります。この記事では、detectBrowserLanguage: falseを使用してブラウザ言語検出を完全に無効化する方法について解説します。 https://v8.i18n.nuxtjs.org/guide/browser-language-detection 設定方法 ブラウザの言語検出機能を無効にするには、nuxt.config.jsファイルでdetectBrowserLanguageオプションをfalseに設定します。 export default defineNuxtConfig({ // その他の設定 i18n: { // 言語検出を無効化 detectBrowserLanguage: false }, // その他の設定 }) これが役立つケース 特定のURLで直接アクセスさせたい場合 : 特定のコンテンツをユーザーが直接訪れることを意図している場合、リダイレクトが邪魔になることがあります。 クロールの最適化 : 検索エンジンのクローラーが特定の言語ページに直接アクセスできるようにしたい場合。 一貫性のあるユーザーエクスペリエンス : 例えば、リンクされた言語のページ同士を行き来するユーザーに対して、予想外のリダイレクトを避けたい場合。 まとめ detectBrowserLanguage: falseを利用することで、ユーザー体験やSEO最適化のために、リダイレクトに頼らずにサイトのアクセスを制御できます。適切な状況でこの設定を利用することで、サイトのユーザビリティを向上させることができます。 ブラウザの言語設定に影響されずに、指定した言語ページをユーザーに見てもらいたいときに、この設定を試してみてください。

Nuxt Content: Cannot find name 'queryContent'.への対応

Nuxt Content: Cannot find name 'queryContent'.への対応

概要 Nuxt Contentにおいて、「Cannot find name ‘queryContent’.」というエラーが発生しましたので、対処方法に関する備忘録です。 原因 2025/1/16にNuxt Content v3がリリースされたようです。 https://content.nuxt.com/blog/v3 これにより、queryContentはqueryCollectionなどに変更されたようです。 対処方法 以下に記載があるように、content.config.tsを作成した上で、queryCollectionなどを使用するように変更する必要があるようです。 https://content.nuxt.com/blog/v3#️-content-collections 上記の対応により、エラーを解消できました。 まとめ Nuxt Content v2からv3への移行にあたり、参考になりましたら幸いです。

@sidebase/nuxt-authのローカル認証を試す

@sidebase/nuxt-authのローカル認証を試す

概要 @sidebase/nuxt-authのローカル認証を試す機会がありましたので、備忘録です。 背景 以下の記事で、@sidebase/nuxt-authを使って、Drupalの認証を行う方法を紹介しました。 上記の記事では、Nuxt3のSSRを利用して、@sidebase/nuxt-authのauthjsプロバイダを使用していました。プロバイダの説明は以下です。 authjs: for non-static apps that want to use Auth.js / NextAuth.js to offer the reliability & convenience of a 23k star library to the Nuxt 3 ecosystem with a native developer experience (DX) local: for static pages that rely on an external backend with a credential flow for authentication. The Local Provider also supports refresh tokens since v0.9.0. Read more here. (機械翻訳)authjs: 非静的なアプリ向けで、Auth.js / NextAuth.js を使用し、23,000以上のスターを持つ信頼性と利便性をNuxt 3エコシステムに提供します。開発者にネイティブな開発体験 (DX) を提供します。 local: 外部バックエンドを使用し、認証のために資格情報フローを利用する静的ページ向けです。このローカルプロバイダーは、バージョン0.9.0以降、リフレッシュトークンもサポートしています。詳しくはこちらをご覧ください。 ...

Nuxt3と@sidebase/nuxt-authを使って、Drupalの認証を行う

Nuxt3と@sidebase/nuxt-authを使って、Drupalの認証を行う

概要 Nuxt3と@sidebase/nuxt-authを使って、Drupalの認証を行う方法です。 背景 以下の記事で、GakuNin RDMの認証を行う方法を紹介しました。 また、以下の記事で、Next.jsからDrupalのOAuthを利用する方法を紹介しました。 これらを参考にして、Nuxt3からDrupalのOAuthを利用します。 方法 ソースコードは以下のリポジトリでご確認いただけます。 https://github.com/nakamura196/nuxt-rdm 具体的には、以下です。 https://github.com/nakamura196/nuxt-rdm/blob/main/server/api/auth/[…].ts { id: "drupal", name: "Drupal", type: "oauth", clientId: useRuntimeConfig().drupalClientId, clientSecret: useRuntimeConfig().drupalClientSecret, authorization: { url: process.env.DRUPAL_AUTH_URL, params: { scope: process.env.DRUPAL_SCOPE, response_type: "code", redirect_uri: `${ useRuntimeConfig().nextAuthUrl }/api/auth/callback/drupal`, }, }, token: { async request(context) { const body = new URLSearchParams({ client_id: useRuntimeConfig().drupalClientId, client_secret: useRuntimeConfig().drupalClientSecret, code: context.params.code || "", grant_type: "authorization_code", redirect_uri: `${ useRuntimeConfig().nextAuthUrl }/api/auth/callback/drupal`, }); const res = await fetch(process.env.DRUPAL_TOKEN_URL || "", { method: "POST", headers: { "Content-Type": "application/x-www-form-urlencoded", }, body, }); const json = await res.json(); // Parse the response body once if (!res.ok) { throw new Error(`Token request failed: ${res.statusText}`); } return { tokens: json }; }, }, profile(profile) { return { id: profile.sub, // "sub" をユーザーの一意のIDとして利用 name: profile.name || profile.preferred_username || "Unknown User", // 名前の優先順位を設定 email: profile.email || "No Email Provided", // メールがない場合のフォールバック image: profile.profile || null, // プロファイルURLを画像として使用(必要に応じて調整) }; }, }, まとめ 間違っている点もあるかもしれませんが、参考になりましたら幸いです。 ...

Nuxt3と@sidebase/nuxt-authを使って、GakuNin RDMの認証を行う

Nuxt3と@sidebase/nuxt-authを使って、GakuNin RDMの認証を行う

概要 Nuxt3と@sidebase/nuxt-authを使って、GakuNin RDMの認証を行う方法です。 デモアプリ https://nuxt-rdm.vercel.app/ リポジトリ https://github.com/nakamura196/nuxt-rdm 参考 当初、以下のwarningが表示されていました。 AUTH_NO_ORIGIN: No origin - this is an error in production, see https://sidebase.io/nuxt-auth/resources/errors. You can ignore this during development そのため、以下を参考に、 https://auth.sidebase.io/resources/error-reference 以下のように設定したところ、エラーが発生しました。 ... auth: { baseURL: process.env.NEXTAUTH_URL, }, ... これについて、以下のように、rc版のライブラリを使用していることが原因でした。 ... "@sidebase/nuxt-auth": "^0.10.0-rc.2", ... 以下のように、バージョンを変更することで、エラーを回避できました。 ... "@sidebase/nuxt-auth": "^0.9.4" ... 同様のことでお困りの方の参考になりましたら幸いです。 まとめ 改善すべき点などがあるかと思いますが、参考になりましたら幸いです。

Nuxtで@elastic/search-uiを使ったサンプルリポジトリを作成しました。

Nuxtで@elastic/search-uiを使ったサンプルリポジトリを作成しました。

概要 Nuxtで@elastic/search-uiを使ったサンプルリポジトリを作成しました。 https://github.com/nakamura196/nuxt-search-ui-demo 以下からお試しいただけます。 https://nakamura196.github.io/nuxt-search-ui-demo 背景 @elastic/search-uiは以下のように説明されています。 https://www.elastic.co/docs/current/search-ui/overview A JavaScript library for the fast development of modern, engaging search experiences with Elastic. Get up and running quickly without re-inventing the wheel. (機械翻訳)Elasticを使用して、モダンで魅力的な検索エクスペリエンスを迅速に開発するためのJavaScriptライブラリです。車輪を再発明することなく、すぐに使い始めることができます。 以下でVue.jsを使ったサンプルリポジトリが公開されています。 https://github.com/elastic/vue-search-ui-demo 今回は上記のリポジトリを参考に、Nuxtを使ったサンプルリポジトリを作成しました。 メモ 初期検索 以下のように指定することで、初期読み込み時の検索を実行することができました。 https://github.com/nakamura196/nuxt-search-ui-demo/blob/main/searchConfig.ts#L49 alwaysSearchOnInitialLoad: true, 公式ドキュメントの以下に記載がありました。 https://www.elastic.co/docs/current/search-ui/api/react/search-provider 参考: カスタムconnectorの作成 以下を参考にカスタムconnectorを作成することで、Elasticsearch以外のAPIでも使用することができました。 https://www.elastic.co/docs/current/search-ui/guides/building-a-custom-connector 具体的には以下のような手順を参考に、Drupalで作成したJSON:API Search APIと組み合わせて使用することも可能でした。 https://next-drupal.org/guides/search-api まとめ 検索機能を持つアプリケーションの作成にあたり、参考になりましたら幸いです。

nuxt3-leafletで、指定したマーカーを前面に表示する

nuxt3-leafletで、指定したマーカーを前面に表示する

概要 nuxt3-leafletで、指定したマーカーを前面に表示する方法に関する備忘録です。 方法 以下のように、LMarkerにz-index-offset属性を用いることで、指定したマーカーを前面に表示することができました。 <template v-for="marker in markers"> <LMarker @click="selectMarker(marker)" :lat-lng="[marker.lat, marker.lng]" :z-index-offset="selectedSpotId === marker.id ? 1000 : 0" > <LTooltip> {{ marker.title }} </LTooltip> <LIcon :iconUrl="marker.icon" :iconSize="[25, 41]" :iconAnchor="[12, 41]" :popupAnchor="[1, -34]" :tooltipAnchor="[16, -28]" shadowUrl="https://esm.sh/leaflet@1.9.2/dist/images/marker-shadow.png" :shadowSize="[41, 41]" :shadowAnchor="[12, 41]" ></LIcon> </LMarker> </template> まとめ nuxt3-leafletの利用にあたり、参考になりましたら幸いです。

Nuxt3でサイトマップを作成する

Nuxt3でサイトマップを作成する

概要 Nuxt3でサイトマップを作成する方法がいくつかありましたので、備忘録です。 [1] @nuxtjs/sitemap ドキュメント https://sitemap.nuxtjs.org/ 参考記事 https://zenn.dev/kumao/articles/3fe10078a7e9d2 インストール npm install -D @nuxtjs/sitemap リポジトリ https://github.com/nuxt-community/sitemap-module [2] sitemap 参考記事 https://zenn.dev/kakkokari_gtyih/articles/db1aed4fed6054 インストール npm install -D sitemap リポジトリ https://github.com/ekalinin/sitemap.js [3] nuxt-simple-sitemap こちらは、以下の記載がありましたので、[1]の@nuxtjs/sitemapを使うのがよさそうです。 Package has been migrated to @nuxtjs/sitemap. https://www.npmjs.com/package/nuxt-simple-sitemap ドキュメント https://nuxt.com/modules/simple-sitemap 参考記事 https://shinobiworks.com/blog/615/ インストール npm install --save-dev nuxt-simple-sitemap リポジトリ https://github.com/nuxt-modules/sitemap まとめ 他にもあるかもしれませんが、参考になりましたら幸いです。

sidebase/nuxt-authをproduction環境で使う際のTips

sidebase/nuxt-authをproduction環境で使う際のTips

概要 sidebase/nuxt-authをproduction環境で使う際の注意点に関する備忘録です。 sidebase/nuxt-authは、Nuxt 3 アプリケーション向けの認証モジュールです。 https://github.com/sidebase/nuxt-auth 問題 VercelやAWS Amplifyにデプロイした際、以下のメッセージとともに、サーバエラーが発生しました。 AUTH_NO_ORIGIN: No `origin` - this is an error in production, see https://sidebase.io/nuxt-auth/resources/errors. You can ignore this during development 対策 以下が参考になりました。 https://github.com/sidebase/nuxt-auth/issues/613 以下のようにbaseURLを与えることで、上記のエラーを解消できました。 auth: { baseURL: process.env.AUTH_ORIGIN, }, 改めて確認すると、以下に記載がありましたが、なかなかたどり着くことができませんでした。 https://sidebase.io/nuxt-auth/configuration/nuxt-config#provider-authjs-baseurl まとめ 同様の事象でお困りの方の参考になりましたら幸いです。

Nuxt3 x Vuetify x Cesium

Nuxt3 x Vuetify x Cesium

概要 Nuxt3とVuetifyとCesiumを使用したサンプルリポジトリを作成しました。 ソースコード vue-cesiumを使用しています。 https://github.com/zouyaoji/vue-cesium GitHubリポジトリは以下です。 https://github.com/nakamura196/nuxt3-vuetify-cesium デモサイト https://nakamura196.github.io/nuxt3-vuetify-cesium/ まとめ 参考になりましたら幸いです。

Nuxt 3とDecap CMSを試す

Nuxt 3とDecap CMSを試す

概要 Nuxt 3とDecap CMSを試してみましたので、その備忘録です。 https://decapcms.org/ Nuxt3プロジェクトの用意 既存のサイトにDecap CMSを追加する以下を参考にしました。 https://decapcms.org/docs/add-to-your-site/ まず、nuxt/contentモジュールを含む、Nuxt3のプロジェクトを用意します。 ソースコードの例はこちらです。 https://github.com/nakamura196/nuxt3-decapcms 以下の2つのファイルを作成しました。 # when using the default proxy server port local_backend: true # This line should *not* be indented publish_mode: editorial_workflow backend: name: git-gateway branch: main # Branch to update (optional; defaults to master) media_folder: public/img public_folder: /img collections: - name: 'blog' label: 'Blog' folder: 'content/blog' format: 'frontmatter' create: true slug: '{{year}}-{{month}}-{{day}}-{{slug}}' fields: - { label: 'Title', name: 'title', widget: 'string' } - { label: 'Publish Date', name: 'date', widget: 'datetime' } - { label: 'Description', name: 'description', widget: 'string' } - { label: 'Body', name: 'body', widget: 'markdown' } <!DOCTYPE html> <html> <head> <meta charset="utf-8" /> <meta name="viewport" content="width=device-width, initial-scale=1.0" /> <title>Content Manager</title> <!-- Include the script that enables Netlify Identity on this page. --> <script src="https://identity.netlify.com/v1/netlify-identity-widget.js"></script> </head> <body> <!-- Include the script that builds the page and powers Decap CMS --> <script src="https://unpkg.com/decap-cms@^3.0.0/dist/decap-cms.js"></script> </body> </html> そして、GitHubにpushしました。 ...

Nuxt 3 x Composition APIでLeaflet Marker Clusterを試す

Nuxt 3 x Composition APIでLeaflet Marker Clusterを試す

概要 以下の記事で、Nuxt 3でLeaflet Marker Clusterを試す方法を紹介しました。今回は、Composition APIを使った書き方に更新したので、その備忘録です。 インストール 以下をインストールします。 npm i leaflet leaflet.markercluster @vue-leaflet/vue-leaflet npm i -D @types/leaflet @types/leaflet.markercluster ソースコード 以下を参考にしてください。 https://github.com/nakamura196/nuxt3-demo/blob/main/components/map/MarkerCluster.vue まとめ TypeScriptに一部対応できていない点がありますが、参考になりましたら幸いです。

Nuxt3 x Vuetify x Cytoscape

Nuxt3 x Vuetify x Cytoscape

概要 Nuxt3とVuetifyを使用したサンプルリポジトリに、Cytoscapeの動作デモを追加しました。 https://github.com/nakamura196/nuxt3-demo 以下のページで動作確認いただけます。 https://nakamura196.github.io/nuxt3-demo/ インストール 以下を実行しました。 npm i cytoscape npm i @types/cytoscape ソースコード <template> <div id="view"> <v-btn class="ma-4" color="primary" v-on:click="addNode">push</v-btn> <div id="cy"></div> </div> </template> <script setup lang="ts"> import cytoscape from "cytoscape"; let cy: any = null; // = ref(null); //reactive({}); //: any const count: number = 0; // = ref(0); //reactive(0); const addNode = () => { cy.add([ { group: "nodes", data: { id: "node" + count }, position: { x: 300, y: 200 }, }, { group: "edges", data: { id: "edge" + count, source: "node" + count, target: "cat" }, }, ]); }; onMounted(() => { cy = cytoscape({ container: document.getElementById("cy"), boxSelectionEnabled: false, autounselectify: true, style: cytoscape .stylesheet() .selector("node") .css({ height: 80, width: 80, "background-fit": "cover", "border-color": "#000", "border-width": 3, "border-opacity": 0.5, content: "data(name)", "text-valign": "center", }) .selector("edge") .css({ width: 6, "target-arrow-shape": "triangle", "line-color": "#ffaaaa", "target-arrow-color": "#ffaaaa", "curve-style": "bezier", }), elements: { nodes: [ { data: { id: "cat" } }, { data: { id: "bird" } }, { data: { id: "ladybug" } }, { data: { id: "aphid" } }, { data: { id: "rose" } }, { data: { id: "grasshopper" } }, { data: { id: "plant" } }, { data: { id: "wheat" } }, ], edges: [ { data: { source: "cat", target: "bird" } }, { data: { source: "bird", target: "ladybug" } }, { data: { source: "bird", target: "grasshopper" } }, { data: { source: "grasshopper", target: "plant" } }, { data: { source: "grasshopper", target: "wheat" } }, { data: { source: "ladybug", target: "aphid" } }, { data: { source: "aphid", target: "rose" } }, ], }, layout: { name: "breadthfirst", directed: true, padding: 10, }, }); }); </script> <style scoped> #cy { width: 100%; height: 80%; position: absolute; background-color: lightcyan; } </style> まとめ 参考になりましたら幸いです。 ...

Nuxt3でXMLをフォーマットしてシンタックスハイライト表示する

Nuxt3でXMLをフォーマットしてシンタックスハイライト表示する

概要 以下の画像にあるように、Nuxt3を使ってXML形式のテキストデータを表示する機会がありましたので、その備忘録です。 インストール 以下の2つのライブラリを使用しました。 npm i xml-formatter npm i highlight.js 使い方 Nuxt3のコンポーネントとして、以下のようなファイルを作成しました。xml-formatterでXML形式の文字列をフォーマットし、さらにhighlight.jsを使ってシンタックスハイライトを行っています。 <script setup lang="ts"> import hljs from "highlight.js"; import "highlight.js/styles/xcode.css"; import formatter from "xml-formatter"; interface PropType { xml: string; } const props = withDefaults(defineProps<PropType>(), { xml: "", }); const formattedXML = ref<string>(""); onMounted(() => { // `highlightAuto` 関数が非同期でない場合は、 // `formattedXML` を直接アップデートできます。 // そうでない場合は、適切な非同期処理を行ってください。 formattedXML.value = hljs.highlightAuto(formatXML(props.xml)).value; }); const formatXML = (xmlstring: string) => { return formatter(xmlstring, { indentation: " ", filter: (node) => node.type !== "Comment", }); }; </script> <template> <pre class="pa-4" v-html="formattedXML"></pre> </template> <style> pre { /* 以下のスタイルは適切で、pre要素内のテキストの折り返しを制御しています。 */ white-space: pre-wrap; /* CSS 3 */ white-space: -moz-pre-wrap; /* Mozilla, 1999年から2002年までに対応 */ white-space: -pre-wrap; /* Opera 4-6 */ white-space: -o-pre-wrap; /* Opera 7 */ word-wrap: break-word; /* Internet Explorer 5.5+ */ } </style> まとめ TEI/XMLデータの可視化などにおいて、参考になりましたら幸いです。 ...