概要
Nuxt 3とDecap CMSを試してみましたので、その備忘録です。
Nuxt3プロジェクトの用意
既存のサイトにDecap CMSを追加する以下を参考にしました。
https://decapcms.org/docs/add-to-your-site/
まず、nuxt/contentモジュールを含む、Nuxt3のプロジェクトを用意します。
ソースコードの例はこちらです。
https://github.com/nakamura196/nuxt3-decapcms
以下の2つのファイルを作成しました。
# when using the default proxy server port
local_backend: true

# This line should *not* be indented
publish_mode: editorial_workflow

backend:
  name: git-gateway
  branch: main # Branch to update (optional; defaults to master)

media_folder: public/img
public_folder: /img

collections:
  - name: 'blog'
    label: 'Blog'
    folder: 'content/blog'
    format: 'frontmatter'
    create: true
    slug: '{{year}}-{{month}}-{{day}}-{{slug}}'
    fields:
      - { label: 'Title', name: 'title', widget: 'string' }
      - { label: 'Publish Date', name: 'date', widget: 'datetime' }
      - { label: 'Description', name: 'description', widget: 'string' }
      - { label: 'Body', name: 'body', widget: 'markdown' }
<!DOCTYPE html>
<html>
  <head>
    <meta charset="utf-8" />
    <meta name="viewport" content="width=device-width, initial-scale=1.0" />
    <title>Content Manager</title>
    <!-- Include the script that enables Netlify Identity on this page. -->
    <script src="https://identity.netlify.com/v1/netlify-identity-widget.js"></script>
  </head>
  <body>
    <!-- Include the script that builds the page and powers Decap CMS -->
    <script src="https://unpkg.com/decap-cms@^3.0.0/dist/decap-cms.js"></script>
  </body>
</html>
そして、GitHubにpushしました。
Netlifyでの設定
以下にアクセスして、ログインします。
先ほどGitHubにpushしたリポジトリを選択して、デプロイします。

この時、Build commandとPublish directoryを変更しました。

結果、以下にデプロイできました。
https://nuxt3-decapcms.netlify.app
Enable Identity and Git Gateway
以下を参考に、Netlify上で追加設定を行います。
https://decapcms.org/docs/add-to-your-site/#enable-identity-and-git-gateway
まず、Settings > Identityから、Identityサービスを有効化します。
次に、Registration preferencesとExternal providersを必要に応じて設定します。

最後に、Enable Git Gatewayを有効化します。

そして、以下にアクセスすると、ログインすることができました。
https://nuxt3-decapcms.netlify.app/admin/#/

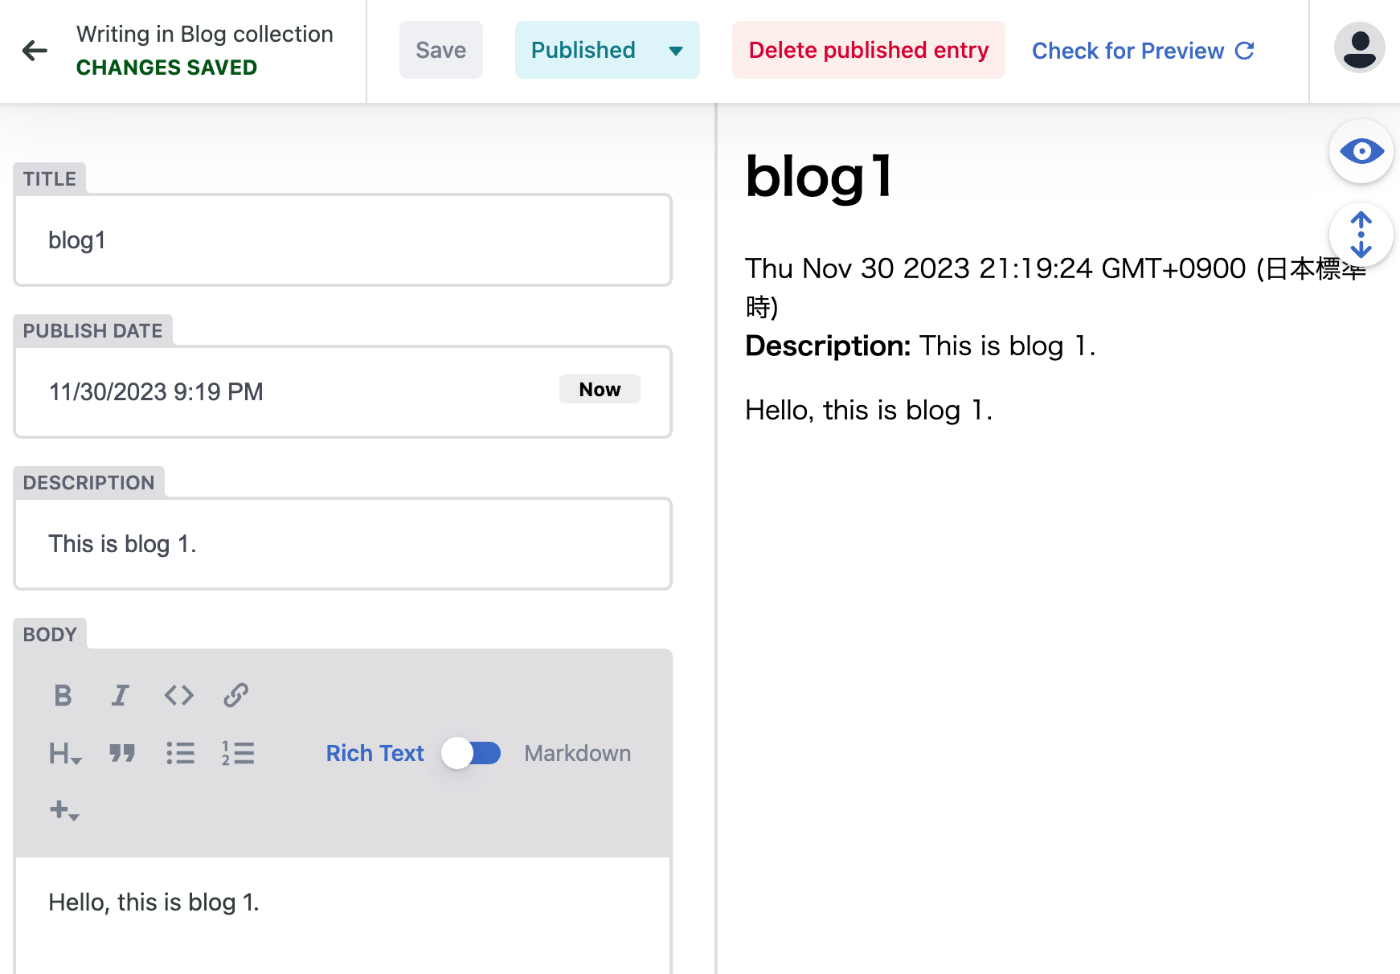
以下のようにコンテンツを追加します。
結果、以下のように、GitHubリポジトリにマークダウンが作成されました。

さらに、以下のようにページが追加されました。
https://nuxt3-decapcms.netlify.app/blog
ローカル環境でCMSを試す
以下に記載がありました。
https://decapcms.org/docs/beta-features/#working-with-a-local-git-repository
# when using the default proxy server port
local_backend: true

backend:
  name: git-gateway
上記のように、local_backend: trueにした上で、以下を実行します。
npx decap-server
結果、以下などにアクセスするとログインボタンが表示され、ログイン後、編集画面が表示されます。
http://localhost:3000/admin/#/

まとめ
説明が不足している点があるかと思いますが、Decap CMSの利用にあたり、参考になりましたら幸いです。