ホーム 記事一覧 ブック DH週間トピックス 検索 このサイトについて
RSS English

最新の記事

Drupal JSON Web Token Authenticationモジュールを試す

Drupal JSON Web Token Authenticationモジュールを試す

概要 DrupalのJSON Web Token Authenticationモジュールを試してみます。 https://www.drupal.org/project/jwt 以下のページを参考にしました。 https://preston.so/writing/decoupled-drupal-authentication-with-json-web-tokens/ なお、類似するモジュールとして、以下があるようです。 https://www.drupal.org/project/rest_api_authentication 上記モジュールを使ったjwt認証は以下で説明されています。 https://www.drupal.org/docs/contributed-modules/api-authentication/jwt-authentication しかし、以下の記事に記載したように、上記モジュールでjwt認証を使用するには有料プランに加入する必要があるようでした。 そこで、今回は、jwtモジュールのほうを試してみます。 インストールと有効化 jwtモジュール 注意点として、jwtだけでなく、jwt_auth_consumerやjwt_auth_issuerも有効化する必要がありました。 composer.phar require 'drupal/jwt:^2.0' vendor/bin/drush en jwt jwt_auth_consumer jwt_auth_issuer restuiモジュール composer.phar require 'drupal/restui:^1.21' vendor/bin/drush en restui 設定 以下にアクセスして、キーを作成します。 /admin/config/system/keys Key typeとしてJWT HMAC Keyを選択して、JWT AlgorithmとしてSHA-256を選択しました。 次に、以下にアクセスして、JWTの設定を行います。 AlgorithmとしてデフォルトのSHA-256を選択して、Secretとして先ほど作成したキー(ここではjwt)を選択します。 その後、ログインした状態で、以下にアクセスしてみます。 /jwt/token すると、以下のようなトークンが得られます。 参考までに、このトークンをjwt.ioで検証してみます。 https://jwt.io/ PAYLOADの箇所を見てみると、iat(Issued A: トークンが発行された時刻)やDrupalの「User ID」を確認することができます。 RESTリソースの設定 以下にアクセスします。 /admin/config/services/rest ここでは、コンテンツに対して、POSTを有効化し、認証プロバイダとしてjwt_authを選択します。 Postman Postmanを使って、コンテンツの作成を試してみます。 まず、Authorizationを指定せずに、コンテンツの作成試してみます。 Bodyはrawを選択して、フォーマットをJSONとします。以下の最低限のデータで、articleタイプのコンテンツの作成してみます。 { "type": [ { "target_id": "article" } ], "title": [ { "value": "新しい記事のタイトル" } ] } POST先のURLは以下です。 ...

Drupal REST & JSON API Authenticationモジュールの調査

Drupal REST & JSON API Authenticationモジュールの調査

概要 以下の記事を参考に、JWT認証を試してみます。 https://www.drupal.org/docs/contributed-modules/api-authentication/jwt-authentication ただ試してみた結果、JWT認証を行うには、有料プランに加入する必要がありそうで、そこで調査が止まりました。 前提条件: ダウンロードとインストール 以下の2つのモジュールをインストールして有効化します。 https://www.drupal.org/project/rest_api_authentication https://www.drupal.org/project/restui composer.phar require 'drupal/rest_api_authentication:^2.0' composer.phar require 'drupal/restui:^1.21' vendor/bin/drush en rest_api_authentication JWT ベースの API 認証を構成する手順 以下の説明に従って、APIを有効化して、JWTベースのAPI認証をセットアップします。 https://www.drupal.org/docs/contributed-modules/api-authentication/jwt-authentication#s-steps-to-configure-jwt-based-api-authentication しかし、メソッドを選択する場面で、以下に示すように、JWTを選択するには、プレミアムという有料プランに加入する必要がありそうでした。 まとめ 現在調査中のため、情報が不正確かもしれませんが、JWT認証を行うモジュールとして、以下があるようです。 https://www.drupal.org/project/jwt また、OAuth2を使用するモジュールとして、以下があるようです。 https://www.drupal.org/project/simple_oauth 次は、上記の2つのモジュールの使用方法について調査します。

さくらレンタルサーバ上のDrupalを更新する

さくらレンタルサーバ上のDrupalを更新する

概要 さくらレンタルサーバ上のDrupalを更新する機会がありましたので、手順のメモです。 まず、以下のサイトを参考にしました。 https://www.drupal.org/docs/updating-drupal/updating-drupal-core-via-drush ただし、以下のような記載がありました。 Use Composer to manage Drupal dependencies. Drush 9 and newer no longer supports updating Drupal. そこで、以下も参考にさせていただきました。 https://drupalfan.com/drupal10を最新版にアップデートする/ 手順 ! 間違った手順や不要な手順が含まれているかもしれませんので、参考程度ご確認ください。 Drupalをダウンロードしたディレクトリに移動 cd ~/www/{project_name} 準備(インストール済みの場合は不要) composer composer.pharというファイルしかない場合、composerを作成する。(mvでもよいかと思います。) cp composer.phar composer drush composer require --dev drush/drush メンテナンスモードの有効化 ./vendor/bin/drush state-set system.maintenance_mode 1 キャッシュのクリア ./vendor/bin/drush cr バックアップ バックアップ用のディレクトリの作成 mkdir ~/bk sqlのバックアップ ./vendor/bin/drush sql:dump --extra-dump=--no-tablespaces > ~/bk/dump.sql 参考 以下のように、--extra-dump=--no-tablespacesを指定しないと、エラーがメッセージが表示されました。 ./vendor/bin/drush sql:dump > ~/bk/dump.sql > mysqldump: Error: 'Access denied; you need (at least one of) the PROCESS privilege(s) for this operation' when trying to dump tablespaces ファイルのバックアップ tar cvzf ~/bk/web.zip . 更新 事前確認 composer update "drupal/core-*" --with-all-dependencies --dry-run 更新 composer update "drupal/core-*" --with-all-dependencies コントリビュートモジュールのアップデート composer update データベースの更新 ./vendor/bin/drush updatedb メンテナンスモードの無効化 ./vendor/bin/drush state-set system.maintenance_mode 0 キャッシュのクリア ./vendor/bin/drush cr 更新後にキャッシュのクリアを行わないと、表示が崩れることがありました。 ...

Drupalモジュール開発: 異体字を考慮した検索を行う

Drupalモジュール開発: 異体字を考慮した検索を行う

概要 Drupalを用いたシステム開発にあたり、異体字を考慮した検索を行う必要がありましたので、それを実現するためのカスタムモジュールを作成しました。(すでに同様のことを行うことができるモジュールがあるかもしれませんが、私のほうでは見つけることができませんでした。) 以下のリポジトリで公開しています。 https://github.com/nakamura196/Drupal-module-itaiji 使い方 設定 /admin/configにアクセスして、検索とメタデータの項目にあるItaijiのリンクをクリックします。 Conversion Rulesというフォームに、original1, original2 => convertedのような形式で変換ルールを入力します。 検索API search_apiモジュールを使って作成したインデックスのプロセッサーにアクセスします。 /admin/config/search/search-api/index/{INDEX_NAME}/processors Itaijiという項目を有効化します。 上記により、インデックス登録およびクエリの前処理として、変換ルールに基づいた変換が行われ、異体字を考慮した検索を行うことが可能になります。 注意点とまとめ Search APIのBackendとして、データベースを選択した場合でのみ、動作確認を行なっています。また、Drupalに関する開発経験が乏しいため、他の不具合を多々見られるかと思います。ご利用にあたっては、十分にご注意ください。 DrupalのSearch APIを使った検索システムの開発にあたり、参考になりましたら幸いです。

lando start時のエラー対応

lando start時のエラー対応

ローカル開発環境構築ツールの一つであるLandoを使用してDrupalやOmekaのモジュール開発を行っていた際、以下のエラーが生じることがありました。 lando start __ __ __ __ ___ _ __ __ __ ______ / / / /__ ___/ /__ _/ /____ / _ |_ _____ _(_) /__ _/ / / /__ / / / / / /_/ / _ \/ _ / _ `/ __/ -_) / __ | |/ / _ `/ / / _ `/ _ \/ / -_)_/_/_/ \____/ .__/\_,_/\_,_/\__/\__/ /_/ |_|___/\_,_/_/_/\_,_/_.__/_/\__(_|_|_) /_/ Updating helps us provide the best support and saves us tons of time Use the link below to get the latest and greatest https://github.com/lando/lando/releases/tag/v3.20.8 Lando is FREE and OPEN SOURCE software that relies on contributions from developers like you! If you like Lando then help us spend more time making, updating and supporting it by contributing at the link below https://github.com/sponsors/lando If you would like to customize the behavior of this message then check out: https://docs.lando.dev/config/releases.html Let's get this party started! Starting app my-lando-app... ERROR ==> connect ENOENT /var/run/docker.sock ██╗ ██╗██╗ ██╗ ██████╗ ██╗ ██╗██╗ ██║ ██║██║ ██║ ██╔═══██╗██║ ██║██║ ██║ ██║███████║ ██║ ██║███████║██║ ██║ ██║██╔══██║ ██║ ██║██╔══██║╚═╝ ╚██████╔╝██║ ██║ ╚██████╔╝██║ ██║██╗ ╚═════╝ ╚═╝ ╚═╝ ╚═════╝ ╚═╝ ╚═╝╚═╝ An error occurred while starting up your app! Here are a few things you can try to get back into a good state: ■ Try running lando rebuild ■ Try restarting in debug mode lando restart -vvv ■ Try checking the logs with lando logs If those fail then consult the troubleshooting materials: ■ https://docs.lando.dev/help/logs.html ■ https://docs.lando.dev/help/updating.html Or post your issue to Slack or GitHub ■ Slack - https://launchpass.com/devwithlando ■ GitHub - https://github.com/lando/lando/issues/new/choose ERROR ==> connect ENOENT /var/run/docker.sock 本件について、以下のIssueで言及されていました。 ...

drushのコマンドの備忘録

drushのコマンドの備忘録

概要 Drupalのモジュールの開発において、使用頻度が高かったコマンドのメモです。 キャッシュのクリア drush cr 翻訳ファイルのインポート 以下は、itaijiというモジュールの日本語ファイルをインポートしている例です。 drush locale:import ja /app/web/modules/custom/Drupal-module-itaiji/translations/itaiji.ja.po モジュールの再インストール drush pm-uninstall itaiji && drush en itaiji

DrupalでJSON:API Search APIを使用する際のページネーションエラー

DrupalでJSON:API Search APIを使用する際のページネーションエラー

DrupalでJSON:API Search APIを使用していた際、page[limit]などをクエリパラメータを追加した際にエラーが発生しました。 https://www.drupal.org/project/jsonapi_search_api 具体的には、以下のエラーメッセージが表示されました。 Input value “page” contains a non-scalar value. 調べてみたところ、これは以下のIssuesでも言及されていました。 https://www.drupal.org/project/jsonapi_search_api/issues/3403107 Development version(開発版)の8.x-1.x-devでは修正済みということで、以下に差し替えました。 https://www.drupal.org/project/jsonapi_search_api/releases/8.x-1.x-dev 結果、エラーが解消しました。 開発版のモジュールを使用するか要検討ですが、同様の不具合でお困りの方の参考になりましたら幸いです。

Oxygen XML Editorのイメージマップエディタの使用例

Oxygen XML Editorのイメージマップエディタの使用例

概要 Oxygen XML Editorのイメージマップエディタの使用方法に関する説明です。 動画 https://youtu.be/9dZQ1v0Rky0?si=8EhAZdVsLqgPz2Rf 使用方法 以下のようなTEI/XMLファイルを用意します。<graphic>のurlの値は、当該ファイルからの相対パスや、PC上の絶対パス、およびインターネット上で公開されているURLを指定します。 以下の例では、TEI/XMLファイルと同じフォルダに格納されているdigidepo_3437686_pn_null_9c48d89b-e2ec-4593-8d00-6fbc1d29d1bd.jpgというファイルを参照しています。 <?xml version="1.0" ?> <?xml-model href="http://www.tei-c.org/release/xml/tei/custom/schema/relaxng/tei_all.rng" type="application/xml" schematypens="http://relaxng.org/ns/structure/1.0"?> <TEI xmlns="http://www.tei-c.org/ns/1.0"> <teiHeader> <fileDesc> <titleStmt> <title>Sample</title> </titleStmt> <publicationStmt> <ab/> </publicationStmt> <sourceDesc> <ab/> </sourceDesc> </fileDesc> </teiHeader> <facsimile> <surface> <graphic url="digidepo_3437686_pn_null_9c48d89b-e2ec-4593-8d00-6fbc1d29d1bd.jpg"/> </surface> </facsimile> </TEI> 画面下部の「作者」というボタンをクリックすると、以下のように「イメージマップエディタ」が表示されます。上記の動画を参考に、アノテーションを付与します。 結果、以下のようにzoneタグが自動的に追加されます。 <?xml version="1.0" ?> <?xml-model href="http://www.tei-c.org/release/xml/tei/custom/schema/relaxng/tei_all.rng" type="application/xml" schematypens="http://relaxng.org/ns/structure/1.0"?> <TEI xmlns="http://www.tei-c.org/ns/1.0"> <teiHeader> <fileDesc> <titleStmt> <title>Sample</title> </titleStmt> <publicationStmt> <ab/> </publicationStmt> <sourceDesc> <ab/> </sourceDesc> </fileDesc> </teiHeader> <facsimile> <surface> <graphic url="digidepo_3437686_pn_null_9c48d89b-e2ec-4593-8d00-6fbc1d29d1bd.jpg"/> <zone xml:id="zone_z3p_zll_szb" change="#ch1" lry="3960" lrx="2705" uly="730" ulx="2590"/> <zone xml:id="zone_fmm_xnv_szb" change="#ch2" lry="4038" lrx="1025" uly="700" ulx="850"/> </surface> </facsimile> </TEI> まとめ Oxygen XML Editorの利用に際して、参考になりましたら幸いです。 ...

Allmapsを使ってジオリファレンスを行う

Allmapsを使ってジオリファレンスを行う

概要 今回は、Allmapsを使ったジオリファレンスを試します。 https://allmaps.org/ Allmapsは以下のように説明されています。 Allmaps makes it easier and more inspiring to curate, georeference and explore collections of digitized maps. (機械翻訳) Allmaps を使用すると、デジタル化された地図のコレクションを整理、地理参照、探索することがより簡単かつ刺激的になります。 
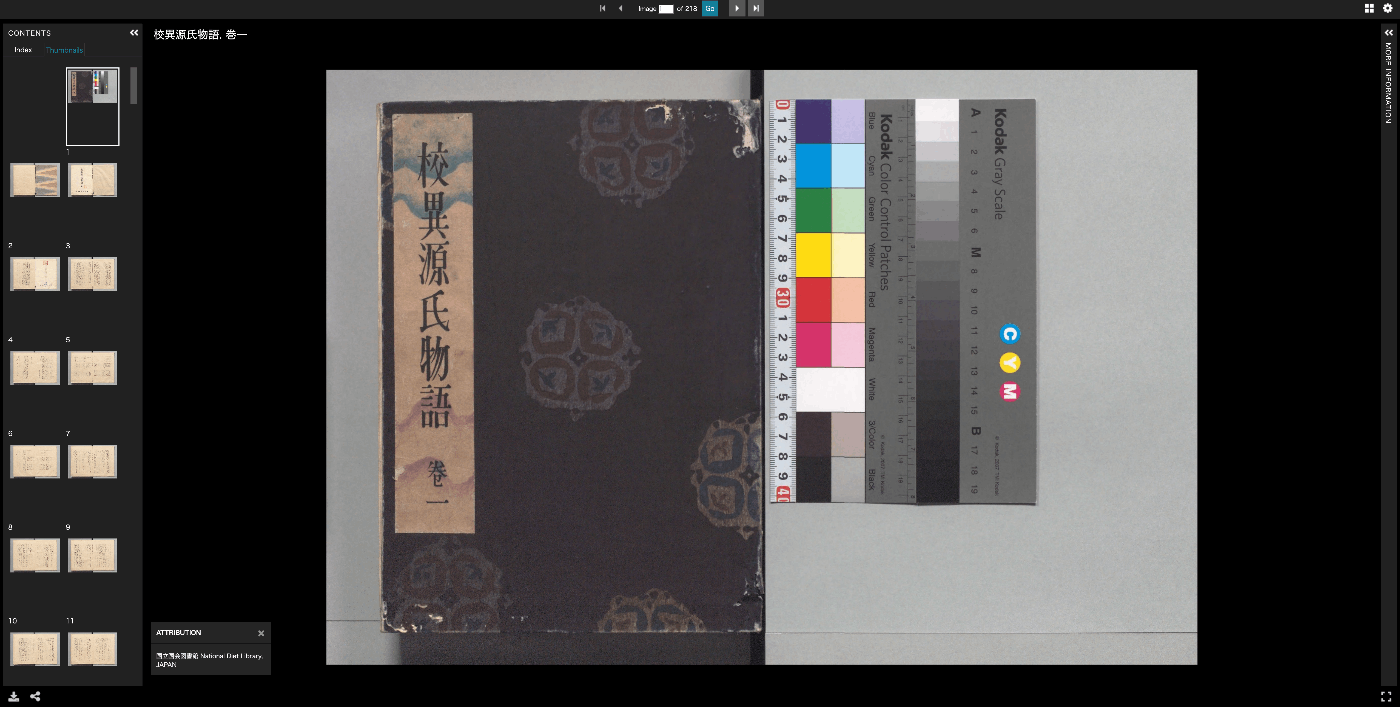
今回は、「東京大学農学生命科学図書館」が所蔵する「東京帝國大學本部構内及農學部建物鳥瞰圖」を使用します。 https://da.dl.itc.u-tokyo.ac.jp/portal/assets/187cc82d-11e6-9912-9dd4-b4cca9b10970
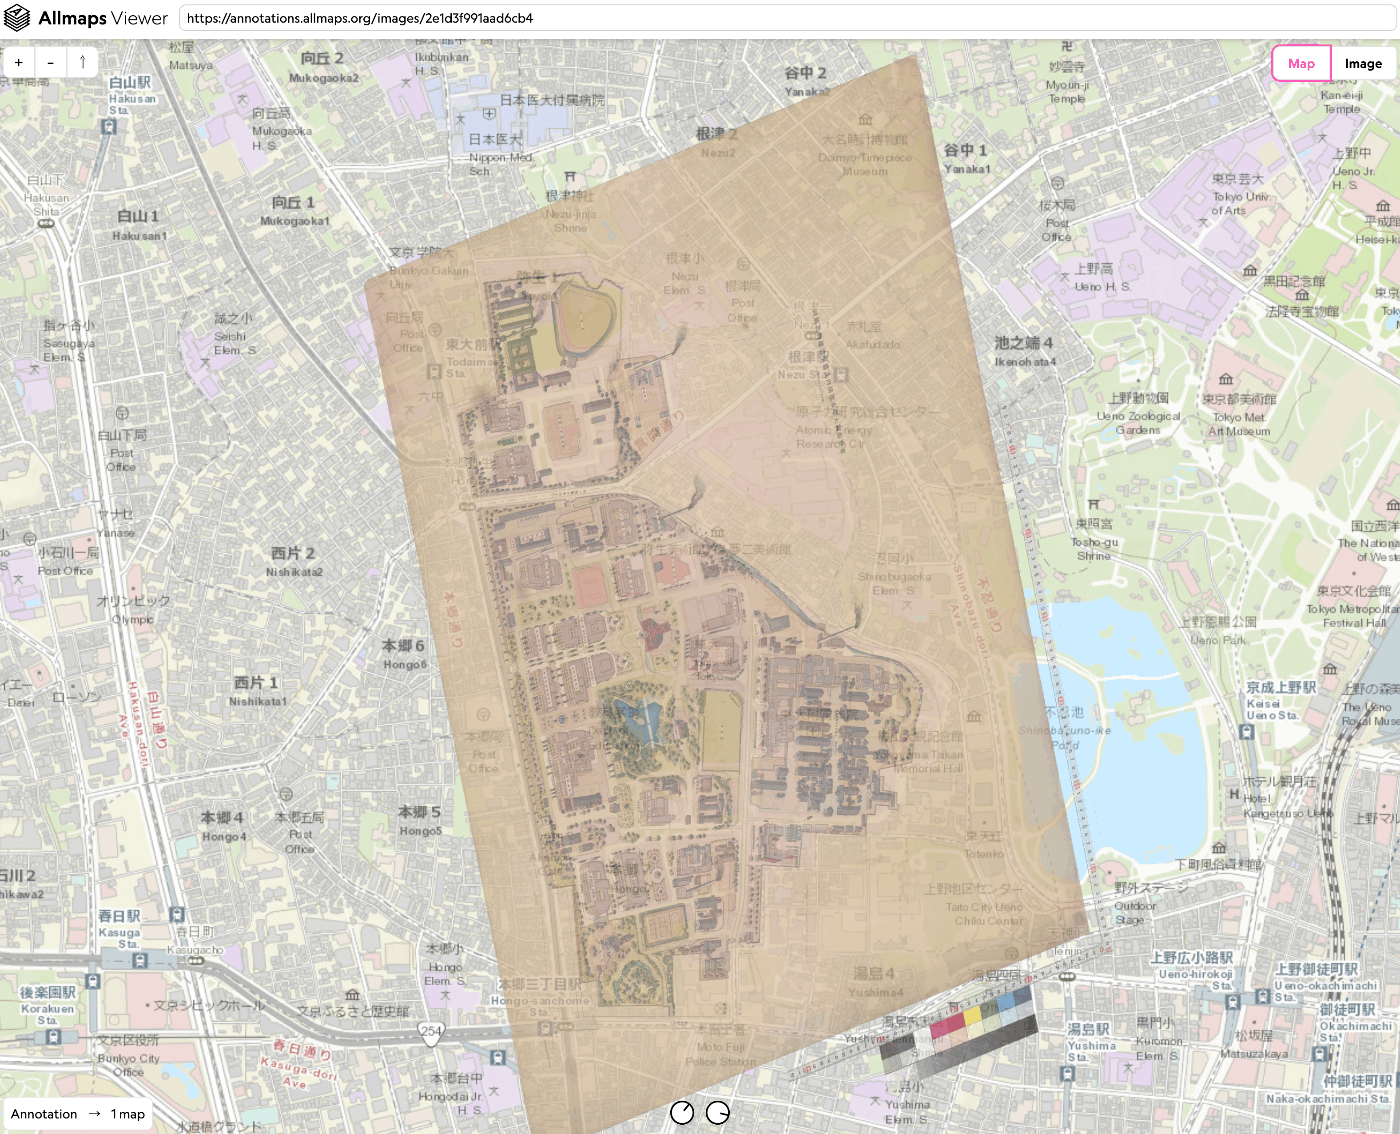
 以下のような成果物を作成します。 https://viewer.allmaps.org/?url=https%3A%2F%2Fannotations.allmaps.org%2Fimages%2F2e1d3f991aad6cb4 https://www.youtube.com/watch?v=G0CcXfqo6rs 方法 以下にアクセスします。 https://editor.allmaps.org/#/ 今回は、2枚目の画像を使用するので、以下のURLをフォームに入力します。 https://iiif.dl.itc.u-tokyo.ac.jp/iiif/agriculture_re/nou_tatemonochokanzu/0002.tif 以下のようなページで、「Georeference」ボタンを押します。 以下のように、画像と地図が並列に表示されるページに遷移します。画像と地図で対応する箇所をポイントしていきます。 その後、「Results」ボタンを押して、以下の「View current image」リンクをクリックします。 結果、以下のようなビューアのページに遷移します。 作成されるデータ Editor画面で、作成されるJSONデータをコピー、またはダウンロードすることができます。以下のようなJSONデータが作成されました。 { "type": "AnnotationPage", "@context": [ "http://www.w3.org/ns/anno.jsonld" ], "items": [ { "id": "75912f7214324ea9", "type": "Annotation", "@context": [ "http://www.w3.org/ns/anno.jsonld", "http://geojson.org/geojson-ld/geojson-context.jsonld", "http://iiif.io/api/presentation/3/context.json" ], "motivation": "georeferencing", "target": { "type": "Image", "source": "https://iiif.dl.itc.u-tokyo.ac.jp/iiif/2/agriculture_re%2Fnou_tatemonochokanzu%2F0002.tif/full/full/0/default.jpg", "service": [ { "@id": "https://iiif.dl.itc.u-tokyo.ac.jp/iiif/2/agriculture_re%2Fnou_tatemonochokanzu%2F0002.tif", "type": "ImageService2" } ], "selector": { "type": "SvgSelector", "value": "<svg width=\"18415\" height=\"12911\"><polygon points=\"0,0 0,12911 18415,12911 18415,0\" /></svg>" } }, "body": { "type": "FeatureCollection", "purpose": "gcp-georeferencing", "transformation": { "type": "polynomial", "order": 0 }, "features": [ { "type": "Feature", "properties": { "pixelCoords": [ 6690, 7517 ] }, "geometry": { "type": "Point", "coordinates": [ 139.7623182, 35.7151233 ] } }, { "type": "Feature", "properties": { "pixelCoords": [ 8846, 9181 ] }, "geometry": { "type": "Point", "coordinates": [ 139.7612649, 35.7129321 ] } }, { "type": "Feature", "properties": { "pixelCoords": [ 11626, 8624 ] }, "geometry": { "type": "Point", "coordinates": [ 139.7622949, 35.7109037 ] } }, { "type": "Feature", "properties": { "pixelCoords": [ 12761, 9476 ] }, "geometry": { "type": "Point", "coordinates": [ 139.7618816, 35.7097492 ] } }, { "type": "Feature", "properties": { "pixelCoords": [ 7540, 8365 ] }, "geometry": { "type": "Point", "coordinates": [ 139.7618343, 35.7143244 ] } }, { "type": "Feature", "properties": { "pixelCoords": [ 10681, 5983 ] }, "geometry": { "type": "Point", "coordinates": [ 139.764372, 35.7123118 ] } }, { "type": "Feature", "properties": { "pixelCoords": [ 9304, 5659 ] }, "geometry": { "type": "Point", "coordinates": [ 139.7645652, 35.7135689 ] } }, { "type": "Feature", "properties": { "pixelCoords": [ 3826, 10219 ] }, "geometry": { "type": "Point", "coordinates": [ 139.7594158, 35.7166753 ] } }, { "type": "Feature", "properties": { "pixelCoords": [ 8044, 9859 ] }, "geometry": { "type": "Point", "coordinates": [ 139.76062, 35.7134203 ] } }, { "type": "Feature", "properties": { "pixelCoords": [ 10517, 7862 ] }, "geometry": { "type": "Point", "coordinates": [ 139.7627108, 35.7121183 ] } }, { "type": "Feature", "properties": { "pixelCoords": [ 8892, 9831 ] }, "geometry": { "type": "Point", "coordinates": [ 139.7607901, 35.7126873 ] } }, { "type": "Feature", "properties": { "pixelCoords": [ 14667, 9708 ] }, "geometry": { "type": "Point", "coordinates": [ 139.7620234, 35.7081704 ] } }, { "type": "Feature", "properties": { "pixelCoords": [ 2354, 8506 ] }, "geometry": { "type": "Point", "coordinates": [ 139.7608678, 35.7184833 ] } }, { "type": "Feature", "properties": { "pixelCoords": [ 10054, 8713 ] }, "geometry": { "type": "Point", "coordinates": [ 139.7620034, 35.7122089 ] } }, { "type": "Feature", "properties": { "pixelCoords": [ 5594, 10678 ] }, "geometry": { "type": "Point", "coordinates": [ 139.7593041, 35.7151585 ] } }, { "type": "Feature", "properties": { "pixelCoords": [ 13028, 6647 ] }, "geometry": { "type": "Point", "coordinates": [ 139.7642327, 35.7102509 ] } }, { "type": "Feature", "properties": { "pixelCoords": [ 10685, 10444 ] }, "geometry": { "type": "Point", "coordinates": [ 139.7605725, 35.7111428 ] } }, { "type": "Feature", "properties": { "pixelCoords": [ 4438, 9181 ] }, "geometry": { "type": "Point", "coordinates": [ 139.7606565, 35.7165095 ] } }, { "type": "Feature", "properties": { "pixelCoords": [ 8840, 10491 ] }, "geometry": { "type": "Point", "coordinates": [ 139.7602447, 35.7126024 ] } }, { "type": "Feature", "properties": { "pixelCoords": [ 4667, 10202 ] }, "geometry": { "type": "Point", "coordinates": [ 139.759576, 35.7159457 ] } }, { "type": "Feature", "properties": { "pixelCoords": [ 6762, 10060 ] }, "geometry": { "type": "Point", "coordinates": [ 139.7600401, 35.7144106 ] } }, { "type": "Feature", "properties": { "pixelCoords": [ 8587, 8135 ] }, "geometry": { "type": "Point", "coordinates": [ 139.762299, 35.7134381 ] } }, { "type": "Feature", "properties": { "pixelCoords": [ 7967, 10465 ] }, "geometry": { "type": "Point", "coordinates": [ 139.7600601, 35.7133129 ] } }, { "type": "Feature", "properties": { "pixelCoords": [ 6466, 8313 ] }, "geometry": { "type": "Point", "coordinates": [ 139.7616346, 35.7150937 ] } }, { "type": "Feature", "properties": { "pixelCoords": [ 7569, 7471 ] }, "geometry": { "type": "Point", "coordinates": [ 139.7625263, 35.7143713 ] } }, { "type": "Feature", "properties": { "pixelCoords": [ 10111, 10099 ] }, "geometry": { "type": "Point", "coordinates": [ 139.7607835, 35.7116287 ] } }, { "type": "Feature", "properties": { "pixelCoords": [ 12606, 10162 ] }, "geometry": { "type": "Point", "coordinates": [ 139.7611825, 35.7096128 ] } } ] } } ] } まとめ IIIF対応画像に対するジオリファレンスを行うにあたり、参考になりましたら幸いです。 ...

Nuxt3 x Vuetify x Cesium

Nuxt3 x Vuetify x Cesium

概要 Nuxt3とVuetifyとCesiumを使用したサンプルリポジトリを作成しました。 ソースコード vue-cesiumを使用しています。 https://github.com/zouyaoji/vue-cesium GitHubリポジトリは以下です。 https://github.com/nakamura196/nuxt3-vuetify-cesium デモサイト https://nakamura196.github.io/nuxt3-vuetify-cesium/ まとめ 参考になりましたら幸いです。

Nuxt 3とDecap CMSを試す

Nuxt 3とDecap CMSを試す

概要 Nuxt 3とDecap CMSを試してみましたので、その備忘録です。 https://decapcms.org/ Nuxt3プロジェクトの用意 既存のサイトにDecap CMSを追加する以下を参考にしました。 https://decapcms.org/docs/add-to-your-site/ まず、nuxt/contentモジュールを含む、Nuxt3のプロジェクトを用意します。 ソースコードの例はこちらです。 https://github.com/nakamura196/nuxt3-decapcms 以下の2つのファイルを作成しました。 # when using the default proxy server port local_backend: true # This line should *not* be indented publish_mode: editorial_workflow backend: name: git-gateway branch: main # Branch to update (optional; defaults to master) media_folder: public/img public_folder: /img collections: - name: 'blog' label: 'Blog' folder: 'content/blog' format: 'frontmatter' create: true slug: '{{year}}-{{month}}-{{day}}-{{slug}}' fields: - { label: 'Title', name: 'title', widget: 'string' } - { label: 'Publish Date', name: 'date', widget: 'datetime' } - { label: 'Description', name: 'description', widget: 'string' } - { label: 'Body', name: 'body', widget: 'markdown' } <!DOCTYPE html> <html> <head> <meta charset="utf-8" /> <meta name="viewport" content="width=device-width, initial-scale=1.0" /> <title>Content Manager</title> <!-- Include the script that enables Netlify Identity on this page. --> <script src="https://identity.netlify.com/v1/netlify-identity-widget.js"></script> </head> <body> <!-- Include the script that builds the page and powers Decap CMS --> <script src="https://unpkg.com/decap-cms@^3.0.0/dist/decap-cms.js"></script> </body> </html> そして、GitHubにpushしました。 ...

AttributeError: 'ImageDraw' object has no attribute 'textsize'への対応

AttributeError: 'ImageDraw' object has no attribute 'textsize'への対応

PythonのPillowで以下を使用していた際、 textsize = 14 font = ImageFont.truetype("Arial Unicode.ttf", size=textsize) txw, txh = draw.textlength(label, font=font) 以下のエラーが発生しました。 AttributeError: ‘ImageDraw’ object has no attribute ’textsize’ この対処法として、以下が参考になりました。 https://stackoverflow.com/questions/77038132/python-pillow-pil-doesnt-recognize-the-attribute-textsize-of-the-object-imag 具体的には、以下のように書き直しました。 textsize = 14 font = ImageFont.truetype("Arial Unicode.ttf", size=textsize) txw = draw.textlength(label, font=font) txh = textsize 参考になりましたら幸いです。

Amazon SNSを用いたEC2上のVirtuosoの再起動

Amazon SNSを用いたEC2上のVirtuosoの再起動

概要 以下の記事で、ヘルスチェックを行う方法について記述しました。 また、Virtuosoが停止した際の再起動のためのコマンドを以下に記述しました。 今回は、Amazon SNSを用いた通知に合わせて、Virtuosoを再起動してみます。 方法 EC2インスタンスにsudo rm -rf /usr/local/var/lib/virtuoso/db/virtuoso.lck && ...のようなコマンドを送信するには、SSM(AWS Systems Manager)に関する設定が必要でした。 IAMロールとポリシー IAMロールを新規に作成して、AmazonSSMFullAccessというポリシーを許可しました。はじめ、AmazonSSMManagedInstanceCoreというポリシーを許可していましたが、後述するlambda実行時に以下のようなエラーが発生して、うまく動作させることができませんでした。 An error occurred (InvalidInstanceId) when calling the SendCommand operation: Instances [[i-xxxxxx]] not in a valid state for account xxxxxx EC2インスタンスの「IAMロールを変更」から、作成したIAMロールを選択して更新しました。 AWS SAM: lamda関数の作成 AWS SAMを用いました。以下でのプロジェクトを作成します。 sam init hello_world/app.pyを以下のように作成しました。instance_idの部分には、要修正です。 import boto3 import time def lambda_handler(event, context): # EC2クライアントの初期化 ec2 = boto3.client('ec2') # 特定のEC2インスタンスIDを指定 instance_id = 'i-xxxxxxxx' # EC2インスタンスのステータスチェック response = ec2.describe_instance_status(InstanceIds=[instance_id]) if len(response['InstanceStatuses']) == 0: print(f"インスタンス {instance_id} は停止中です。") return # Define the command to be executed on the instance (e.g., restart software) command = 'sudo rm -rf /usr/local/var/lib/virtuoso/db/virtuoso.lck && sudo /usr/local/bin/virtuoso-t +configfile /usr/local/var/lib/virtuoso/db/virtuoso.ini' # SSMを通じてEC2インスタンスにコマンドを送信 ssm_client = boto3.client('ssm') response = ssm_client.send_command( InstanceIds=[instance_id], DocumentName='AWS-RunShellScript', Parameters={'commands': [command]} ) time.sleep(1.0) command_id = response['Command']['CommandId'] output = ssm_client.get_command_invocation( CommandId=command_id, InstanceId=instance_id, ) print("コマンドを実行しました。") # Extract only the necessary information from the output simplified_response = { "Output": output['StandardOutputContent'], "Error": output['StandardErrorContent'], } return simplified_response また、hello_word/requirements.txtにboto3を追記しました。 ...

samでError: Running AWS SAM projects locally requires Docker...への対応

samでError: Running AWS SAM projects locally requires Docker...への対応

概要 AWS SAMを使ってsam local invokeを試した際、以下のメッセージが表示されました。 Error: Running AWS SAM projects locally requires Docker. Have you got it installed and running? 環境はMacで、Dockerも動作していました。 対処法 以下を実行することで、解決しました。 sudo ln -s ~/.docker/run/docker.sock /var/run/docker.sock 以下を参考にしました。 https://github.com/lando/lando/issues/3533 まとめ 同様の事象でお困りの方の参考になりましたら幸いです。

Nuxt 3 x Composition APIでLeaflet Marker Clusterを試す

Nuxt 3 x Composition APIでLeaflet Marker Clusterを試す

概要 以下の記事で、Nuxt 3でLeaflet Marker Clusterを試す方法を紹介しました。今回は、Composition APIを使った書き方に更新したので、その備忘録です。 インストール 以下をインストールします。 npm i leaflet leaflet.markercluster @vue-leaflet/vue-leaflet npm i -D @types/leaflet @types/leaflet.markercluster ソースコード 以下を参考にしてください。 https://github.com/nakamura196/nuxt3-demo/blob/main/components/map/MarkerCluster.vue まとめ TypeScriptに一部対応できていない点がありますが、参考になりましたら幸いです。

Universal Viewer v4を使ったページの作成例

Universal Viewer v4を使ったページの作成例

概要 以下のように、ページ全体にUniversal Viewerが表示されるページを作成しましたので、その備忘録です。Universal Viewer v4を使用しています。 https://nuxt3-demo-nine.vercel.app/uv/?manifest=https://dl.ndl.go.jp/api/iiif/3437686/manifest.json ソースコード 以下のソースコードを参考にしてください。 https://github.com/nakamura196/nuxt3-demo/blob/main/public/uv/index.html 以下のページにある https://github.com/UniversalViewer/universalviewer/wiki/UV-Examples 以下のサンプルを参考に、ページのリサイズに応じて、ビューアのサイズも変更されるようにしています。 https://codesandbox.io/s/uv-url-adapter-example-9d6x8 また、manifestというクエリパラメータを受け取る記述も含めています。 参考 以下を参考に、cdnを利用しない形でのNuxt3への導入を試みましたが、うまく動作させることができませんでした。こちらについては、引き続き調査を行いたいと思います。 https://codesandbox.io/s/uv-vite-example-9ie3rh まとめ 以下のページで、v3を用いた全画面表示の例が公開されていますが、本記事執筆時点では、v4の例が見当たりませんでした。 https://universalviewer.io/examples/uv/uv.html#?manifest=https://dl.ndl.go.jp/api/iiif/3437686/manifest.json 参考になりましたら幸いです。

Nuxt3 x Vuetify x Cytoscape

Nuxt3 x Vuetify x Cytoscape

概要 Nuxt3とVuetifyを使用したサンプルリポジトリに、Cytoscapeの動作デモを追加しました。 https://github.com/nakamura196/nuxt3-demo 以下のページで動作確認いただけます。 https://nakamura196.github.io/nuxt3-demo/ インストール 以下を実行しました。 npm i cytoscape npm i @types/cytoscape ソースコード <template> <div id="view"> <v-btn class="ma-4" color="primary" v-on:click="addNode">push</v-btn> <div id="cy"></div> </div> </template> <script setup lang="ts"> import cytoscape from "cytoscape"; let cy: any = null; // = ref(null); //reactive({}); //: any const count: number = 0; // = ref(0); //reactive(0); const addNode = () => { cy.add([ { group: "nodes", data: { id: "node" + count }, position: { x: 300, y: 200 }, }, { group: "edges", data: { id: "edge" + count, source: "node" + count, target: "cat" }, }, ]); }; onMounted(() => { cy = cytoscape({ container: document.getElementById("cy"), boxSelectionEnabled: false, autounselectify: true, style: cytoscape .stylesheet() .selector("node") .css({ height: 80, width: 80, "background-fit": "cover", "border-color": "#000", "border-width": 3, "border-opacity": 0.5, content: "data(name)", "text-valign": "center", }) .selector("edge") .css({ width: 6, "target-arrow-shape": "triangle", "line-color": "#ffaaaa", "target-arrow-color": "#ffaaaa", "curve-style": "bezier", }), elements: { nodes: [ { data: { id: "cat" } }, { data: { id: "bird" } }, { data: { id: "ladybug" } }, { data: { id: "aphid" } }, { data: { id: "rose" } }, { data: { id: "grasshopper" } }, { data: { id: "plant" } }, { data: { id: "wheat" } }, ], edges: [ { data: { source: "cat", target: "bird" } }, { data: { source: "bird", target: "ladybug" } }, { data: { source: "bird", target: "grasshopper" } }, { data: { source: "grasshopper", target: "plant" } }, { data: { source: "grasshopper", target: "wheat" } }, { data: { source: "ladybug", target: "aphid" } }, { data: { source: "aphid", target: "rose" } }, ], }, layout: { name: "breadthfirst", directed: true, padding: 10, }, }); }); </script> <style scoped> #cy { width: 100%; height: 80%; position: absolute; background-color: lightcyan; } </style> まとめ 参考になりましたら幸いです。 ...

Cantaloupe: サービスとして実行する

Cantaloupe: サービスとして実行する

概要 Cantaloupe Image Serverは以下のコマンドで実行できます。 java -Dcantaloupe.config=cantaloupe.properties -Xmx2g -jar cantaloupe-5.0.5.jar しかしこの方法では、ssh接続が切れた場合など、Cantaloupeサーバが止まってしまいます。 そこで、サービスとして実行する方法を紹介します。 方法 サービスファイルの作成 : /etc/systemd/system/ディレクトリにサービスファイル(例えば、cantaloupe.service)をsudo権限で作成します。 [Unit] Description=Cantaloupe Image Server [Service] User=ubuntu # 以下のパスは適宜修正してください WorkingDirectory=/home/ubuntu/cantaloupe-5.0.5 ExecStart=/usr/bin/java -Dcantaloupe.config=cantaloupe.properties -Xmx2g -jar cantaloupe-5.0.5.jar SuccessExitStatus=143 [Install] WantedBy=multi-user.target このファイルでは、ExecStartに実行するJavaコマンドを指定します。また、UserとWorkingDirectoryは適切に設定する必要があります。 サービスのリロード : 変更を適用するために、次のコマンドでsystemdをリロードします。 sudo systemctl daemon-reload サービスの開始 : 以下のコマンドでサービスを開始します。 sudo systemctl start cantaloupe サービスの有効化 : システム起動時にサービスが自動的に起動するようにするには、以下のコマンドを実行します。 sudo systemctl enable cantaloupe サービスの状態確認 : サービスの状態を確認するには、次のコマンドを使用します。 sudo systemctl status cantaloupe 注意: この例では、Javaのパスやcantaloupeのインストールパスは適宜修正する必要があります。また、Userはcantaloupeを実行するユーザーに置き換えてください。サービスファイルの詳細設定については、systemdのドキュメントを参照してください。 まとめ 以下のようにサービスとして起動していることを確認できます。参考になりましたら幸いです。 sudo systemctl status cantaloupe ● cantaloupe.service - Cantaloupe Image Server Loaded: loaded (/etc/systemd/system/cantaloupe.service; enabled; vendor preset: enabled) Active: active (running) since Thu 2023-11-16 03:52:24 UTC; 6min ago Main PID: 33204 (java) Tasks: 31 (limit: 4667) Memory: 116.2M CPU: 4.408s CGroup: /system.slice/cantaloupe.service └─33204 /usr/bin/java -Dcantaloupe.config=cantaloupe.properties -Xmx2g -jar cantaloupe-5.0.5.jar

Cantaloupe: Amazon S3に格納した画像を配信する

Cantaloupe: Amazon S3に格納した画像を配信する

概要 IIIFイメージサーバの一つであるCantaloupe Image Serverについて、Amazon S3に格納した画像を配信する方法の備忘録です。 なお、Amazon S3に格納した画像を配信する別の方法として、以下の記事で紹介した方法もありますので、参考になりましたら幸いです。(記事執筆時点からツールが更新されているようで、記事通りに進められないかもしれません。) 設定 以下に公式マニュアルが公開されています。 https://cantaloupe-project.github.io/manual/5.0/sources.html#S3Source 以下のファイルを編集します。 /cantaloupe-5.0.5/cantaloupe.properties まず、source.staticをS3Sourceに変更しました。 ########################################################################### # SOURCES ########################################################################### # Uses one source for all requests. Available values are `FilesystemSource`, # `HttpSource`, `JdbcSource`, `S3Source`, and `AzureStorageSource`. # source.static = FilesystemSource source.static = S3Source 次に、S3Source.access_key_id、S3Source.secret_key、S3Source.BasicLookupStrategy.bucket.nameを設定します。 #---------------------------------------- # S3Source #---------------------------------------- # !! Endpoint URI. Only needed for non-AWS endpoints. S3Source.endpoint = # !! AWS region. Only needed for AWS endpoints. S3Source.region = # !! Credentials for your AWS account. # See: http://aws.amazon.com/security-credentials # Note that this info can be obtained from elsewhere rather than setting # it here; see the user manual. S3Source.access_key_id = <アクセスキー> S3Source.secret_key = <シークレットキー> # How to look up objects. Allowed values are `BasicLookupStrategy` and # `ScriptLookupStrategy`. ScriptLookupStrategy uses a delegate method for # dynamic lookups; see the user manual. S3Source.lookup_strategy = BasicLookupStrategy # !! Name of the bucket containing images to be served. S3Source.BasicLookupStrategy.bucket.name = <バケット名> これでAmazon S3に格納した画像が参照されるようになりました。 ...

Drupal: Feeds Tamperモジュールを使った複数の値の登録とスキップ処理

Drupal: Feeds Tamperモジュールを使った複数の値の登録とスキップ処理

概要 DrupalのFeedsモジュールを使って、以下のようなCSVの登録を試みました。 id title target xxx あああ 9600023 このように、一つのフィールドに複数の値を登録したい場合には、Feeds Tamperモジュールが使用できました。 https://www.drupal.org/project/feeds_tamper 以下の記事が参考になりました。 https://acret.jp/drupal/articles/456 以下のように設定することで、複数の値を一括登録できました。 ただし、以下のように、target列が空の行を含む場合、 id title target xxx あああ 以下に示すエラーが発生しました。 ResponseText: The website encountered an unexpected error. Please try again later.Drupal\tamper\Exception\TamperException: Input should be a string. in Drupal\tamper\Plugin\Tamper\Explode->tamper() (line 72 of /bitnami/drupal/modules/contrib/tamper/src/Plugin/Tamper/Explode.php). 対処法 以下のように、「Skip tampers」を選択しました。 さらに、「Skip tampers」を「Explode」の前に移動します。 結果、空の文字列が含まれていても、エラーを回避できました。 まとめ 同様のことでお困りの方の参考になりましたら幸いです。