ホーム 記事一覧 ブック DH週間トピックス 検索 このサイトについて
RSS English
Drupalのsimple_oauthモジュールを用いたRESTリソースのoauth2認証を試す

Drupalのsimple_oauthモジュールを用いたRESTリソースのoauth2認証を試す

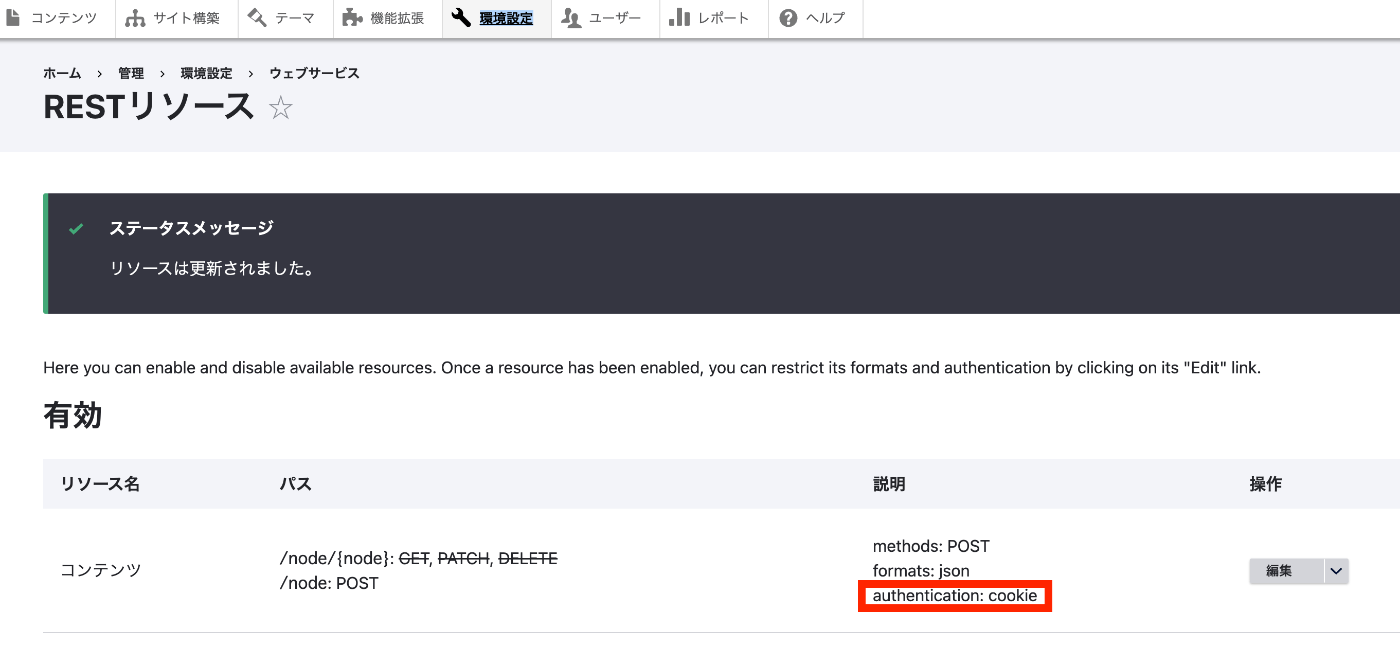
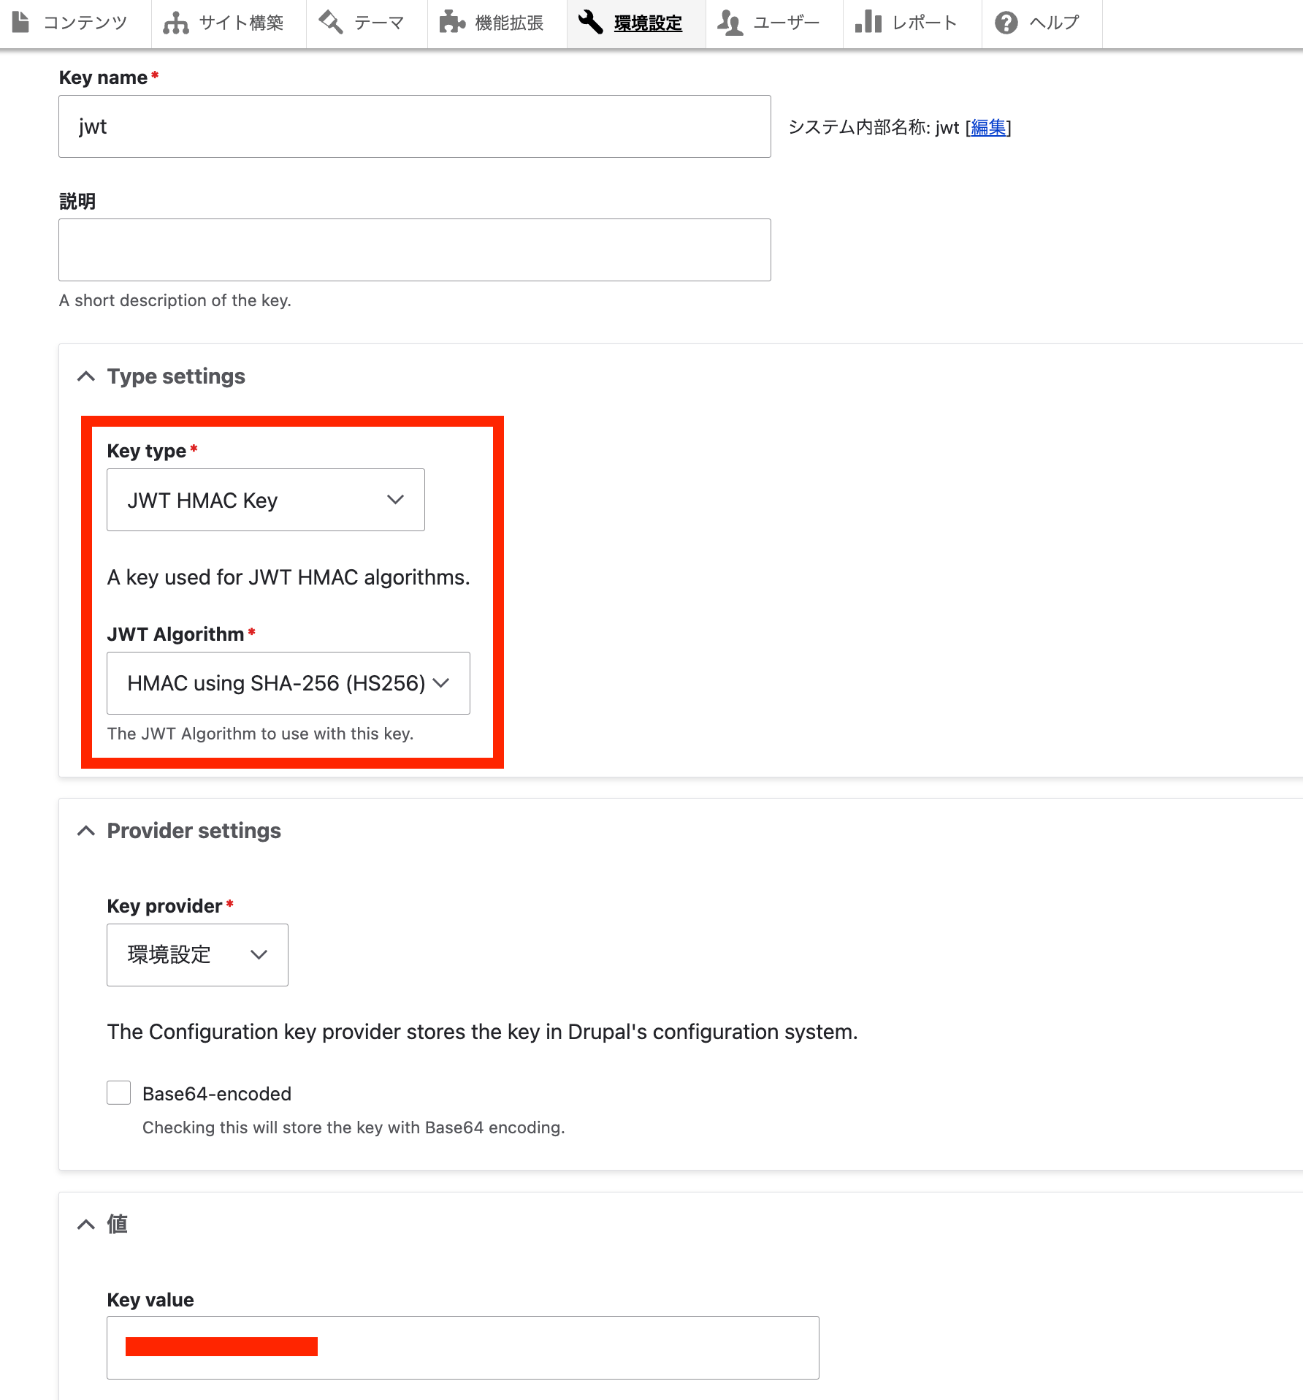
概要 DrupalのSimple OAuth (OAuth2) & OpenID ConnectモジュールはOAuth 2.0認証フレームワークRFCの実装と説明されています。 https://www.drupal.org/project/simple_oauth 関連する記事として、cookie認証の例や、jwt認証の例も参考にしてください。 インストール simple_oauthモジュールには、5系と6系があるようですが、今回は5系を使用します。以下でインストールします。 composer.phar require 'drupal/simple_oauth:^5.2' ただし、さくらレンタルサーバを使用している場合、以下のエラーが発生しました。PHP's sodium extensionが必要でした。 composer.phar require 'drupal/simple_oauth:^5.2' ./composer.json has been updated Running composer update drupal/simple_oauth Loading composer repositories with package information Updating dependencies Your requirements could not be resolved to an installable set of packages. Problem 1 - steverhoades/oauth2-openid-connect-server v2.4.0 requires lcobucci/jwt 4.1.5 -> satisfiable by lcobucci/jwt[4.1.5]. - steverhoades/oauth2-openid-connect-server[v2.6.0, ..., v2.6.1] require lcobucci/jwt 4.1.5|^4.2|^4.3|^5.0 -> satisfiable by lcobucci/jwt[4.1.5, ..., 4.4.x-dev, 5.0.0, ..., 5.3.x-dev]. - steverhoades/oauth2-openid-connect-server v2.5.0 requires lcobucci/jwt 4.1.5|^4.2 -> satisfiable by lcobucci/jwt[4.1.5, ..., 4.4.x-dev]. - drupal/simple_oauth[5.2.0, ..., 5.x-dev] require drupal/core ^8 || ^9 -> found drupal/core[8.0.0-beta6, ..., 8.9.x-dev, 9.0.0-alpha1, ..., 9.5.x-dev] but the package is fixed to 10.2.0 (lock file version) by a partial update and that version does not match. Make sure you list it as an argument for the update command. - lcobucci/jwt[4.1.5, ..., 4.4.x-dev, 5.0.0, ..., 5.3.x-dev] require ext-sodium * -> it is missing from your system. Install or enable PHP's sodium extension. - drupal/simple_oauth[5.2.3, ..., 5.2.x-dev] require steverhoades/oauth2-openid-connect-server ^2.4 -> satisfiable by steverhoades/oauth2-openid-connect-server[v2.4.0, v2.5.0, v2.6.0, v2.6.1]. - Root composer.json requires drupal/simple_oauth ^5.2 -> satisfiable by drupal/simple_oauth[5.2.0, ..., 5.x-dev]. To enable extensions, verify that they are enabled in your .ini files: - /usr/local/php/8.1/etc/php.ini - /usr/local/php/8.1/etc/conf.d/apcu.ini - /usr/local/php/8.1/etc/conf.d/imagick.ini - /usr/local/php/8.1/etc/conf.d/mcrypt.ini - /usr/local/php/8.1/etc/conf.d/opcache.ini You can also run `php --ini` in a terminal to see which files are used by PHP in CLI mode. Alternatively, you can run Composer with `--ignore-platform-req=ext-sodium` to temporarily ignore these required extensions. Use the option --with-all-dependencies (-W) to allow upgrades, downgrades and removals for packages currently locked to specific versions. Installation failed, reverting ./composer.json and ./composer.lock to their original content. そこで、以下のサイトを参考に、PHP-sodium 拡張を追加しました。 ...

Postmanを使って、DrupalのRESTリソースのcookie認証を試す

Postmanを使って、DrupalのRESTリソースのcookie認証を試す

概要 以下の記事で、JWTモジュールを使ったJWT認証を試しました。 今回は、cookie認証を試します。 インストール restuiモジュールをインストールしていない場合には、以下のようなコマンドをインストールと有効化を行います。 composer.phar require 'drupal/restui:^1.21' vendor/bin/drush en restui 設定 今回は、以下のように、cookie認証を使用します。設定方法の詳細については、冒頭の関連記事をご確認ください。 Postman ログイン POST /user/login Body > x-www-form-urlencoded Key Value name {ユーザー名} pass {パスワード} form_id user_login_form ログインに成功すると、Cookieが発行されます。 セッショントークンの取得 GET /session/token Headersタブをみると、先に発行したCookieが設定されていることが確認できます。また、結果としてセッショントークンが取得できています。 コンテンツの作成 POST /node?_format=json Headersタブで、上記で取得したセッショントークンをX-CSRF-TokenKeyのValueとして設定します。 Bodyの値は、以下を例として使用しました。 { "type": [ { "target_id": "article" } ], "title": [ { "value": "新しい記事のタイトル" } ] } なお、誤ったセッショントークンを入力して試してみると、以下が返却されました。 { "message": "X-CSRF-Token request header is invalid" } 参考:ログアウト GET /user/logout 上記により、発行されたセッションクッキーが削除されました。 まとめ DrupalのRESTリソースのcookie認証を試しました。誤っている点があるかと思いますが、参考になりましたら幸いです。

Drupal JSON Web Token Authenticationモジュールを試す

Drupal JSON Web Token Authenticationモジュールを試す

概要 DrupalのJSON Web Token Authenticationモジュールを試してみます。 https://www.drupal.org/project/jwt 以下のページを参考にしました。 https://preston.so/writing/decoupled-drupal-authentication-with-json-web-tokens/ なお、類似するモジュールとして、以下があるようです。 https://www.drupal.org/project/rest_api_authentication 上記モジュールを使ったjwt認証は以下で説明されています。 https://www.drupal.org/docs/contributed-modules/api-authentication/jwt-authentication しかし、以下の記事に記載したように、上記モジュールでjwt認証を使用するには有料プランに加入する必要があるようでした。 そこで、今回は、jwtモジュールのほうを試してみます。 インストールと有効化 jwtモジュール 注意点として、jwtだけでなく、jwt_auth_consumerやjwt_auth_issuerも有効化する必要がありました。 composer.phar require 'drupal/jwt:^2.0' vendor/bin/drush en jwt jwt_auth_consumer jwt_auth_issuer restuiモジュール composer.phar require 'drupal/restui:^1.21' vendor/bin/drush en restui 設定 以下にアクセスして、キーを作成します。 /admin/config/system/keys Key typeとしてJWT HMAC Keyを選択して、JWT AlgorithmとしてSHA-256を選択しました。 次に、以下にアクセスして、JWTの設定を行います。 AlgorithmとしてデフォルトのSHA-256を選択して、Secretとして先ほど作成したキー(ここではjwt)を選択します。 その後、ログインした状態で、以下にアクセスしてみます。 /jwt/token すると、以下のようなトークンが得られます。 参考までに、このトークンをjwt.ioで検証してみます。 https://jwt.io/ PAYLOADの箇所を見てみると、iat(Issued A: トークンが発行された時刻)やDrupalの「User ID」を確認することができます。 RESTリソースの設定 以下にアクセスします。 /admin/config/services/rest ここでは、コンテンツに対して、POSTを有効化し、認証プロバイダとしてjwt_authを選択します。 Postman Postmanを使って、コンテンツの作成を試してみます。 まず、Authorizationを指定せずに、コンテンツの作成試してみます。 Bodyはrawを選択して、フォーマットをJSONとします。以下の最低限のデータで、articleタイプのコンテンツの作成してみます。 { "type": [ { "target_id": "article" } ], "title": [ { "value": "新しい記事のタイトル" } ] } POST先のURLは以下です。 ...

さくらレンタルサーバ上のDrupalを更新する

さくらレンタルサーバ上のDrupalを更新する

概要 さくらレンタルサーバ上のDrupalを更新する機会がありましたので、手順のメモです。 まず、以下のサイトを参考にしました。 https://www.drupal.org/docs/updating-drupal/updating-drupal-core-via-drush ただし、以下のような記載がありました。 Use Composer to manage Drupal dependencies. Drush 9 and newer no longer supports updating Drupal. そこで、以下も参考にさせていただきました。 https://drupalfan.com/drupal10を最新版にアップデートする/ 手順 ! 間違った手順や不要な手順が含まれているかもしれませんので、参考程度ご確認ください。 Drupalをダウンロードしたディレクトリに移動 cd ~/www/{project_name} 準備(インストール済みの場合は不要) composer composer.pharというファイルしかない場合、composerを作成する。(mvでもよいかと思います。) cp composer.phar composer drush composer require --dev drush/drush メンテナンスモードの有効化 ./vendor/bin/drush state-set system.maintenance_mode 1 キャッシュのクリア ./vendor/bin/drush cr バックアップ バックアップ用のディレクトリの作成 mkdir ~/bk sqlのバックアップ ./vendor/bin/drush sql:dump --extra-dump=--no-tablespaces > ~/bk/dump.sql 参考 以下のように、--extra-dump=--no-tablespacesを指定しないと、エラーがメッセージが表示されました。 ./vendor/bin/drush sql:dump > ~/bk/dump.sql > mysqldump: Error: 'Access denied; you need (at least one of) the PROCESS privilege(s) for this operation' when trying to dump tablespaces ファイルのバックアップ tar cvzf ~/bk/web.zip . 更新 事前確認 composer update "drupal/core-*" --with-all-dependencies --dry-run 更新 composer update "drupal/core-*" --with-all-dependencies コントリビュートモジュールのアップデート composer update データベースの更新 ./vendor/bin/drush updatedb メンテナンスモードの無効化 ./vendor/bin/drush state-set system.maintenance_mode 0 キャッシュのクリア ./vendor/bin/drush cr 更新後にキャッシュのクリアを行わないと、表示が崩れることがありました。 ...

lando start時のエラー対応

lando start時のエラー対応

ローカル開発環境構築ツールの一つであるLandoを使用してDrupalやOmekaのモジュール開発を行っていた際、以下のエラーが生じることがありました。 lando start __ __ __ __ ___ _ __ __ __ ______ / / / /__ ___/ /__ _/ /____ / _ |_ _____ _(_) /__ _/ / / /__ / / / / / /_/ / _ \/ _ / _ `/ __/ -_) / __ | |/ / _ `/ / / _ `/ _ \/ / -_)_/_/_/ \____/ .__/\_,_/\_,_/\__/\__/ /_/ |_|___/\_,_/_/_/\_,_/_.__/_/\__(_|_|_) /_/ Updating helps us provide the best support and saves us tons of time Use the link below to get the latest and greatest https://github.com/lando/lando/releases/tag/v3.20.8 Lando is FREE and OPEN SOURCE software that relies on contributions from developers like you! If you like Lando then help us spend more time making, updating and supporting it by contributing at the link below https://github.com/sponsors/lando If you would like to customize the behavior of this message then check out: https://docs.lando.dev/config/releases.html Let's get this party started! Starting app my-lando-app... ERROR ==> connect ENOENT /var/run/docker.sock ██╗ ██╗██╗ ██╗ ██████╗ ██╗ ██╗██╗ ██║ ██║██║ ██║ ██╔═══██╗██║ ██║██║ ██║ ██║███████║ ██║ ██║███████║██║ ██║ ██║██╔══██║ ██║ ██║██╔══██║╚═╝ ╚██████╔╝██║ ██║ ╚██████╔╝██║ ██║██╗ ╚═════╝ ╚═╝ ╚═╝ ╚═════╝ ╚═╝ ╚═╝╚═╝ An error occurred while starting up your app! Here are a few things you can try to get back into a good state: ■ Try running lando rebuild ■ Try restarting in debug mode lando restart -vvv ■ Try checking the logs with lando logs If those fail then consult the troubleshooting materials: ■ https://docs.lando.dev/help/logs.html ■ https://docs.lando.dev/help/updating.html Or post your issue to Slack or GitHub ■ Slack - https://launchpass.com/devwithlando ■ GitHub - https://github.com/lando/lando/issues/new/choose ERROR ==> connect ENOENT /var/run/docker.sock 本件について、以下のIssueで言及されていました。 ...

drushのコマンドの備忘録

drushのコマンドの備忘録

概要 Drupalのモジュールの開発において、使用頻度が高かったコマンドのメモです。 キャッシュのクリア drush cr 翻訳ファイルのインポート 以下は、itaijiというモジュールの日本語ファイルをインポートしている例です。 drush locale:import ja /app/web/modules/custom/Drupal-module-itaiji/translations/itaiji.ja.po モジュールの再インストール drush pm-uninstall itaiji && drush en itaiji

Oxygen XML Editorのイメージマップエディタの使用例

Oxygen XML Editorのイメージマップエディタの使用例

概要 Oxygen XML Editorのイメージマップエディタの使用方法に関する説明です。 動画 https://youtu.be/9dZQ1v0Rky0?si=8EhAZdVsLqgPz2Rf 使用方法 以下のようなTEI/XMLファイルを用意します。<graphic>のurlの値は、当該ファイルからの相対パスや、PC上の絶対パス、およびインターネット上で公開されているURLを指定します。 以下の例では、TEI/XMLファイルと同じフォルダに格納されているdigidepo_3437686_pn_null_9c48d89b-e2ec-4593-8d00-6fbc1d29d1bd.jpgというファイルを参照しています。 <?xml version="1.0" ?> <?xml-model href="http://www.tei-c.org/release/xml/tei/custom/schema/relaxng/tei_all.rng" type="application/xml" schematypens="http://relaxng.org/ns/structure/1.0"?> <TEI xmlns="http://www.tei-c.org/ns/1.0"> <teiHeader> <fileDesc> <titleStmt> <title>Sample</title> </titleStmt> <publicationStmt> <ab/> </publicationStmt> <sourceDesc> <ab/> </sourceDesc> </fileDesc> </teiHeader> <facsimile> <surface> <graphic url="digidepo_3437686_pn_null_9c48d89b-e2ec-4593-8d00-6fbc1d29d1bd.jpg"/> </surface> </facsimile> </TEI> 画面下部の「作者」というボタンをクリックすると、以下のように「イメージマップエディタ」が表示されます。上記の動画を参考に、アノテーションを付与します。 結果、以下のようにzoneタグが自動的に追加されます。 <?xml version="1.0" ?> <?xml-model href="http://www.tei-c.org/release/xml/tei/custom/schema/relaxng/tei_all.rng" type="application/xml" schematypens="http://relaxng.org/ns/structure/1.0"?> <TEI xmlns="http://www.tei-c.org/ns/1.0"> <teiHeader> <fileDesc> <titleStmt> <title>Sample</title> </titleStmt> <publicationStmt> <ab/> </publicationStmt> <sourceDesc> <ab/> </sourceDesc> </fileDesc> </teiHeader> <facsimile> <surface> <graphic url="digidepo_3437686_pn_null_9c48d89b-e2ec-4593-8d00-6fbc1d29d1bd.jpg"/> <zone xml:id="zone_z3p_zll_szb" change="#ch1" lry="3960" lrx="2705" uly="730" ulx="2590"/> <zone xml:id="zone_fmm_xnv_szb" change="#ch2" lry="4038" lrx="1025" uly="700" ulx="850"/> </surface> </facsimile> </TEI> まとめ Oxygen XML Editorの利用に際して、参考になりましたら幸いです。 ...

Nuxt3 x Vuetify x Cesium

Nuxt3 x Vuetify x Cesium

概要 Nuxt3とVuetifyとCesiumを使用したサンプルリポジトリを作成しました。 ソースコード vue-cesiumを使用しています。 https://github.com/zouyaoji/vue-cesium GitHubリポジトリは以下です。 https://github.com/nakamura196/nuxt3-vuetify-cesium デモサイト https://nakamura196.github.io/nuxt3-vuetify-cesium/ まとめ 参考になりましたら幸いです。

Nuxt 3とDecap CMSを試す

Nuxt 3とDecap CMSを試す

概要 Nuxt 3とDecap CMSを試してみましたので、その備忘録です。 https://decapcms.org/ Nuxt3プロジェクトの用意 既存のサイトにDecap CMSを追加する以下を参考にしました。 https://decapcms.org/docs/add-to-your-site/ まず、nuxt/contentモジュールを含む、Nuxt3のプロジェクトを用意します。 ソースコードの例はこちらです。 https://github.com/nakamura196/nuxt3-decapcms 以下の2つのファイルを作成しました。 # when using the default proxy server port local_backend: true # This line should *not* be indented publish_mode: editorial_workflow backend: name: git-gateway branch: main # Branch to update (optional; defaults to master) media_folder: public/img public_folder: /img collections: - name: 'blog' label: 'Blog' folder: 'content/blog' format: 'frontmatter' create: true slug: '{{year}}-{{month}}-{{day}}-{{slug}}' fields: - { label: 'Title', name: 'title', widget: 'string' } - { label: 'Publish Date', name: 'date', widget: 'datetime' } - { label: 'Description', name: 'description', widget: 'string' } - { label: 'Body', name: 'body', widget: 'markdown' } <!DOCTYPE html> <html> <head> <meta charset="utf-8" /> <meta name="viewport" content="width=device-width, initial-scale=1.0" /> <title>Content Manager</title> <!-- Include the script that enables Netlify Identity on this page. --> <script src="https://identity.netlify.com/v1/netlify-identity-widget.js"></script> </head> <body> <!-- Include the script that builds the page and powers Decap CMS --> <script src="https://unpkg.com/decap-cms@^3.0.0/dist/decap-cms.js"></script> </body> </html> そして、GitHubにpushしました。 ...

AttributeError: 'ImageDraw' object has no attribute 'textsize'への対応

AttributeError: 'ImageDraw' object has no attribute 'textsize'への対応

PythonのPillowで以下を使用していた際、 textsize = 14 font = ImageFont.truetype("Arial Unicode.ttf", size=textsize) txw, txh = draw.textlength(label, font=font) 以下のエラーが発生しました。 AttributeError: ‘ImageDraw’ object has no attribute ’textsize’ この対処法として、以下が参考になりました。 https://stackoverflow.com/questions/77038132/python-pillow-pil-doesnt-recognize-the-attribute-textsize-of-the-object-imag 具体的には、以下のように書き直しました。 textsize = 14 font = ImageFont.truetype("Arial Unicode.ttf", size=textsize) txw = draw.textlength(label, font=font) txh = textsize 参考になりましたら幸いです。

Amazon SNSを用いたEC2上のVirtuosoの再起動

Amazon SNSを用いたEC2上のVirtuosoの再起動

概要 以下の記事で、ヘルスチェックを行う方法について記述しました。 また、Virtuosoが停止した際の再起動のためのコマンドを以下に記述しました。 今回は、Amazon SNSを用いた通知に合わせて、Virtuosoを再起動してみます。 方法 EC2インスタンスにsudo rm -rf /usr/local/var/lib/virtuoso/db/virtuoso.lck && ...のようなコマンドを送信するには、SSM(AWS Systems Manager)に関する設定が必要でした。 IAMロールとポリシー IAMロールを新規に作成して、AmazonSSMFullAccessというポリシーを許可しました。はじめ、AmazonSSMManagedInstanceCoreというポリシーを許可していましたが、後述するlambda実行時に以下のようなエラーが発生して、うまく動作させることができませんでした。 An error occurred (InvalidInstanceId) when calling the SendCommand operation: Instances [[i-xxxxxx]] not in a valid state for account xxxxxx EC2インスタンスの「IAMロールを変更」から、作成したIAMロールを選択して更新しました。 AWS SAM: lamda関数の作成 AWS SAMを用いました。以下でのプロジェクトを作成します。 sam init hello_world/app.pyを以下のように作成しました。instance_idの部分には、要修正です。 import boto3 import time def lambda_handler(event, context): # EC2クライアントの初期化 ec2 = boto3.client('ec2') # 特定のEC2インスタンスIDを指定 instance_id = 'i-xxxxxxxx' # EC2インスタンスのステータスチェック response = ec2.describe_instance_status(InstanceIds=[instance_id]) if len(response['InstanceStatuses']) == 0: print(f"インスタンス {instance_id} は停止中です。") return # Define the command to be executed on the instance (e.g., restart software) command = 'sudo rm -rf /usr/local/var/lib/virtuoso/db/virtuoso.lck && sudo /usr/local/bin/virtuoso-t +configfile /usr/local/var/lib/virtuoso/db/virtuoso.ini' # SSMを通じてEC2インスタンスにコマンドを送信 ssm_client = boto3.client('ssm') response = ssm_client.send_command( InstanceIds=[instance_id], DocumentName='AWS-RunShellScript', Parameters={'commands': [command]} ) time.sleep(1.0) command_id = response['Command']['CommandId'] output = ssm_client.get_command_invocation( CommandId=command_id, InstanceId=instance_id, ) print("コマンドを実行しました。") # Extract only the necessary information from the output simplified_response = { "Output": output['StandardOutputContent'], "Error": output['StandardErrorContent'], } return simplified_response また、hello_word/requirements.txtにboto3を追記しました。 ...

samでError: Running AWS SAM projects locally requires Docker...への対応

samでError: Running AWS SAM projects locally requires Docker...への対応

概要 AWS SAMを使ってsam local invokeを試した際、以下のメッセージが表示されました。 Error: Running AWS SAM projects locally requires Docker. Have you got it installed and running? 環境はMacで、Dockerも動作していました。 対処法 以下を実行することで、解決しました。 sudo ln -s ~/.docker/run/docker.sock /var/run/docker.sock 以下を参考にしました。 https://github.com/lando/lando/issues/3533 まとめ 同様の事象でお困りの方の参考になりましたら幸いです。

Nuxt 3 x Composition APIでLeaflet Marker Clusterを試す

Nuxt 3 x Composition APIでLeaflet Marker Clusterを試す

概要 以下の記事で、Nuxt 3でLeaflet Marker Clusterを試す方法を紹介しました。今回は、Composition APIを使った書き方に更新したので、その備忘録です。 インストール 以下をインストールします。 npm i leaflet leaflet.markercluster @vue-leaflet/vue-leaflet npm i -D @types/leaflet @types/leaflet.markercluster ソースコード 以下を参考にしてください。 https://github.com/nakamura196/nuxt3-demo/blob/main/components/map/MarkerCluster.vue まとめ TypeScriptに一部対応できていない点がありますが、参考になりましたら幸いです。

Nuxt3 x Vuetify x Cytoscape

Nuxt3 x Vuetify x Cytoscape

概要 Nuxt3とVuetifyを使用したサンプルリポジトリに、Cytoscapeの動作デモを追加しました。 https://github.com/nakamura196/nuxt3-demo 以下のページで動作確認いただけます。 https://nakamura196.github.io/nuxt3-demo/ インストール 以下を実行しました。 npm i cytoscape npm i @types/cytoscape ソースコード <template> <div id="view"> <v-btn class="ma-4" color="primary" v-on:click="addNode">push</v-btn> <div id="cy"></div> </div> </template> <script setup lang="ts"> import cytoscape from "cytoscape"; let cy: any = null; // = ref(null); //reactive({}); //: any const count: number = 0; // = ref(0); //reactive(0); const addNode = () => { cy.add([ { group: "nodes", data: { id: "node" + count }, position: { x: 300, y: 200 }, }, { group: "edges", data: { id: "edge" + count, source: "node" + count, target: "cat" }, }, ]); }; onMounted(() => { cy = cytoscape({ container: document.getElementById("cy"), boxSelectionEnabled: false, autounselectify: true, style: cytoscape .stylesheet() .selector("node") .css({ height: 80, width: 80, "background-fit": "cover", "border-color": "#000", "border-width": 3, "border-opacity": 0.5, content: "data(name)", "text-valign": "center", }) .selector("edge") .css({ width: 6, "target-arrow-shape": "triangle", "line-color": "#ffaaaa", "target-arrow-color": "#ffaaaa", "curve-style": "bezier", }), elements: { nodes: [ { data: { id: "cat" } }, { data: { id: "bird" } }, { data: { id: "ladybug" } }, { data: { id: "aphid" } }, { data: { id: "rose" } }, { data: { id: "grasshopper" } }, { data: { id: "plant" } }, { data: { id: "wheat" } }, ], edges: [ { data: { source: "cat", target: "bird" } }, { data: { source: "bird", target: "ladybug" } }, { data: { source: "bird", target: "grasshopper" } }, { data: { source: "grasshopper", target: "plant" } }, { data: { source: "grasshopper", target: "wheat" } }, { data: { source: "ladybug", target: "aphid" } }, { data: { source: "aphid", target: "rose" } }, ], }, layout: { name: "breadthfirst", directed: true, padding: 10, }, }); }); </script> <style scoped> #cy { width: 100%; height: 80%; position: absolute; background-color: lightcyan; } </style> まとめ 参考になりましたら幸いです。 ...

Cantaloupe: サービスとして実行する

Cantaloupe: サービスとして実行する

概要 Cantaloupe Image Serverは以下のコマンドで実行できます。 java -Dcantaloupe.config=cantaloupe.properties -Xmx2g -jar cantaloupe-5.0.5.jar しかしこの方法では、ssh接続が切れた場合など、Cantaloupeサーバが止まってしまいます。 そこで、サービスとして実行する方法を紹介します。 方法 サービスファイルの作成 : /etc/systemd/system/ディレクトリにサービスファイル(例えば、cantaloupe.service)をsudo権限で作成します。 [Unit] Description=Cantaloupe Image Server [Service] User=ubuntu # 以下のパスは適宜修正してください WorkingDirectory=/home/ubuntu/cantaloupe-5.0.5 ExecStart=/usr/bin/java -Dcantaloupe.config=cantaloupe.properties -Xmx2g -jar cantaloupe-5.0.5.jar SuccessExitStatus=143 [Install] WantedBy=multi-user.target このファイルでは、ExecStartに実行するJavaコマンドを指定します。また、UserとWorkingDirectoryは適切に設定する必要があります。 サービスのリロード : 変更を適用するために、次のコマンドでsystemdをリロードします。 sudo systemctl daemon-reload サービスの開始 : 以下のコマンドでサービスを開始します。 sudo systemctl start cantaloupe サービスの有効化 : システム起動時にサービスが自動的に起動するようにするには、以下のコマンドを実行します。 sudo systemctl enable cantaloupe サービスの状態確認 : サービスの状態を確認するには、次のコマンドを使用します。 sudo systemctl status cantaloupe 注意: この例では、Javaのパスやcantaloupeのインストールパスは適宜修正する必要があります。また、Userはcantaloupeを実行するユーザーに置き換えてください。サービスファイルの詳細設定については、systemdのドキュメントを参照してください。 まとめ 以下のようにサービスとして起動していることを確認できます。参考になりましたら幸いです。 sudo systemctl status cantaloupe ● cantaloupe.service - Cantaloupe Image Server Loaded: loaded (/etc/systemd/system/cantaloupe.service; enabled; vendor preset: enabled) Active: active (running) since Thu 2023-11-16 03:52:24 UTC; 6min ago Main PID: 33204 (java) Tasks: 31 (limit: 4667) Memory: 116.2M CPU: 4.408s CGroup: /system.slice/cantaloupe.service └─33204 /usr/bin/java -Dcantaloupe.config=cantaloupe.properties -Xmx2g -jar cantaloupe-5.0.5.jar

Cantaloupe: Amazon S3に格納した画像を配信する

Cantaloupe: Amazon S3に格納した画像を配信する

概要 IIIFイメージサーバの一つであるCantaloupe Image Serverについて、Amazon S3に格納した画像を配信する方法の備忘録です。 なお、Amazon S3に格納した画像を配信する別の方法として、以下の記事で紹介した方法もありますので、参考になりましたら幸いです。(記事執筆時点からツールが更新されているようで、記事通りに進められないかもしれません。) 設定 以下に公式マニュアルが公開されています。 https://cantaloupe-project.github.io/manual/5.0/sources.html#S3Source 以下のファイルを編集します。 /cantaloupe-5.0.5/cantaloupe.properties まず、source.staticをS3Sourceに変更しました。 ########################################################################### # SOURCES ########################################################################### # Uses one source for all requests. Available values are `FilesystemSource`, # `HttpSource`, `JdbcSource`, `S3Source`, and `AzureStorageSource`. # source.static = FilesystemSource source.static = S3Source 次に、S3Source.access_key_id、S3Source.secret_key、S3Source.BasicLookupStrategy.bucket.nameを設定します。 #---------------------------------------- # S3Source #---------------------------------------- # !! Endpoint URI. Only needed for non-AWS endpoints. S3Source.endpoint = # !! AWS region. Only needed for AWS endpoints. S3Source.region = # !! Credentials for your AWS account. # See: http://aws.amazon.com/security-credentials # Note that this info can be obtained from elsewhere rather than setting # it here; see the user manual. S3Source.access_key_id = <アクセスキー> S3Source.secret_key = <シークレットキー> # How to look up objects. Allowed values are `BasicLookupStrategy` and # `ScriptLookupStrategy`. ScriptLookupStrategy uses a delegate method for # dynamic lookups; see the user manual. S3Source.lookup_strategy = BasicLookupStrategy # !! Name of the bucket containing images to be served. S3Source.BasicLookupStrategy.bucket.name = <バケット名> これでAmazon S3に格納した画像が参照されるようになりました。 ...

TEI Publisher: TEI Publisher Demo Collectionの可視化例①

TEI Publisher: TEI Publisher Demo Collectionの可視化例①

概要 TEI Publisherの以下のページでは、さまざまな可視化例が紹介されています。 https://teipublisher.com/exist/apps/tei-publisher/index.html?query=&collection=test&sort=title&field=text&start=1 以降、複数の記事にわたって、上記の可視化例を紹介します。 Letter #6 from Robert Graves to William Graves (at Oundle School) November 15, 1957 概要 https://teipublisher.com/exist/apps/tei-publisher/test/graves6.xml 以下のように、地名や人名の一覧、および地図とともにテキストが表示されます。 以下のように説明されています。 A 20th century manuscript letter from Robert Graves where emphasis has been put on visualizing rich encoding of semantic information in the letter, in particular geographic and prosopographical data. The map is displayed with a pb-leaflet component. 機械翻訳 ロバート・グレイブスによる20世紀の写本書簡。書簡中の意味情報、特に地理的・韻律的データの豊富な符号化を視覚化することに重点が置かれている。地図はpb-leafletコンポーネントで表示される。 データ XMLファイルの特徴です。 teiHeader > profileDesc > abstract abstractタグの内容が上記の検索ページに表示されるようです。 ...

Vue.js: Splitpanesを用いた際のiframeを含むpaneへの対処方法

Vue.js: Splitpanesを用いた際のiframeを含むpaneへの対処方法

Splitpanesは、以下のように、ペイン(pane)分割・リサイズを可能にするVue.jsのライブラリです。 https://github.com/antoniandre/splitpanes このライブラリの利用にあたり、ペインにiframe要素を含む際、リサイズがうまくできないことがありました。これに対して、以下で対応方法が記載されていました。 https://github.com/antoniandre/splitpanes/pull/162 上記に記載がある通り、以下を追記することで、iframe要素を含むペインがあっても、正しくリサイズ操作を行うことができました。 .splitpanes--dragging .splitpanes__pane { pointer-events: none; } 同様のことでお困りの方の参考になりましたら幸いです。

Nuxt3でXMLをフォーマットしてシンタックスハイライト表示する

Nuxt3でXMLをフォーマットしてシンタックスハイライト表示する

概要 以下の画像にあるように、Nuxt3を使ってXML形式のテキストデータを表示する機会がありましたので、その備忘録です。 インストール 以下の2つのライブラリを使用しました。 npm i xml-formatter npm i highlight.js 使い方 Nuxt3のコンポーネントとして、以下のようなファイルを作成しました。xml-formatterでXML形式の文字列をフォーマットし、さらにhighlight.jsを使ってシンタックスハイライトを行っています。 <script setup lang="ts"> import hljs from "highlight.js"; import "highlight.js/styles/xcode.css"; import formatter from "xml-formatter"; interface PropType { xml: string; } const props = withDefaults(defineProps<PropType>(), { xml: "", }); const formattedXML = ref<string>(""); onMounted(() => { // `highlightAuto` 関数が非同期でない場合は、 // `formattedXML` を直接アップデートできます。 // そうでない場合は、適切な非同期処理を行ってください。 formattedXML.value = hljs.highlightAuto(formatXML(props.xml)).value; }); const formatXML = (xmlstring: string) => { return formatter(xmlstring, { indentation: " ", filter: (node) => node.type !== "Comment", }); }; </script> <template> <pre class="pa-4" v-html="formattedXML"></pre> </template> <style> pre { /* 以下のスタイルは適切で、pre要素内のテキストの折り返しを制御しています。 */ white-space: pre-wrap; /* CSS 3 */ white-space: -moz-pre-wrap; /* Mozilla, 1999年から2002年までに対応 */ white-space: -pre-wrap; /* Opera 4-6 */ white-space: -o-pre-wrap; /* Opera 7 */ word-wrap: break-word; /* Internet Explorer 5.5+ */ } </style> まとめ TEI/XMLデータの可視化などにおいて、参考になりましたら幸いです。 ...

Visual Studio Code(VSCode)でVersioning Machine(VM5.0)を使用する

Visual Studio Code(VSCode)でVersioning Machine(VM5.0)を使用する

概要 Versioning Machine(VM5.0)は、校異情報の可視化を行うアプリケーションです。 http://v-machine.org/ ここでは、Visual Studio Code(VSCode)を用いて、自身が作成したTEI/XMLファイルを本アプリケーションで表示する方法について説明します。 なお、表示対象となるTEI/XMLファイルは、以下のように、<listWit>タグで校異情報が記述されているものです。 <TEI xmlns="http://www.tei-c.org/ns/1.0"> <teiHeader> <fileDesc> <titleStmt> ... </titleStmt> <publicationStmt> ... </publicationStmt> <sourceDesc> <listWit> <witness xml:id="WA"> <title xml:lang="ja">ヴァイマル版ゲーテ全集(略称WA)</title> <title xml:lang="de">Goethes Werke. herausgegeben im Auftrage der Großherzogin Sophie von Sachsen</title> </witness> <witness xml:id="UTL"> <title xml:lang="ja">東京大学総合図書館所蔵のゲーテ自署付書簡</title> <title xml:lang="de">Der Brief von Goethe an Ludwig Wilhelm Cramer vom 29. Dezember 1822 im Besitz der Universitätsbibliothek Tokio</title> </witness> </listWit> <msDesc sameAs="#UTL"> ... 後述しますが、本記事では以下で公開されている、東京大学総合図書館所蔵のゲーテ自署付書簡のテキストデータを使用します。 https://utda.github.io/goethe/data/xml/goethe.xml ソースコードのダウンロード 以下のページにアクセスします。 http://v-machine.org/download/ そして、以下の「Click here」をクリックします。 Click here to download the latest or earlier versions of the Versioning Machine. ...