This article explains how to set up a development environment for a search application using AWS x Nuxt.js x Elasticsearch. This is primarily a personal reference note.
We aim for the following architecture. While there may be better configurations and approaches, this at least provides a working development environment for a Nuxt.js web application using Elasticsearch as the search engine on AWS.
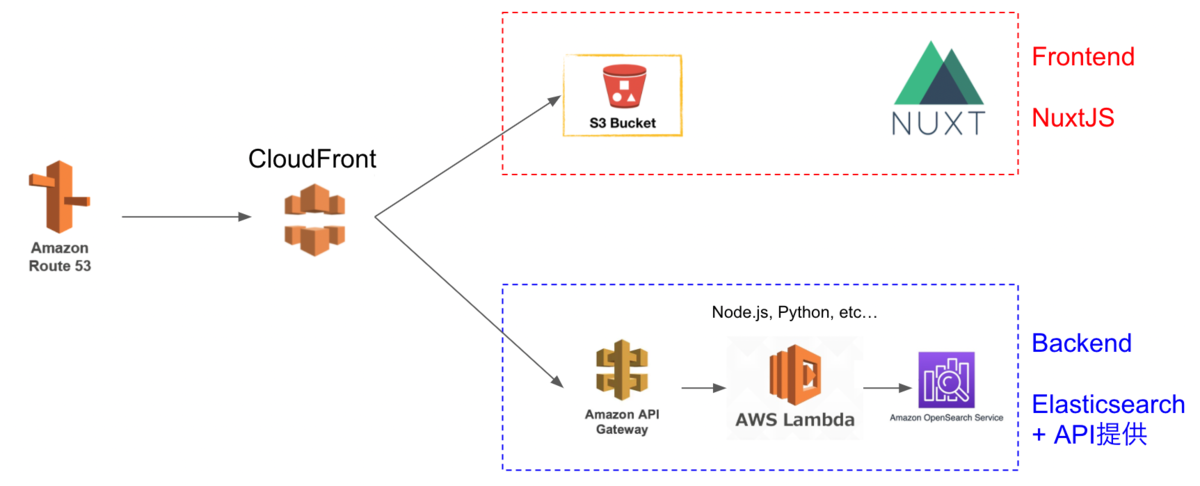
The Cultural Japan project also uses a nearly identical architecture.
The explanation follows this flow:
Preparation (Optional)
This section covers how to obtain a domain and set up SSL/TLS on AWS.
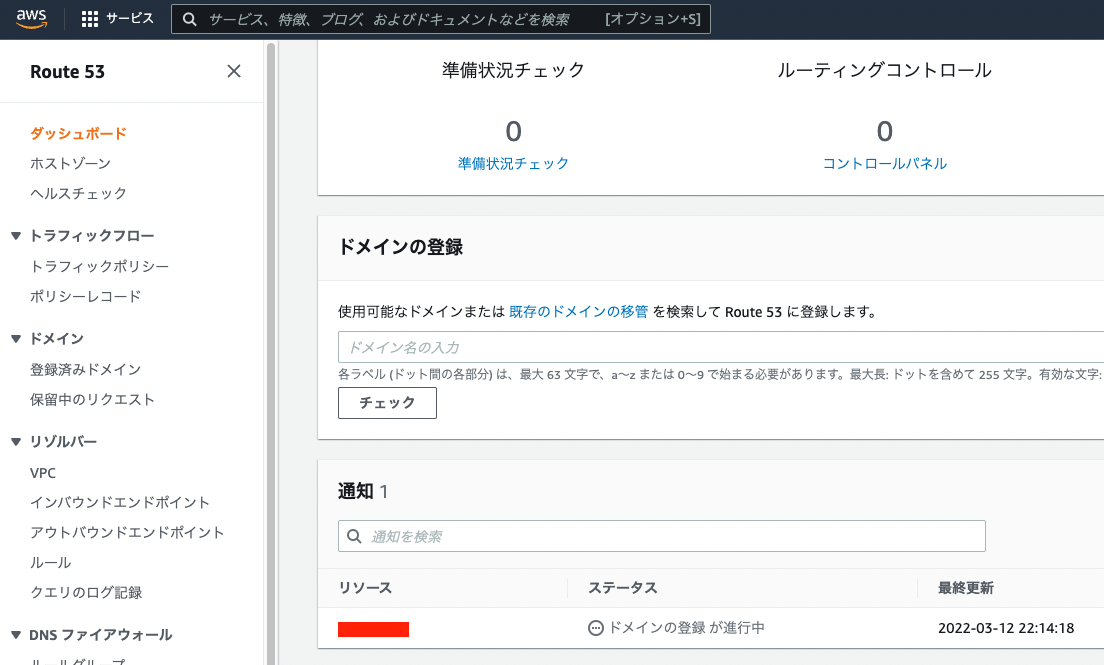
Domain Registration with Route 53
If you need a custom domain, you can register one through Route 53.
AWS Certificate Manager
Next, set up SSL/TLS using AWS Certificate Manager. Following the steps should be straightforward.
When performing validation, I was able to proceed easily by clicking the “Create records in Route 53” button.

Backend
We start with building the backend.
Creating an Identity and Access Management (IAM) User
First, create a user with access permissions to Amazon OpenSearch Service.

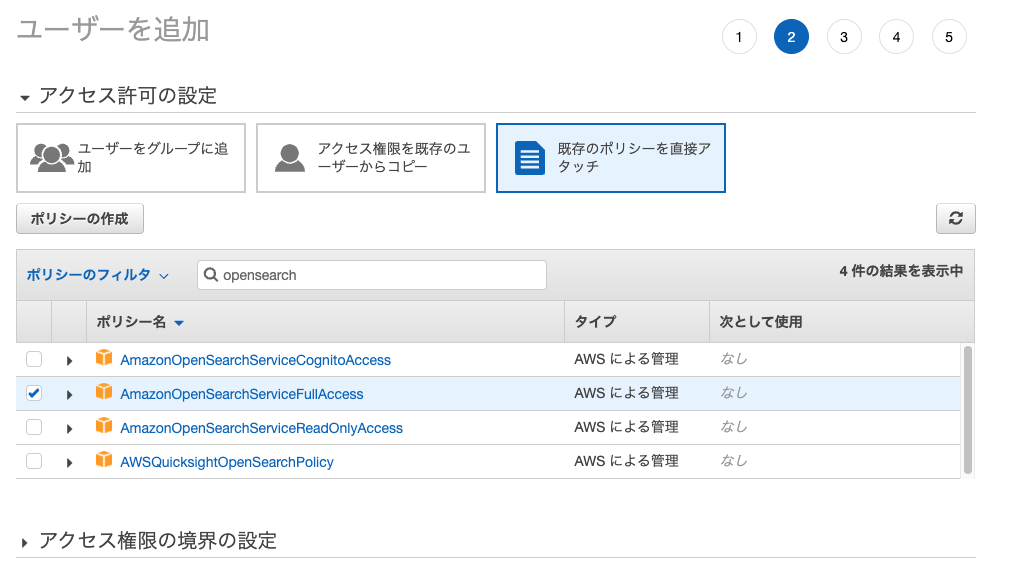
Take note of the “Access Key” and “Secret Access Key” displayed after creation.
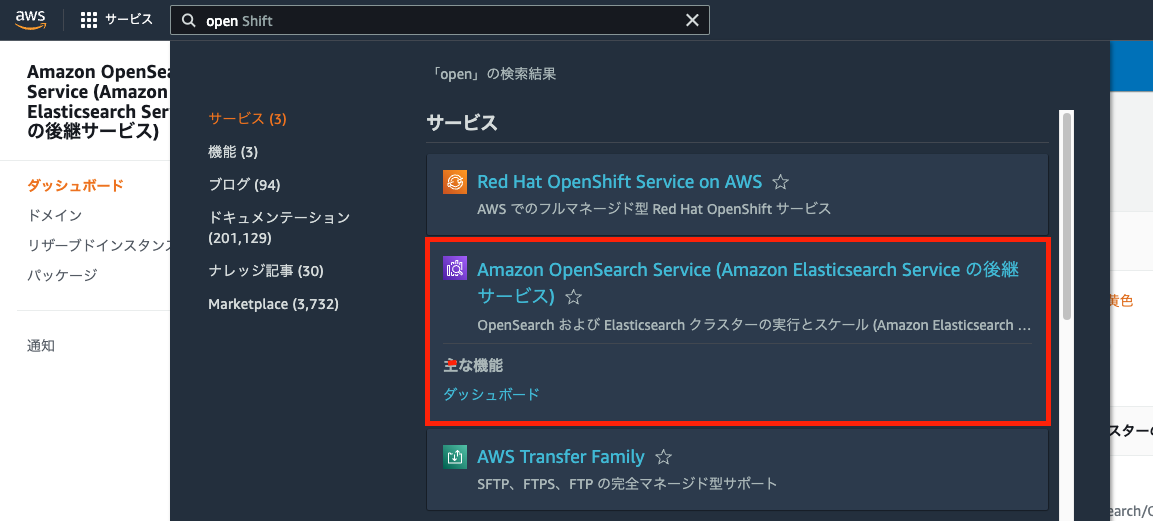
Amazon OpenSearch Service
First, select Amazon OpenSearch Service.
The following tutorial is helpful from here:
https://docs.aws.amazon.com/opensearch-service/latest/developerguide/gsg.html
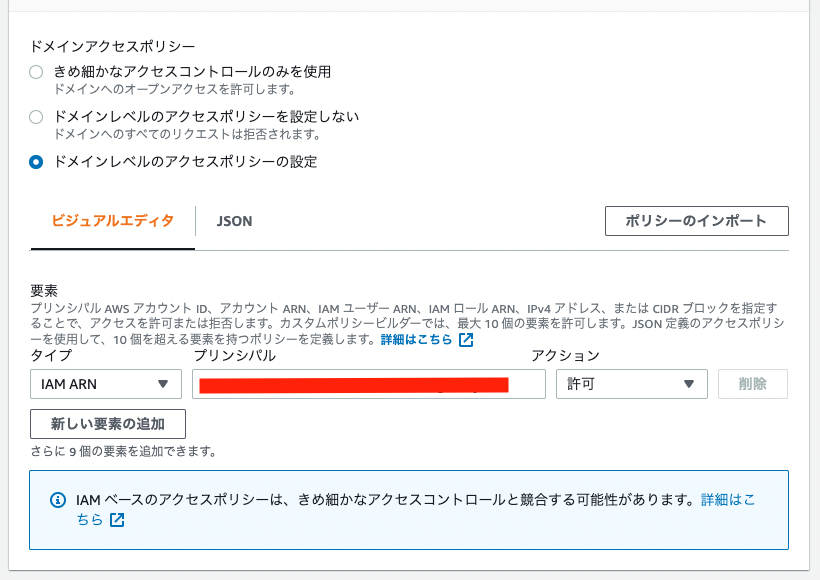
As a modification from the manual above, select “Configure domain level access policy” for the access policy and allow the ARN of the user you created earlier.
(Local) Registering Data to Amazon OpenSearch Service Using Python
Next, register data to Amazon OpenSearch Service using the “Access Key” and “Secret Access Key” issued above.
Specifically, please refer to the following Google Colab notebook:
https://colab.research.google.com/drive/1-uygvtQwoc3Wn4XSEUWN5Z5Hxq3vT9Gj?usp=sharing
AWS SAM (Serverless Application Model)
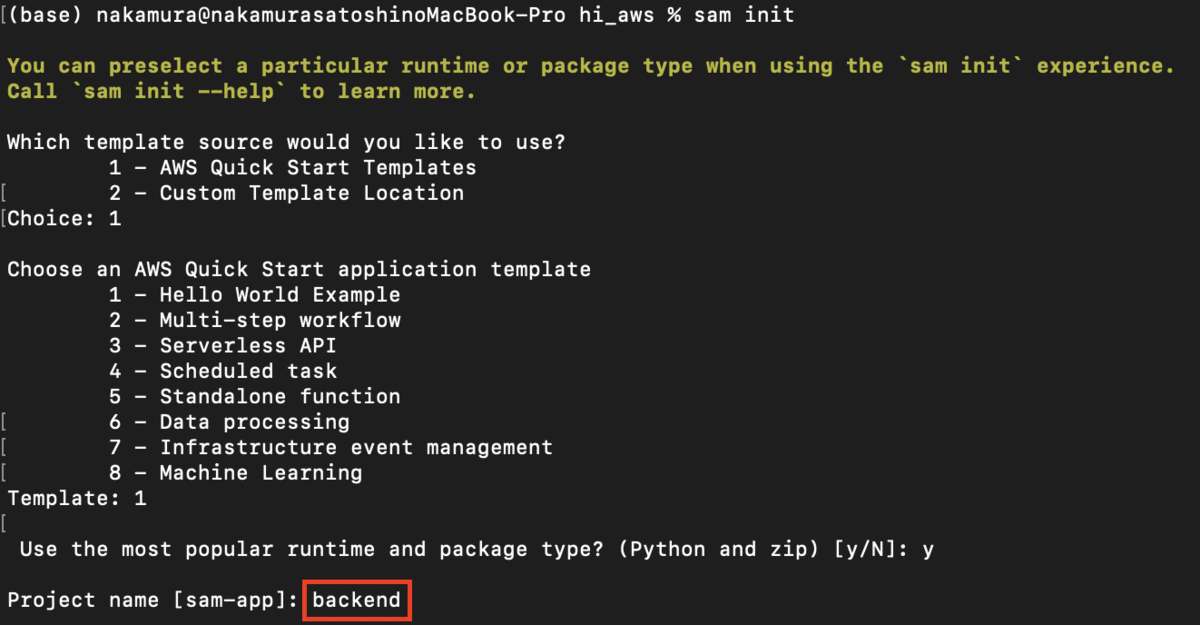
Next, create an API Gateway and Lambda function. Specifically, we use AWS SAM (Serverless Application Model), referencing the following article:
The following steps are performed in the local environment. During sam init, I set the project name to “backend.”
Then, I modified the template.yaml file as follows:
AWSTemplateFormatVersion: "2010-09-09"
Transform: AWS::Serverless-2016-10-31
Description: >
  backend

  Sample SAM Template for backend

# More info about Globals: https://github.com/awslabs/serverless-application-model/blob/master/docs/globals.rst
Globals:
  Function:
    Timeout: 20  Resources:
  SearchFunction:
    Type: AWS::Serverless::Function # More info about Function Resource: https://github.com/awslabs/serverless-application-model/blob/master/versions/2016-10-31.md#awsserverlessfunction
    Properties:
      CodeUri: search/
      Handler: app.lambda_handler
      Runtime: python3.9
      Architectures:
        - x86_64
      Events:
        Search:
          Type: Api # More info about API Event Source: https://github.com/awslabs/serverless-application-model/blob/master/versions/2016-10-31.md#api
          Properties:
            Path: /search
            Method: get
            RequestParameters:
              "method.request.path.str":
                Required: true
                Caching: false
      Environment:
        Variables:
          PARAM1: VALUE

Outputs:
  # ServerlessRestApi is an implicit API created out of Events key under Serverless::Function
  # Find out more about other implicit resources you can reference within SAM
  # https://github.com/awslabs/serverless-application-model/blob/master/docs/internals/generated_resources.rst#api
  SearchApi:
    Description: "API Gateway endpoint URL for Prod stage for Search function"
    Value: !Sub "https://${ServerlessRestApi}.execute-api.${AWS::Region}.amazonaws.com/Prod/search/"
  SearchFunction:
    Description: "Search Lambda Function ARN"
    Value: !GetAtt SearchFunction.Arn
  SearchFunctionIamRole:
    Description: "Implicit IAM Role created for Search function"
    Value: !GetAtt SearchFunctionRole.Arn
I configured it to accept GET parameters, referencing the following article. I also changed the Timeout from the default of 3 to 20 because timeouts were occurring.
https://xp-cloud.jp/blog/2020/10/15/8936/
Then, create /search/app.py as follows:
import json
import requests
from requests_aws4auth import AWS4Auth

# import requests

region = 'us-east-1' # For example, us-west-1
service = 'es'

access_key = "aaa"
secret_key = "bbb"

awsauth = AWS4Auth(access_key, secret_key, region, service)

host = 'https://xxx.us-east-1.es.amazonaws.com' # The OpenSearch domain endpoint with https://
index = 'hi-gallery'
url = host + '/' + index + '/_search'


def lambda_handler(event, context):
    query = {
        "size": 25,
        "query": {
            "multi_match": {
                "query": event['queryStringParameters']['q'],
                # "fields": ["title^4", "plot^2", "actors", "directors"]
            }
        }
    }

    # Elasticsearch 6.x requires an explicit Content-Type header
    headers = { "Content-Type": "application/json" }

    # Make the signed HTTP request
    r = requests.get(url, auth=awsauth, headers=headers, data=json.dumps(query))

    # Create the response and add some extra content to support CORS
    response = {
        "statusCode": 200,
        "headers": {
            "Access-Control-Allow-Origin": '*'
        },
        "isBase64Encoded": False
    }

    # Add the search results to the response
    response['body'] = r.text

    return response
After preparing the files as above, execute the following:
sam build
sam local start-api -p 3003
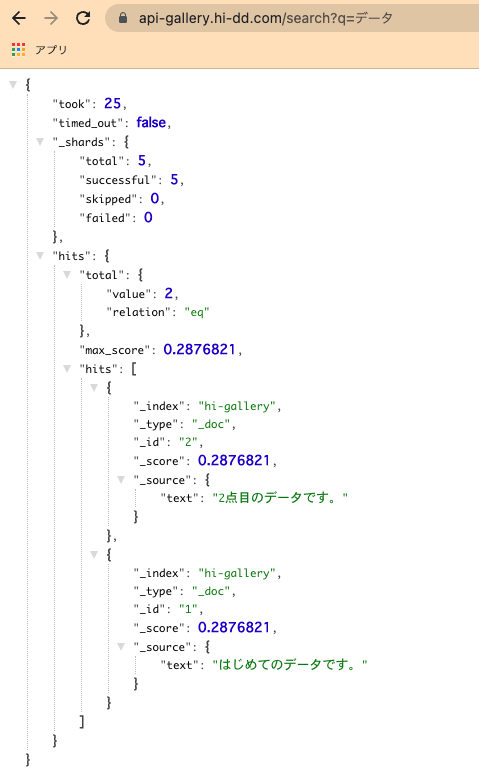
You can then confirm that you can search the previously set up OpenSearch from a URL like the one below. Note that Docker needs to be running.

Next, proceed with deployment.
Before that, save the authentication credentials to a configuration file.
Then execute the following:
sam deploy –guided
Upon successful completion, files will be uploaded and settings will be applied to S3, API Gateway, and Lambda functions.
For example, when you access API Gateway, you can see that the API has been created as follows:

Set up a custom domain for the API created here.
After configuring a custom domain in API Gateway, register the issued CloudFront URL in Route 53 to complete the custom domain setup.
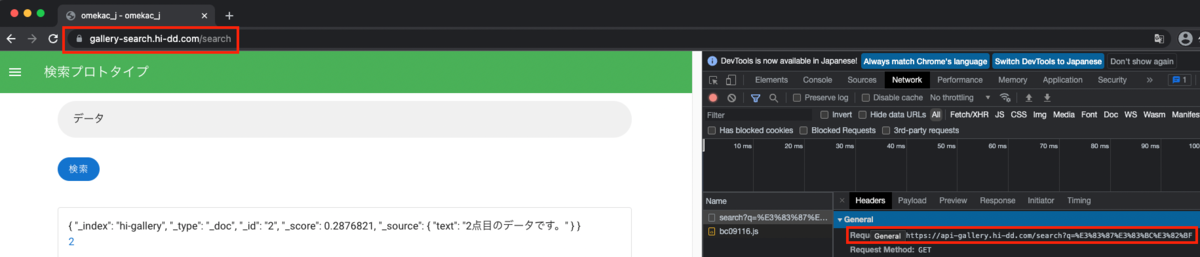
As a result, you can obtain Elasticsearch (OpenSearch) search results using a custom domain like the following:
This completes the backend environment setup.
Frontend
For frontend development, we use Nuxt.js. There are already many articles on how to install and use it, so please refer to those.
We use dotenv to switch the API server between development and production environments.
Once development reaches a good stopping point, proceed with deployment. Here, we use GitHub Actions. Specifically, I used the following:
name: deploy to s3

on:
  push:
    branches:
      - main

jobs:
  build:
    runs-on: ubuntu-latest
    timeout-minutes: 5

    steps:
      - name: Checkout
        uses: actions/checkout@v2

      - name: setup node
        uses: actions/setup-node@v1
        with:
          node-version: '12.x'

      - name: Configure AWS credentials
        uses: aws-actions/configure-aws-credentials@v1
        with:
          aws-access-key-id: ${{ secrets.AWS_ACCESS_KEY_ID }}
          aws-secret-access-key: ${{ secrets.AWS_SECRET_ACCESS_KEY }}
          aws-region: us-east-1

      - name: Cache dependencies
        uses: actions/cache@v1
        with:
          path: ~/.npm
          key: ${{ runner.os }}-node-${{ hashFiles('**/package-lock.json') }}
          restore-keys: |
            ${{ runner.os }}-node-
      - name: Install packages
        run: npm ci

      - name: Genarate files
        run: npm run generate

      - name: Upload dist files to S3
        env:
          S3_BUCKET_NAME: ${{ secrets.S3_BUCKET_NAME }}
        run: aws s3 sync ./dist s3://$S3_BUCKET_NAME/ --quiet

      - name: make invalidation to cloudfront
        uses: chetan/invalidate-cloudfront-action@master
        env:
          DISTRIBUTION: ${{ secrets.DISTRIBUTION_MAIN }}
          PATHS: '/*'
          AWS_REGION: 'us-east-1'
          AWS_ACCESS_KEY_ID: ${{ secrets.AWS_ACCESS_KEY_ID }}
          AWS_SECRET_ACCESS_KEY: ${{ secrets.AWS_SECRET_ACCESS_KEY }}

      - name: Slack Notification on Success
        if: success()
        uses: rtCamp/action-slack-notify@v2.0.2
        env:
          SLACK_WEBHOOK: ${{ secrets.SLACK_WEBHOOK }}
          SLACK_TITLE: Deploy Success(Develop)
          SLACK_COLOR: good

      - name: Slack Notification on Failure
        uses: rtCamp/action-slack-notify@v2.0.2
        if: failure()
        env:
          SLACK_WEBHOOK: ${{ secrets.SLACK_WEBHOOK }}
          SLACK_TITLE: Deploy Failure(Develop)
          SLACK_COLOR: danger
This also performs CloudFront invalidation and Slack notifications.
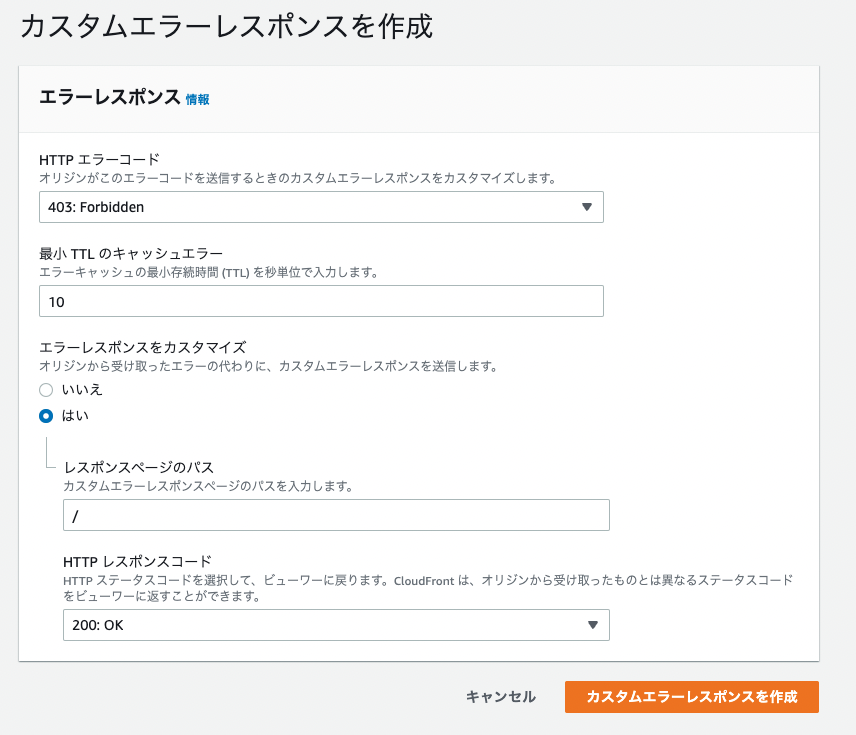
Related to the above, create an S3 bucket and a CloudFront distribution with that bucket as the origin domain.
At that time, set the default root object to “index.html.”
Also, configure custom error responses as follows:
By configuring the CloudFront URL issued here in Route 53, you can also access the frontend via a custom domain.
As a result, I confirmed that searching from the frontend to the backend works, with each using custom domains, as shown below.
Summary
There are many parts where I have omitted explanations, and I understand this may be unclear in places, but I hope it serves as a useful reference in terms of what services to use and in what order.