Overview
In recent years, the importance of data sharing and distribution between organizations has been growing. However, simply exposing APIs makes it difficult to control “who” can access “which data” under “what conditions.”
Dataspaces are a concept designed to solve this challenge. They provide a mechanism for data owners to maintain sovereignty while securely sharing data with trusted parties.
This article uses Eclipse EDC (Eclipse Dataspace Components), a dataspace implementation framework, to experience data exchange flows in a local environment.
Table of Contents
- What is a Dataspace?
- Overview of Eclipse EDC
- Environment Setup
- Executing the Data Exchange Flow
- Building a GUI Dashboard
- Summary
What is a Dataspace?
Challenges with Traditional Data Sharing
Traditional API integrations had the following challenges:
- Difficult access control: Once an API key is shared, any data can be retrieved
- Usage condition management: Conditions like “this data is for internal use only” cannot be technically enforced
- Auditing and tracking: It is difficult to track who retrieved data and when
The Dataspace Solution
Dataspaces solve these issues with the following approach:
┌─────────────────────────────────────────────────────────────┐
│  Traditional API Integration                                │
│                                                             │
│  Consumer ─────API Key────→ Provider API                    │
│            ←────Data────                                    │
│                                                             │
│  Issue: Anyone can retrieve data, no condition management   │
└─────────────────────────────────────────────────────────────┘

┌─────────────────────────────────────────────────────────────┐
│  Dataspace                                                  │
│                                                             │
│  1. Consumer: "I want XX data" (catalog check)              │
│  2. Provider: "I'll provide it if you meet these            │
│     conditions" (policy presentation)                       │
│  3. Both: Contract negotiation and agreement                │
│  4. Consumer: Retrieve data based on the contract           │
│                                                             │
│  Benefits: Conditional access, auditable, sovereignty       │
│  maintained                                                 │
└─────────────────────────────────────────────────────────────┘
Key Terminology
| Term | Description |
|---|---|
| Connector | Software for participating in a dataspace. Both Provider and Consumer have one |
| Provider | The party that provides data |
| Consumer | The party that retrieves data |
| Catalog | A listing of data published by the Provider |
| Policy | Conditions for data access (who, when, how it can be used) |
| Contract | An agreement between Provider and Consumer |
| EDR | Endpoint Data Reference. Temporary access information for data retrieval |
Overview of Eclipse EDC
Eclipse EDC is an open-source dataspace implementation framework developed by the Eclipse Foundation.
Architecture
┌─────────────────────────────────────────────────────────────┐
│                    EDC Connector                             │
├─────────────────────────────────────────────────────────────┤
│                                                             │
│  ┌─────────────────┐    ┌─────────────────┐                │
│  │  Control Plane  │    │   Data Plane    │                │
│  │                 │    │                 │                │
│  │ - Catalog mgmt  │    │ - Data transfer │                │
│  │ - Contract      │    │ - Proxy         │                │
│  │   negotiation   │    │ - AuthN/AuthZ   │                │
│  │ - Policy eval   │    │                 │                │
│  └─────────────────┘    └─────────────────┘                │
│                                                             │
│  Management API (REST)    DSP Protocol (connector-to-       │
│                           connector communication)          │
└─────────────────────────────────────────────────────────────┘
Key API Endpoints
| Endpoint | Purpose |
|---|---|
/management/v3/assets | Asset (data) management |
/management/v3/policydefinitions | Policy management |
/management/v3/contractdefinitions | Contract definition management |
/management/v3/catalog/request | Catalog retrieval |
/management/v3/contractnegotiations | Contract negotiation |
/management/v3/transferprocesses | Data transfer |
/management/v3/edrs | EDR (access token) retrieval |
Environment Setup
Prerequisites
- Docker & Docker Compose
- Java 17 (for Gradle build)
- Python 3 (for proxy server)
1. Clone EDC Samples
git clone --depth 1 https://github.com/eclipse-edc/Samples.git edc-samples
cd edc-samples
2. Build the Connectors
# For Consumer (basic connector)
./gradlew transfer:transfer-00-prerequisites:connector:build

# For Provider (with DataPlane)
./gradlew transfer:transfer-03-consumer-pull:provider-proxy-data-plane:build
3. Create Docker Configuration Files
Dockerfile.consumer
FROM eclipse-temurin:17-jre
WORKDIR /app
COPY transfer/transfer-00-prerequisites/connector/build/libs/connector.jar /app/connector.jar
ENTRYPOINT ["java", "-jar", "/app/connector.jar"]
Dockerfile.provider
FROM eclipse-temurin:17-jre
WORKDIR /app
COPY transfer/transfer-03-consumer-pull/provider-proxy-data-plane/build/libs/connector.jar /app/connector.jar
ENTRYPOINT ["java", "-jar", "/app/connector.jar"]
docker-compose.yml
services:
  consumer:
    build:
      context: .
      dockerfile: Dockerfile.consumer
    container_name: edc-consumer
    environment:
      EDC_FS_CONFIG: /app/config/consumer.properties
    volumes:
      - ./config/consumer.properties:/app/config/consumer.properties:ro
    ports:
      - "29193:29193"  # Management API
      - "29194:29194"  # DSP Protocol

  provider:
    build:
      context: .
      dockerfile: Dockerfile.provider
    container_name: edc-provider
    environment:
      EDC_FS_CONFIG: /app/config/provider.properties
    volumes:
      - ./config/provider-dataplane.properties:/app/config/provider.properties:ro
    ports:
      - "19193:19193"  # Management API
      - "19194:19194"  # DSP Protocol
      - "19291:19291"  # DataPlane Public API
4. Start the Connectors
docker compose up -d --build
Verify startup:
docker compose logs --tail 10
# Success if "Runtime ... ready" is displayed
Executing the Data Exchange Flow
Flow Overview
┌────────────────────────────────────────────────────────────────────┐
│                    EDC Data Exchange Flow                           │
├────────────────────────────────────────────────────────────────────┤
│                                                                    │
│  Step 1: Provider Preparation                                      │
│  ├── Asset registration (what data to provide)                     │
│  ├── Policy definition (under what conditions)                     │
│  └── Contract definition (linking assets and policies)             │
│                                                                    │
│  Step 2: Catalog Retrieval                                         │
│  └── Consumer → Provider: "What data do you have?"                 │
│                                                                    │
│  Step 3: Contract Negotiation                                      │
│  └── Consumer ↔ Provider: Agree on conditions, conclude contract   │
│                                                                    │
│  Step 4: Data Transfer                                             │
│  └── Consumer: Initiate transfer based on contract                 │
│                                                                    │
│  Step 5: Data Retrieval                                            │
│  ├── Consumer: Obtain EDR (access token)                           │
│  └── Consumer → Provider DataPlane: Retrieve data with token       │
│                                                                    │
└────────────────────────────────────────────────────────────────────┘
Step 1: Register Data on the Provider
Create an asset (define the data to be provided)
curl -X POST http://localhost:19193/management/v3/assets \
  -H "Content-Type: application/json" \
  -d '{
    "@context": { "edc": "https://w3id.org/edc/v0.0.1/ns/" },
    "@id": "product-data",
    "properties": {
      "name": "Product Data",
      "description": "Sample product information API"
    },
    "dataAddress": {
      "@type": "DataAddress",
      "type": "HttpData",
      "baseUrl": "https://jsonplaceholder.typicode.com/posts/1"
    }
  }'
Create a policy (define access conditions)
curl -X POST http://localhost:19193/management/v3/policydefinitions \
  -H "Content-Type: application/json" \
  -d '{
    "@context": { "edc": "https://w3id.org/edc/v0.0.1/ns/", "odrl": "http://www.w3.org/ns/odrl/2/" },
    "@id": "open-policy",
    "policy": {
      "@type": "odrl:Set",
      "odrl:permission": [],
      "odrl:prohibition": [],
      "odrl:obligation": []
    }
  }'
Create a contract definition (link assets and policies)
curl -X POST http://localhost:19193/management/v3/contractdefinitions \
  -H "Content-Type: application/json" \
  -d '{
    "@context": { "edc": "https://w3id.org/edc/v0.0.1/ns/" },
    "@id": "product-contract",
    "accessPolicyId": "open-policy",
    "contractPolicyId": "open-policy",
    "assetsSelector": {
      "@type": "CriterionDto",
      "operandLeft": "https://w3id.org/edc/v0.0.1/ns/id",
      "operator": "=",
      "operandRight": "product-data"
    }
  }'
Step 2: Retrieve the Catalog
From the Consumer, check the data published by the Provider:
curl -X POST http://localhost:29193/management/v3/catalog/request \
  -H "Content-Type: application/json" \
  -d '{
    "@context": { "edc": "https://w3id.org/edc/v0.0.1/ns/" },
    "@type": "CatalogRequest",
    "counterPartyAddress": "http://provider:19194/protocol",
    "protocol": "dataspace-protocol-http"
  }'
The response contains the “Product Data” published by the Provider along with its Offer ID.
Step 3: Contract Negotiation
Use the Offer ID obtained from the catalog to initiate contract negotiation:
curl -X POST http://localhost:29193/management/v3/contractnegotiations \
  -H "Content-Type: application/json" \
  -d '{
    "@context": { "edc": "https://w3id.org/edc/v0.0.1/ns/", "odrl": "http://www.w3.org/ns/odrl/2/" },
    "@type": "ContractRequest",
    "counterPartyAddress": "http://provider:19194/protocol",
    "protocol": "dataspace-protocol-http",
    "policy": {
      "@id": "",
      "@type": "odrl:Offer",
      "odrl:permission": [],
      "odrl:prohibition": [],
      "odrl:obligation": [],
      "odrl:target": { "@id": "product-data" },
      "odrl:assigner": { "@id": "provider" }
    }
  }'
When negotiation is complete, the state becomes FINALIZED and a contractAgreementId is issued.
Step 4: Data Transfer
Once the contract is concluded, initiate data transfer:
curl -X POST http://localhost:29193/management/v3/transferprocesses \
  -H "Content-Type: application/json" \
  -d '{
    "@context": { "edc": "https://w3id.org/edc/v0.0.1/ns/" },
    "@type": "TransferRequest",
    "connectorId": "provider",
    "counterPartyAddress": "http://provider:19194/protocol",
    "contractId": "",
    "assetId": "product-data",
    "protocol": "dataspace-protocol-http",
    "transferType": "HttpData-PULL"
  }'
Step 5: Retrieve Data
Once the transfer state becomes STARTED, obtain the EDR and retrieve the data:
# Obtain the EDR (access token)
curl http://localhost:29193/management/v3/edrs/Transfer ID>/dataaddress

# Retrieve the actual data
curl http://localhost:19291/public/ \
  -H "Authorization: "
Response example:
{
  "userId": 1,
  "id": 1,
  "title": "sunt aut facere repellat provident...",
  "body": "quia et suscipit..."
}
Building a GUI Dashboard
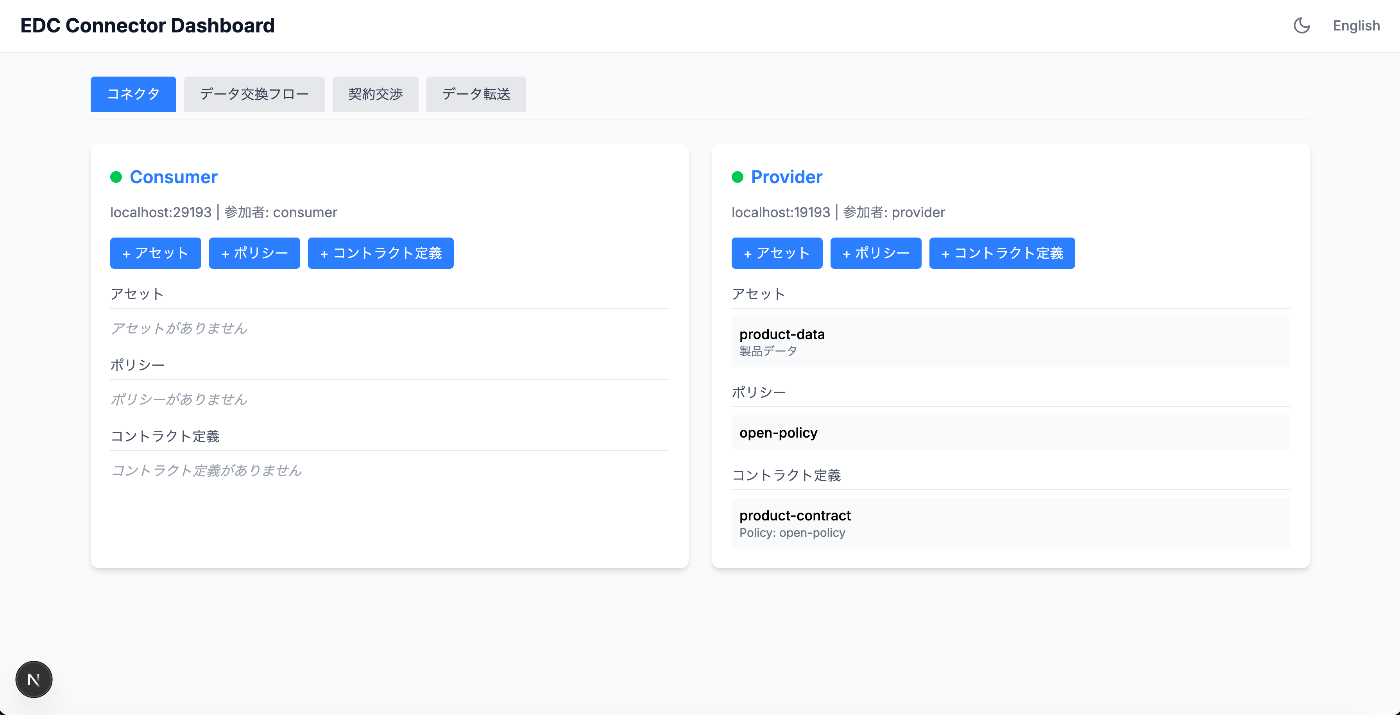
While CLI operations are good for learning, a visual dashboard is more convenient for actual use. We built an EDC dashboard using Next.js + TypeScript.
Features
- Connector tab: Consumer/Provider asset, policy, and contract management
- Data Exchange Flow tab: Execute the full flow via GUI
- Contract Negotiation tab: View list and status of contract negotiations
- Data Transfer tab: View list and status of data transfers
Executing the Data Exchange Flow
In the “Data Exchange Flow” tab of the dashboard, data exchange can be executed in 5 steps.
Steps 1-2: Catalog Retrieval and Offer Selection
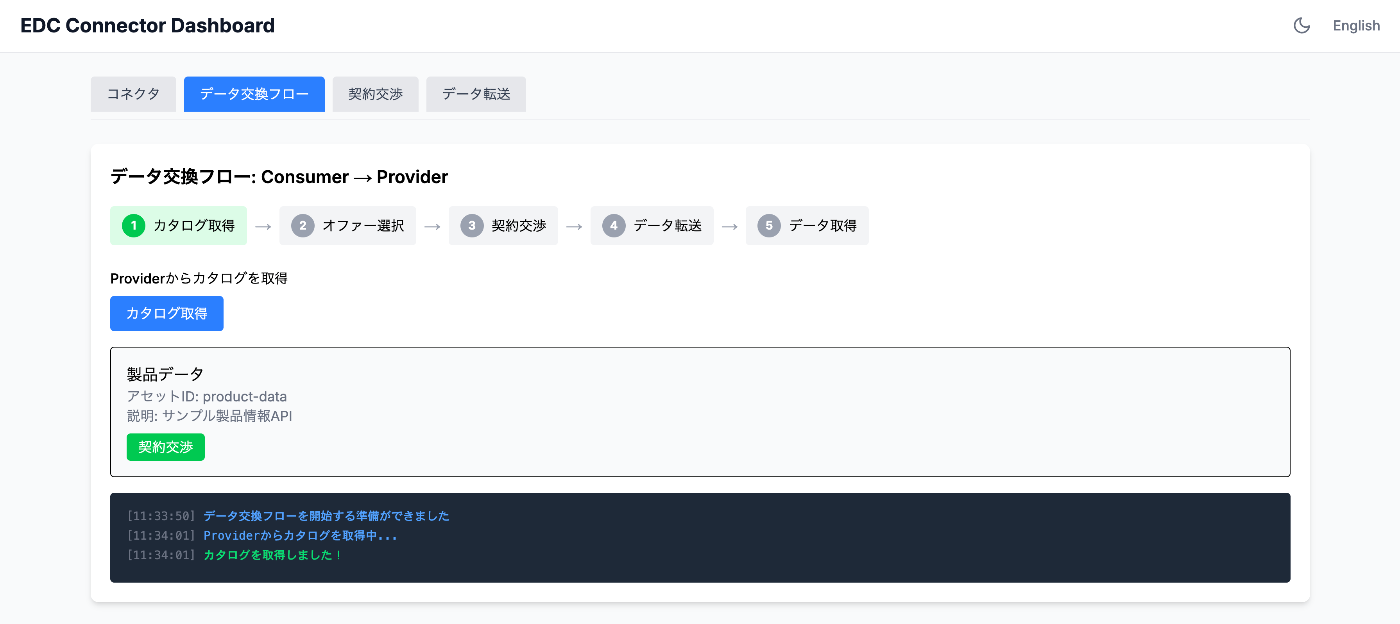
Clicking the “Retrieve Catalog” button displays the data published by the Provider (product data).
Steps 3-4: Contract Negotiation and Data Transfer
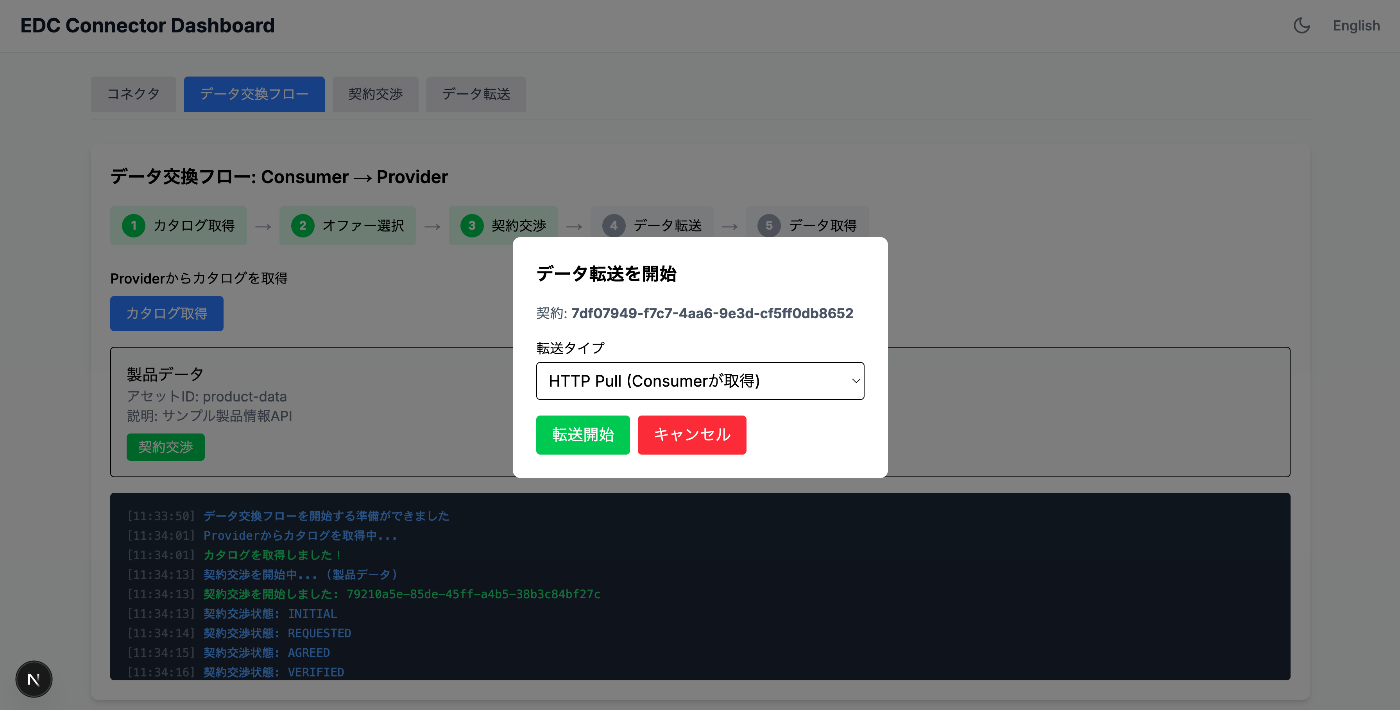
Once contract negotiation is complete, you can select the transfer type (HTTP Pull/Push) and start the data transfer.
Step 5: Data Retrieval Complete

When all steps are complete, the actual data retrieved from the Provider is displayed in JSON format.
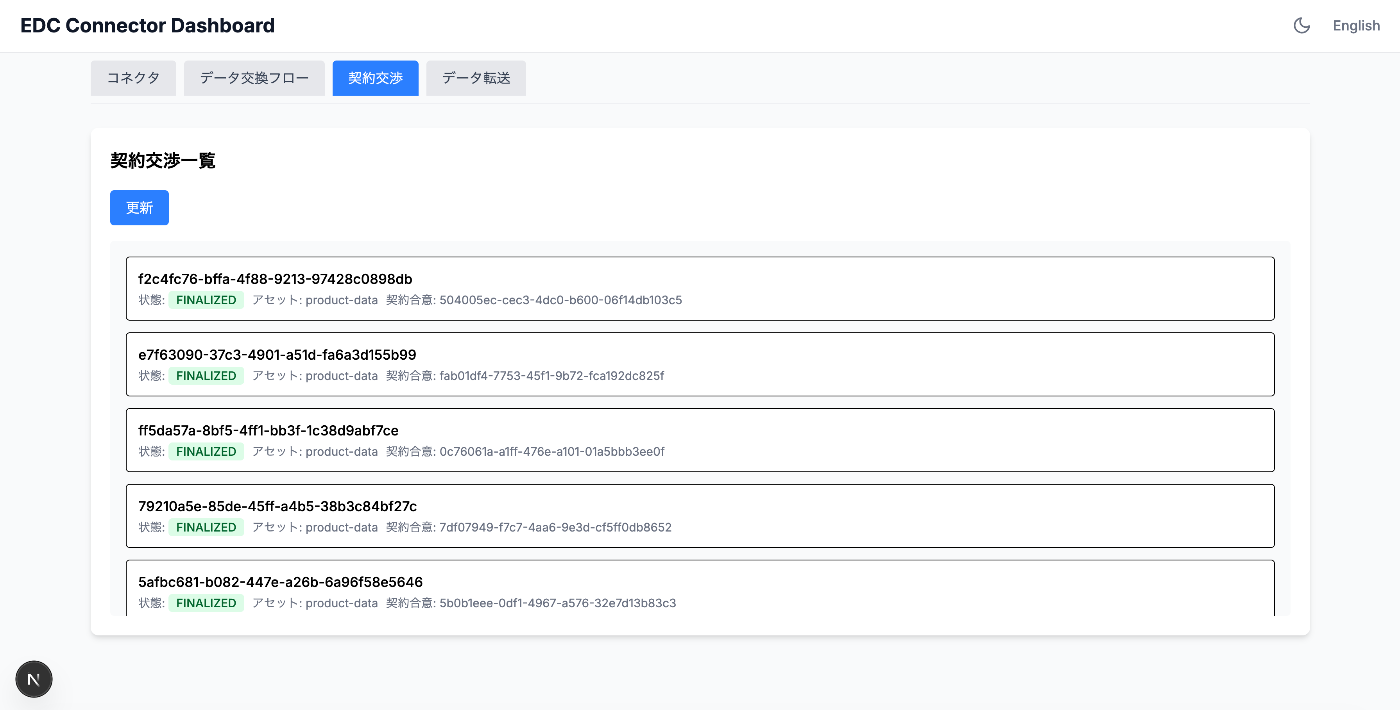
Managing Contract Negotiations and Data Transfers
Contract Negotiation List
Data Transfer List
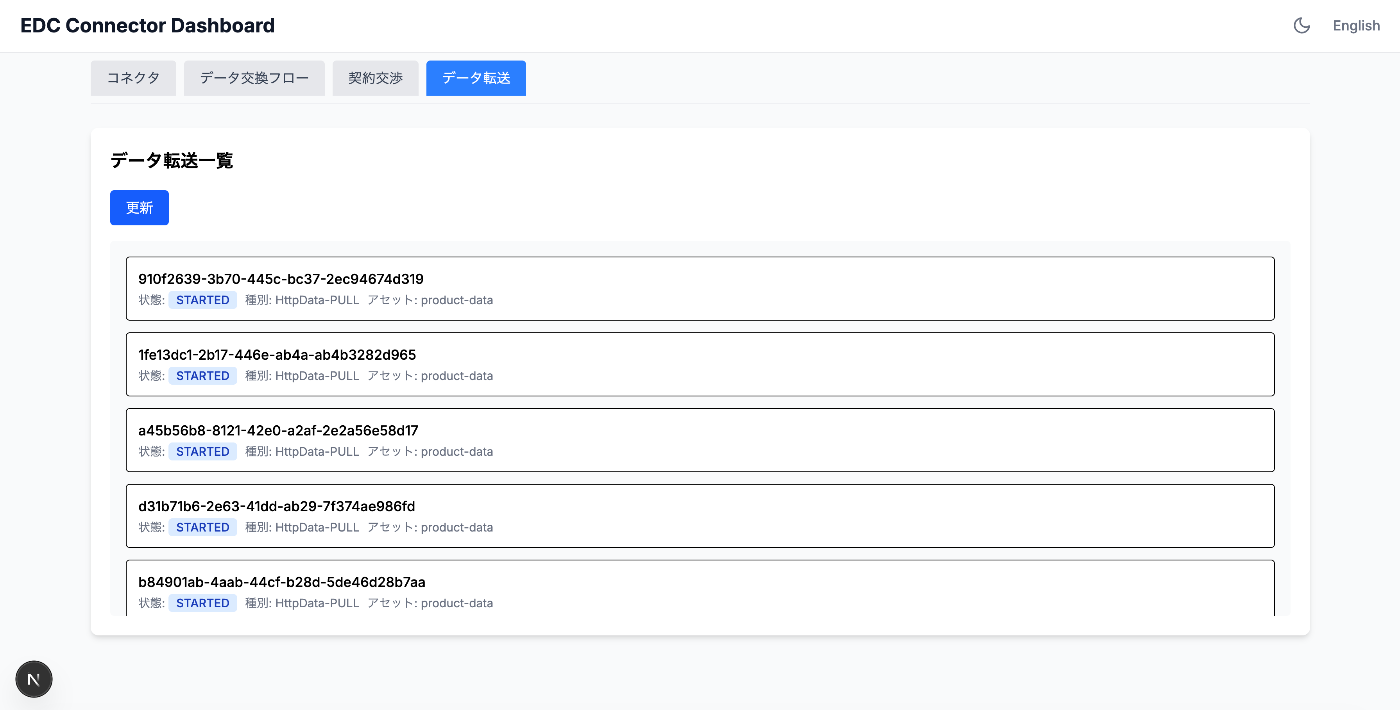
You can check the status of contract negotiations and data transfers in each tab.
Resolving CORS
Since accessing the EDC Management API directly from the browser causes CORS errors, we created a simple proxy server in Python:
# /api/consumer/* → http://localhost:29193/management/*
# /api/provider/* → http://localhost:19193/management/*
# /api/dataplane/* → http://localhost:19291/public/*
Summary
What We Learned
- Dataspace concepts: Differences from traditional API integration, data sharing while maintaining sovereignty
- Eclipse EDC architecture: Control Plane / Data Plane, Management API
- Data exchange flow: Catalog retrieval -> Contract negotiation -> Data transfer -> Data retrieval
- Hands-on practice: Building EDC in a Docker environment, creating a GUI dashboard
Next Steps
- Leveraging policies: Setting policies with specific conditions (time limits, regional restrictions, etc.)
- Authentication and authorization: Vault integration and certificate management for production use
- Federated Catalog: Cross-provider catalog search
- Catena-X / GAIA-X: Integration with automotive industry and EU dataspace initiatives
References
The code used in this article was based on the GitHub repository.