Update History
2024-05-22
- Added the section “Adding the Docker Command User to the docker Group”.
Overview
mdx is a data platform for industry-academia-government collaboration co-created by universities and research institutions.
In this article, we will run NDL Classical Japanese OCR using an mdx virtual machine.
https://github.com/ndl-lab/ndlkotenocr_cli
Project Application
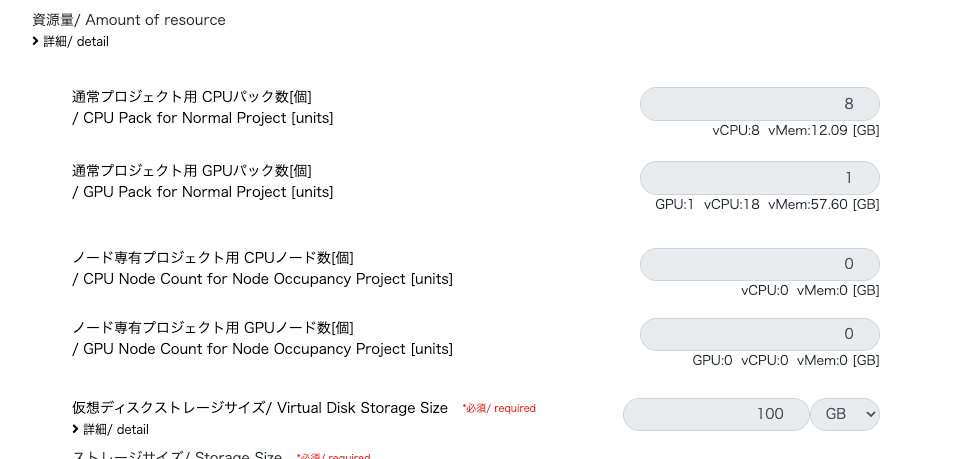
For the project type, we selected “Trial”.
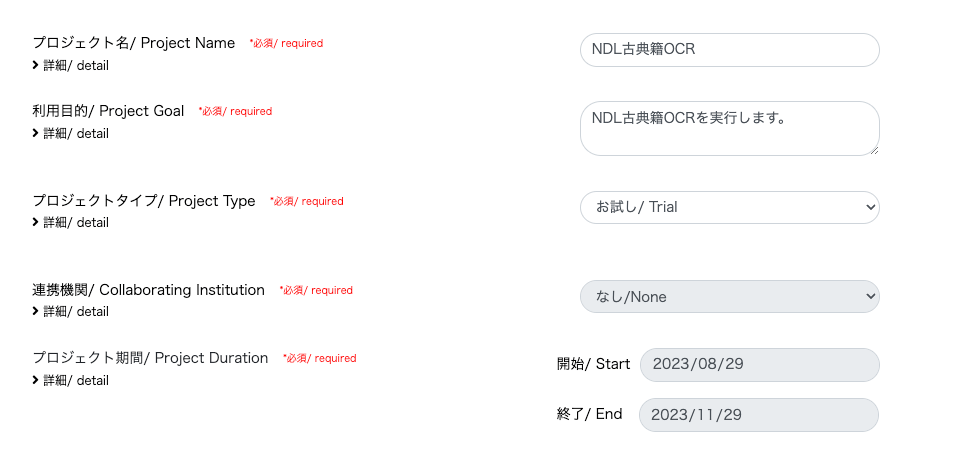
With the “Trial” type, one GPU pack was allocated.
Creating a Virtual Machine
Deployment
We selected “01_Ubuntu-2204-server-gpu (Recommended)”.

On the pre-deployment screen, we configured the settings as follows: pack type set to “GPU Pack” and pack count set to 1.

For the public key, we created one on the local PC as follows:
cd ~/.ssh/mdx
ssh-keygen
Then we pasted the contents of the generated id_rsa.pub.
After that, we waited for the virtual machine deployment to complete.
Network Configuration for SSH Connection
We were able to proceed by following this video:
https://youtu.be/p7OqcnXBQt8?si=E5JtC-xnrc5ZQYo_
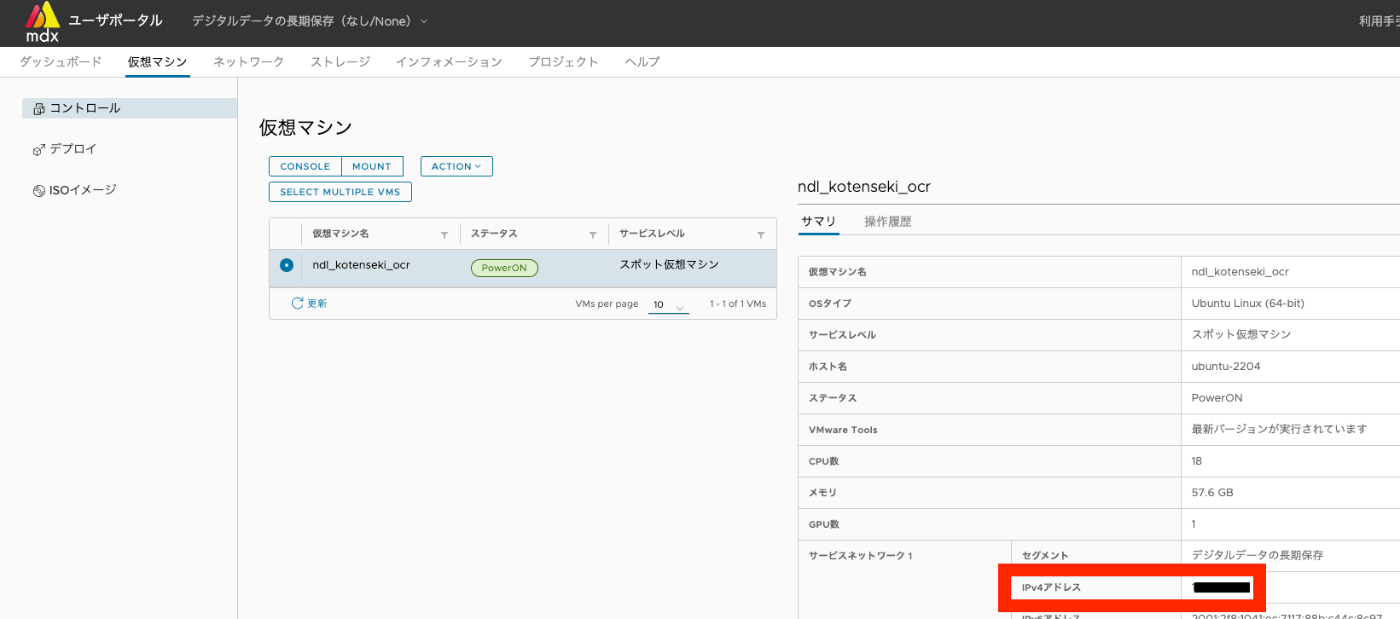
First, note the IPv4 address of Service Network 1 of the launched virtual machine.
Next, we added “DNAT” from the network tags. The “Source Global IPv4 Address” was auto-filled, and we entered the Service Network IPv4 address noted earlier in the “Destination Private IP Address” field.

Next, we added an “ACL”. Following the video, we configured it as follows.
To allow access only from specific IP addresses, we configured it as follows:

On the other hand, while allowing unrestricted access from any address carries security risks, configuring it as follows appears to enable SSH connections from any address:

Testing the Connection
Use the Source Global IPv4 Address added via DNAT. After the initial login, you will be prompted to change the password.
ssh mdxuser@ -i ~/.ssh/mdx/id_rsa
Connecting with VS Code
For subsequent operations, although not required, we used the VS Code extension “Remote Explorer”.
Working Inside the Virtual Machine
Verifying the GPU
sudo su
root@ubuntu-2204:/home/mdxuser# nvidia-smi
+---------------------------------------------------------------------------------------+
| NVIDIA-SMI 535.86.10              Driver Version: 535.86.10    CUDA Version: 12.2     |
|-----------------------------------------+----------------------+----------------------+
| GPU  Name                 Persistence-M | Bus-Id        Disp.A | Volatile Uncorr. ECC |
| Fan  Temp   Perf          Pwr:Usage/Cap |         Memory-Usage | GPU-Util  Compute M. |
|                                         |                      |               MIG M. |
|=========================================+======================+======================|
|   0  NVIDIA A100-SXM4-40GB          On  | 00000000:03:00.0 Off |                    0 |
| N/A   25C    P0              45W / 400W |      4MiB / 40960MiB |      0%      Default |
|                                         |                      |             Disabled |
+-----------------------------------------+----------------------+----------------------+

+---------------------------------------------------------------------------------------+
| Processes:                                                                            |
|  GPU   GI   CI        PID   Type   Process name                            GPU Memory |
|        ID   ID                                                             Usage      |
|=======================================================================================|
|  No running processes found                                                           |
+---------------------------------------------------------------------------------------+
Installing Docker
Docker was installed following the instructions on the following page:
https://docs.docker.com/engine/install/ubuntu/
for pkg in docker.io docker-doc docker-compose podman-docker containerd runc; do sudo apt-get remove $pkg; done
sudo apt-get update
sudo apt-get install ca-certificates curl gnupg
sudo install -m 0755 -d /etc/apt/keyrings
curl -fsSL https://download.docker.com/linux/ubuntu/gpg | sudo gpg --dearmor -o /etc/apt/keyrings/docker.gpg
sudo chmod a+r /etc/apt/keyrings/docker.gpg
echo \
  "deb [arch="$(dpkg --print-architecture)" signed-by=/etc/apt/keyrings/docker.gpg] https://download.docker.com/linux/ubuntu \
  "$(. /etc/os-release && echo "$VERSION_CODENAME")" stable" | \
  sudo tee /etc/apt/sources.list.d/docker.list > /dev/null
sudo apt-get update
sudo apt-get install docker-ce docker-ce-cli containerd.io docker-buildx-plugin docker-compose-plugin
sudo docker run hello-world
If Hello from Docker! is displayed, the installation was successful.
NVIDIA Docker Runtime
(There may be better methods, but) we installed the NVIDIA Docker Runtime by running the following:
# Add the package repositories
distribution=$(. /etc/os-release;echo $ID$VERSION_ID)
curl -s -L https://nvidia.github.io/nvidia-docker/gpgkey | sudo apt-key add -
curl -s -L https://nvidia.github.io/nvidia-docker/$distribution/nvidia-docker.list | sudo tee /etc/apt/sources.list.d/nvidia-docker.list

sudo apt-get update && sudo apt-get install -y nvidia-container-toolkit
sudo systemctl restart docker
Adding the Docker Command User to the docker Group
Add the user to the Docker group:
sudo usermod -aG docker $USER
Reboot the system:
sudo reboot
Installing NDL Classical Japanese OCR
From here, we proceed with setting up NDL Classical Japanese OCR.
The following step takes some time:
git clone https://github.com/ndl-lab/ndlkotenocr_cli
cd ndlkotenocr_cli
sh ./docker/dockerbuild.sh
Next, we launch the container, but first modify it to mount a directory from the host machine.
./docker/run_docker.sh
docker run --gpus all -d -v /home/mdxuser/tmpdir:/root/tmpdir --rm --name kotenocr_cli_runner -i kotenocr-cli-py37:latest
Then run the following:
sh ./docker/run_docker.sh
Enter the container:
docker exec -it kotenocr_cli_runner bash
Running Inference
Downloading Images
Create a directory and download “The Tale of Genji” (held by the National Diet Library):
mkdir -p /root/tmpdir/input/2585098/img
wget https://dl.ndl.go.jp/api/iiif/2585098/R0000003/full/full/0/default.jpg -O /root/tmpdir/input/2585098/img/0001.jpg
Running OCR
Run OCR on the downloaded image.
First, create the output folder:
mkdir -p /root/tmpdir/output
Run the OCR:
python main.py infer /root/tmpdir/input/2585098 /root/tmpdir/output/2585098 -s s
The recognition results are stored in the /home/mdxuser/tmpdir/output folder on the host machine.
Other Notes
Stopping the Container
docker stop kotenocr_cli_runner
Shutting Down the Virtual Machine
sudo shutdown -r now
Summary
Thanks to mdx and NDL Lab, an environment that makes it easy to engage in research using machine learning is well established. We are grateful to all those involved.